

Installed the LST2 differentials in my G3R chassis |

|

|
(#1)
|
|
A Horse's Ass
Offline
Posts: 1,065
Join Date: Oct 2007
Location: Spokane WA
|
Installed the LST2 differentials in my G3R chassis -
10.06.2009, 11:21 PM
With some help from this thread http://www.rc-monster.com/forum/show...t=16855&page=5 and the pictures that are in MisterCrashes photo bucket.
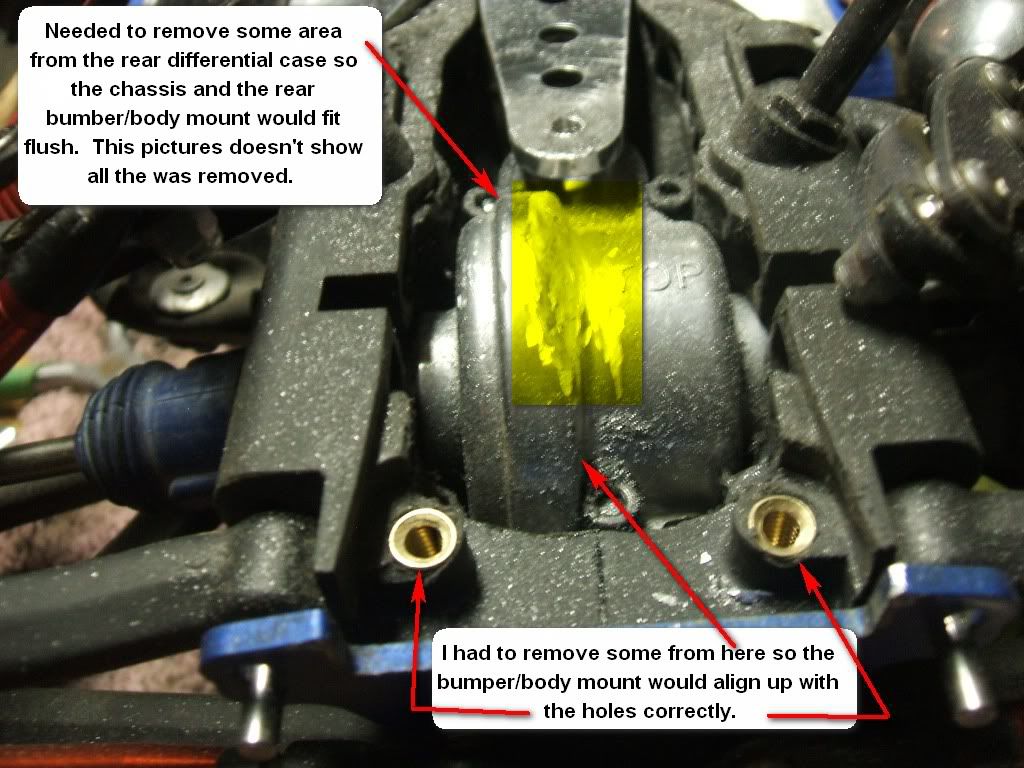
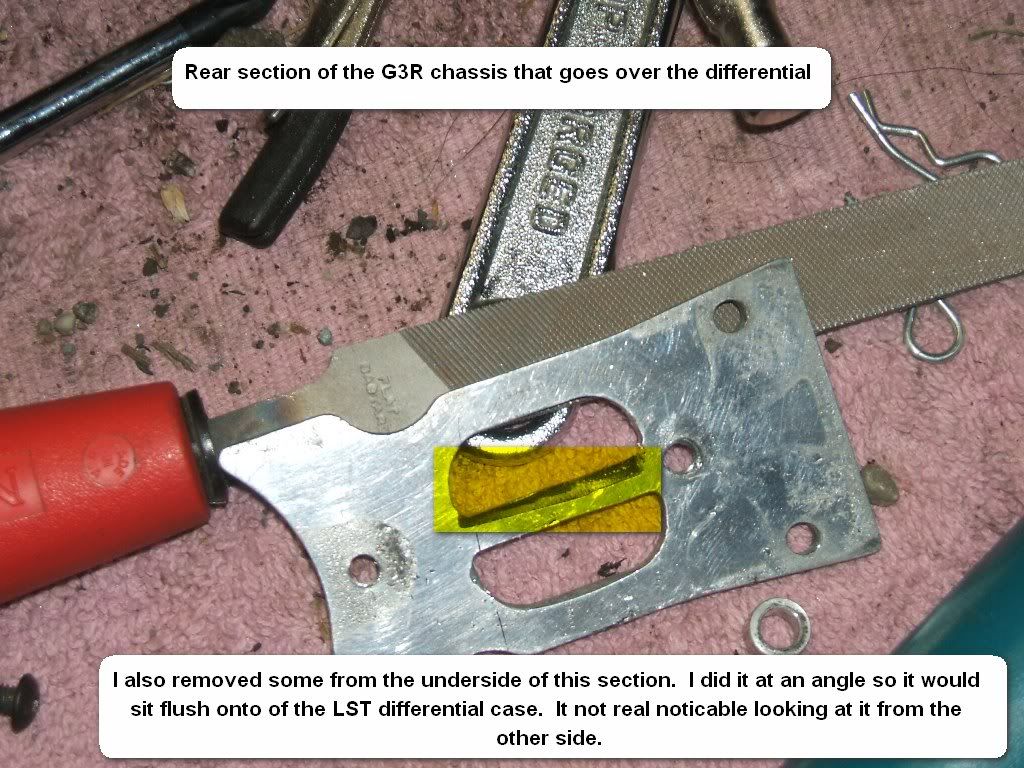
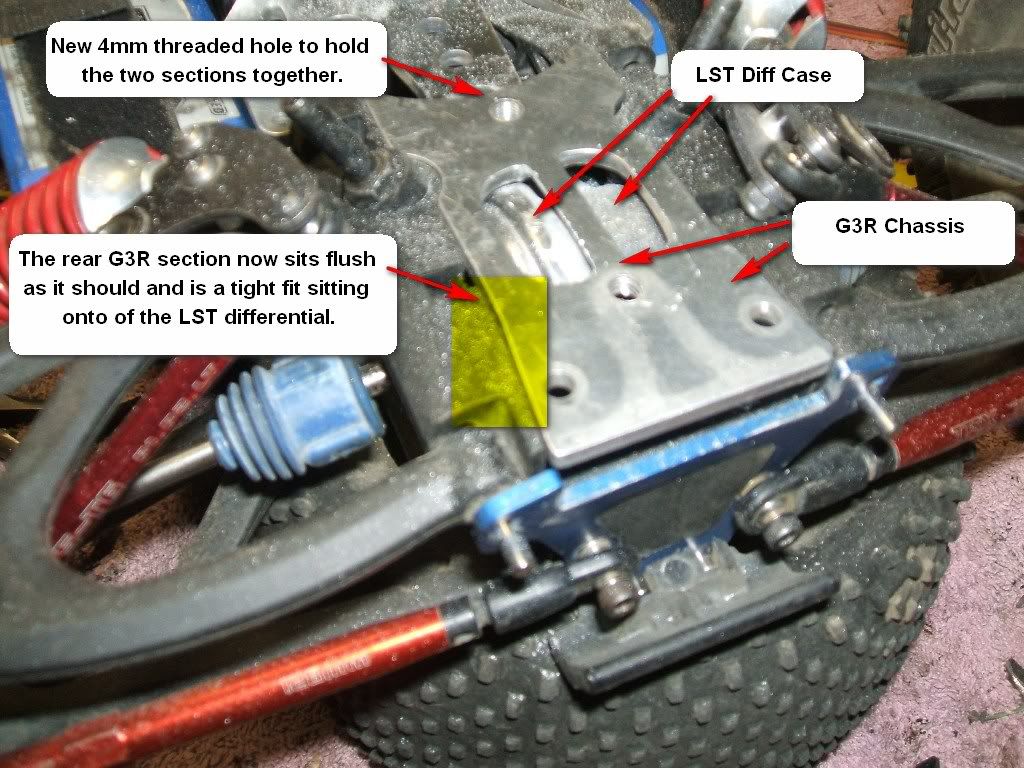
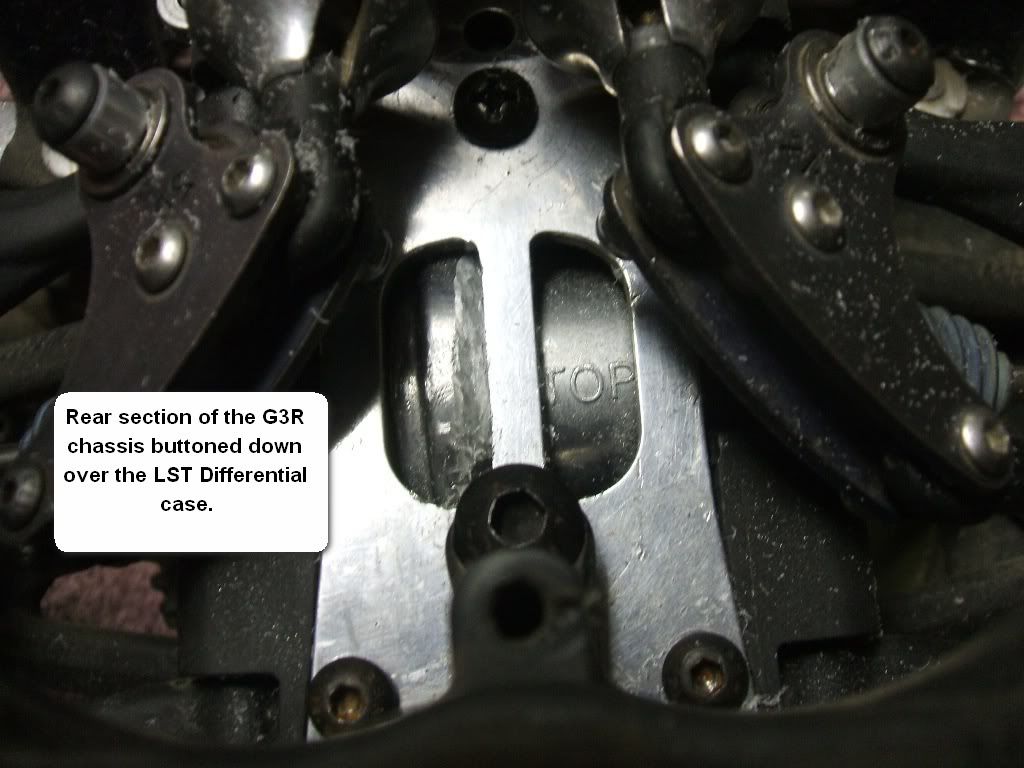
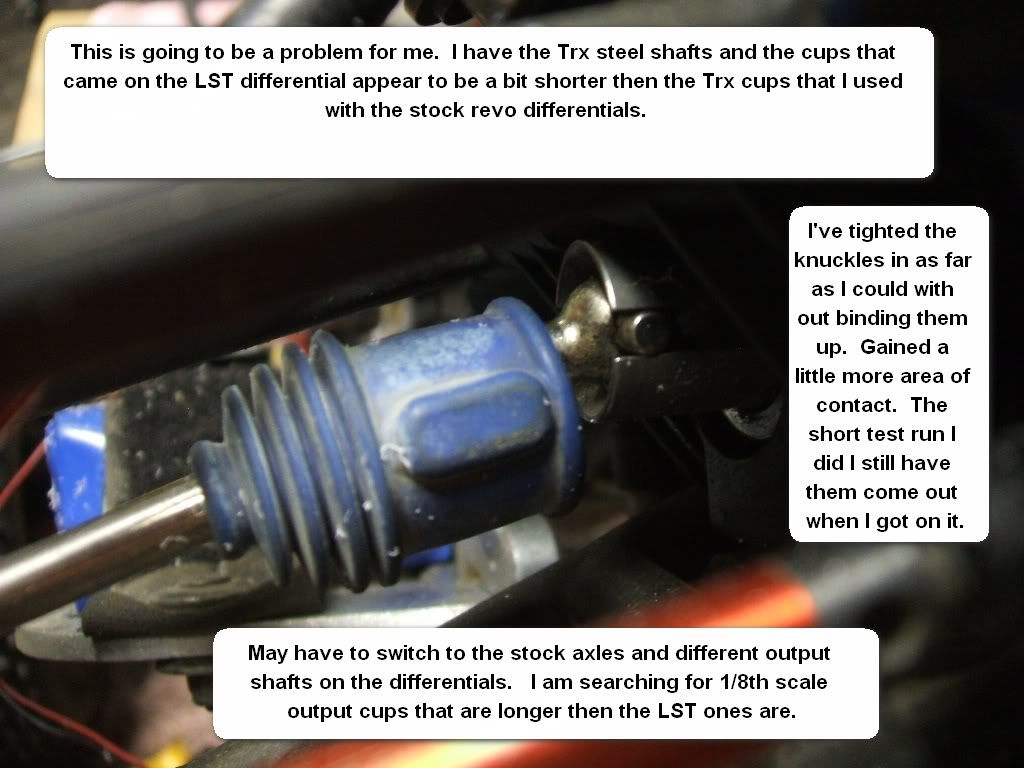
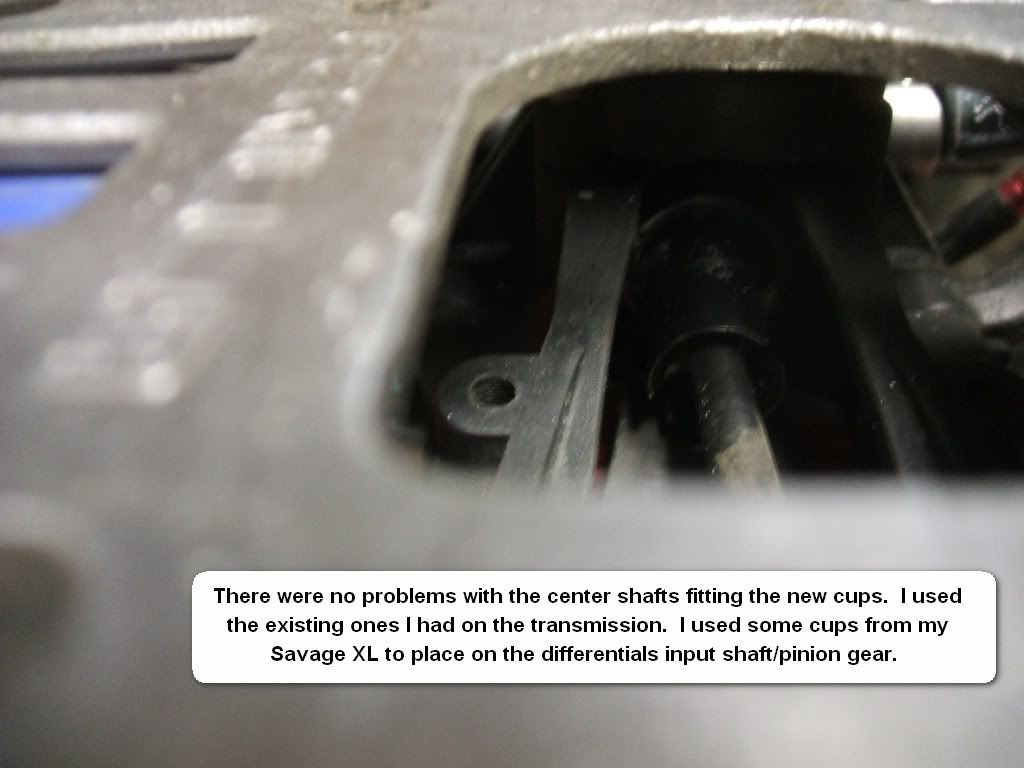
I had some old bulkheads that the plastic threading was stripped out of. I used them for my first try at fitting the LST cases into the revo bulkheads. I took plenty of material off of them but they seem like they will be okay. With everything that is connected up to the bulk and the chassis connected we will see. I also attached the differential cases to the bulkheads themselves to eliminate the movement that you usually get. What I am trying out is explained in the pictures below. I was just going to use the old bulkheads to see how much material needed to be removed and do a better job on the ones that were installed. I figured what the heck and put some brass inserts into the holes that were stripped out and installed these one. Will see how much abuse these skeletons can take. The pictures will tell more of the story of what I did. There are no pictures of the front being installed. It was straight forward and I was trying to get it done before the sun went down. There's a couple of the rear installation due to some carving needed to be done. I have run into a problem with my setup. I have the trx steel shaft cvds installed. The differential cups are shorter then the cups I used with the stock differential. The shafts will pop out when I get on it hard, etc. Will be looking at different alternatives to the differential cups, shafts, axles, etc. Thanks to lincpimp and MisterCrash for traveling the road before us. MisterCrash has some good pictures of what is removed from the bulkhead and what a job well done should look like. I will just say I didn't take my time with these bulkhead but will with the next set I do. Without further ado.... 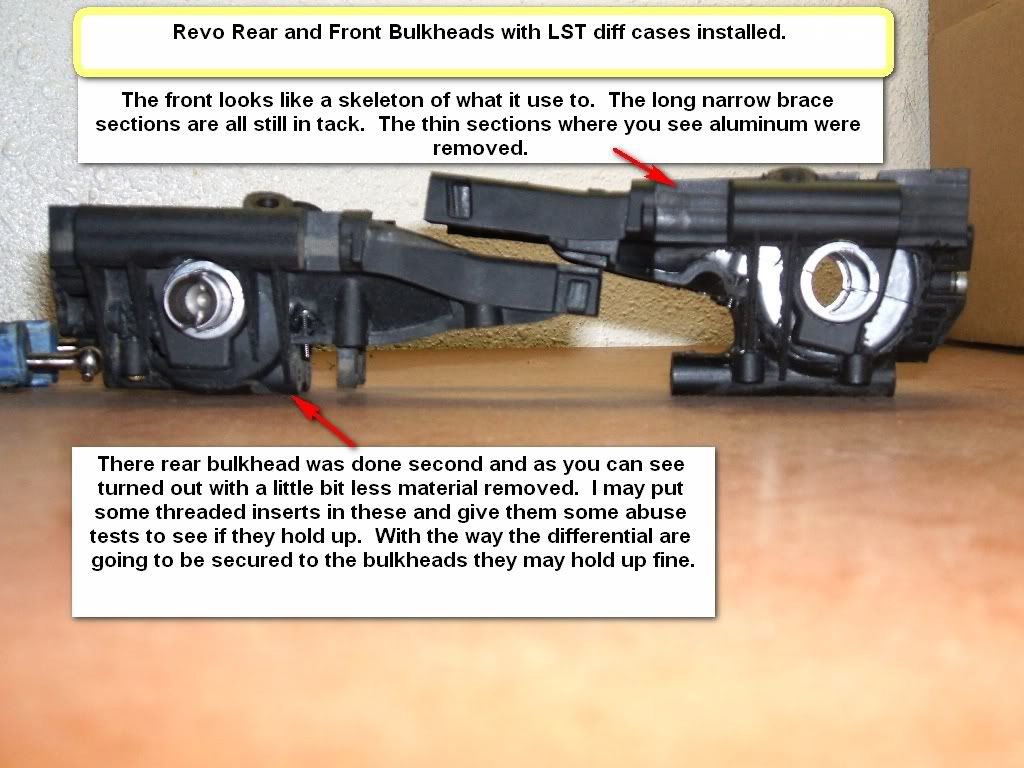 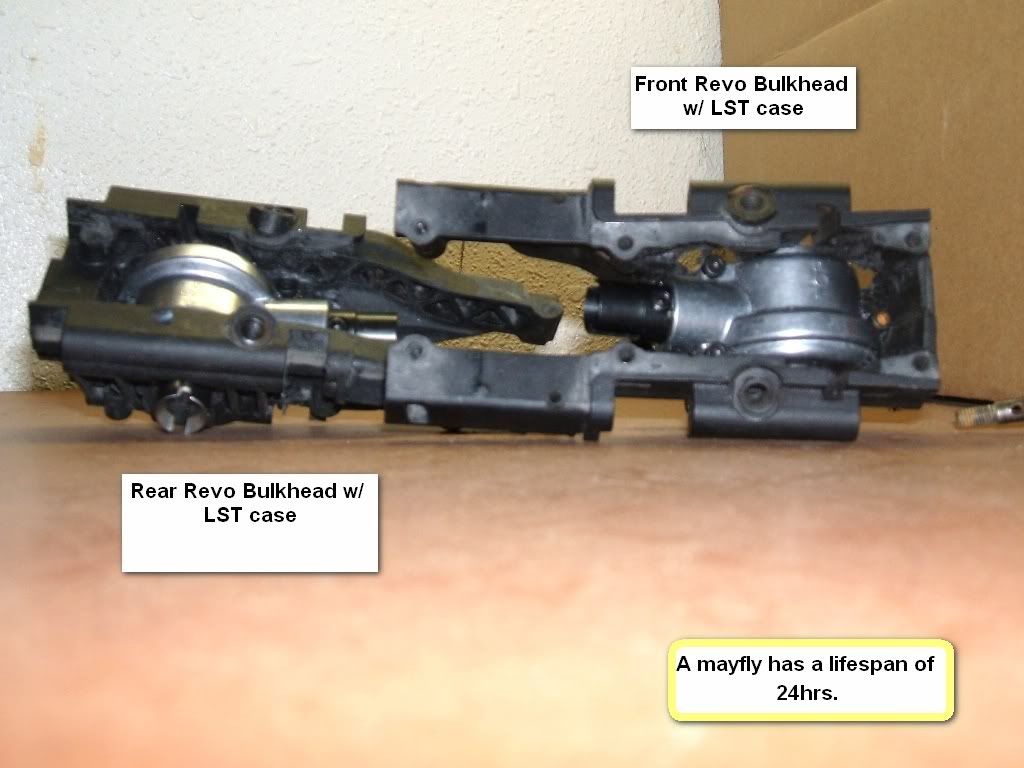 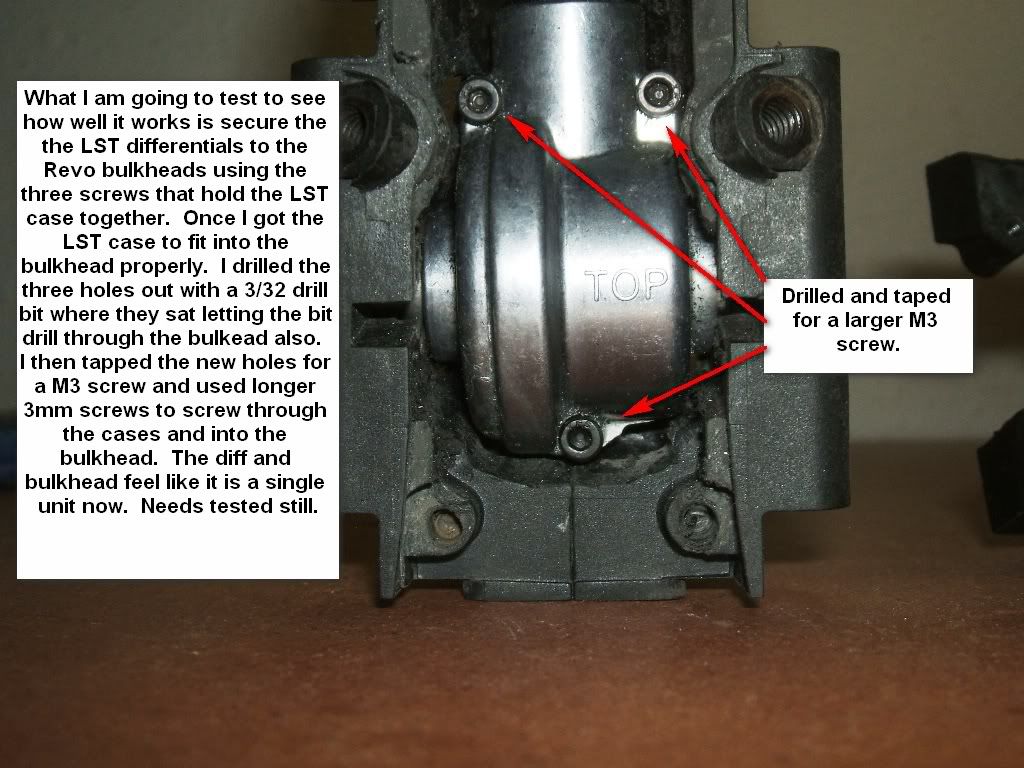 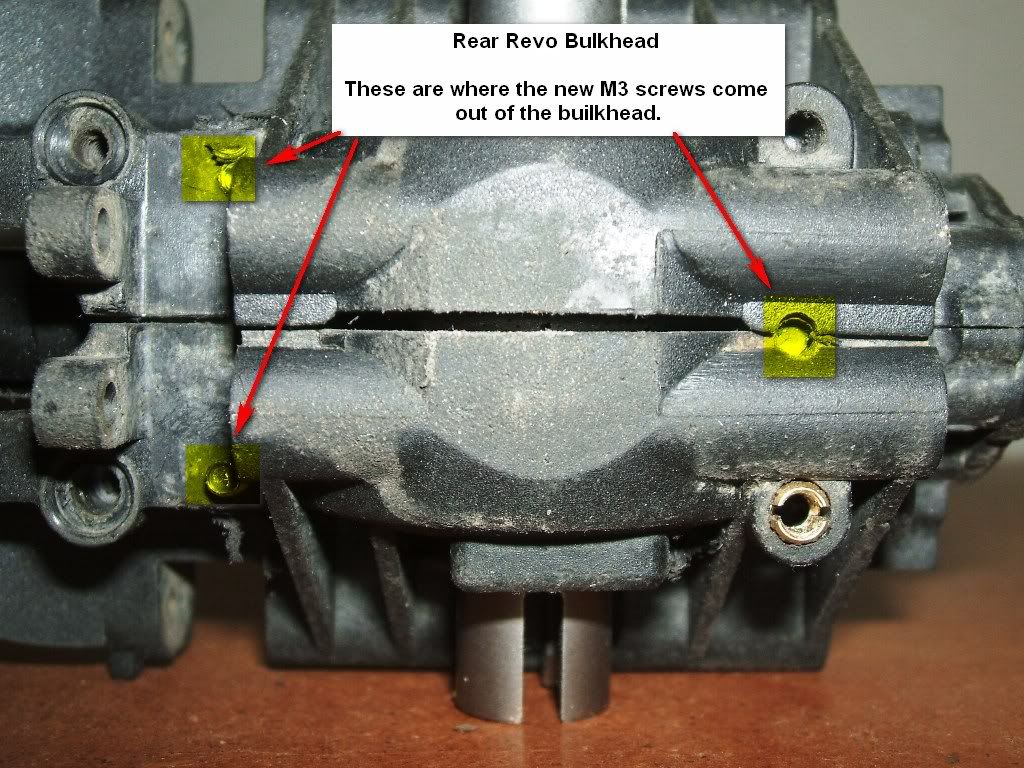 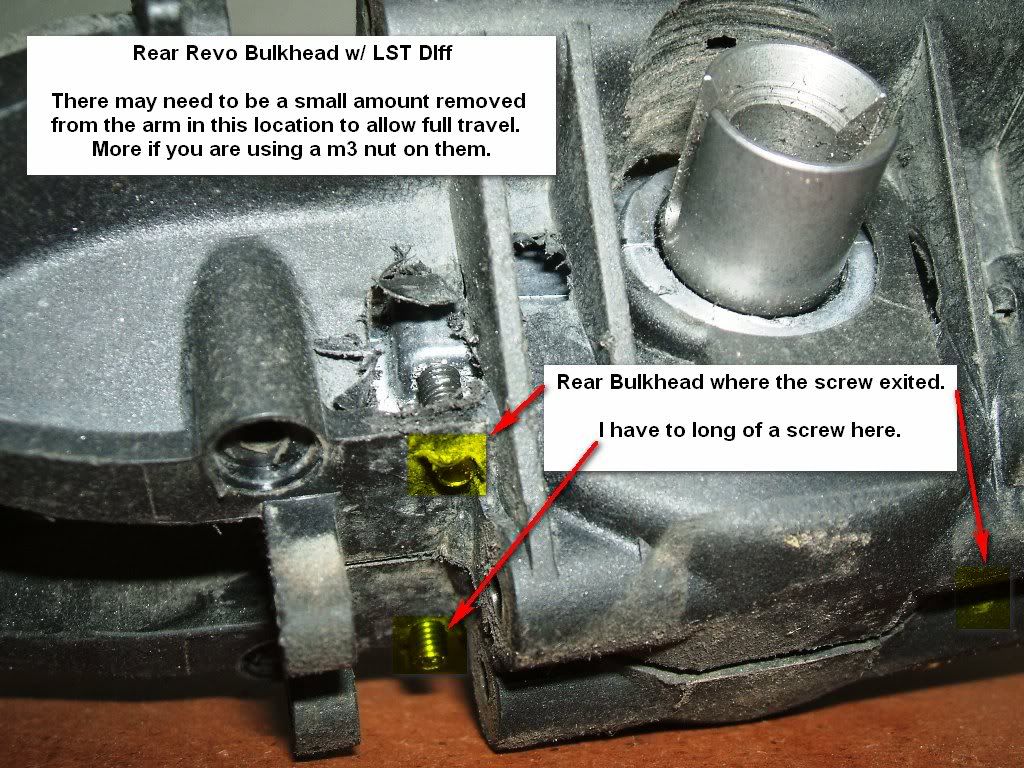 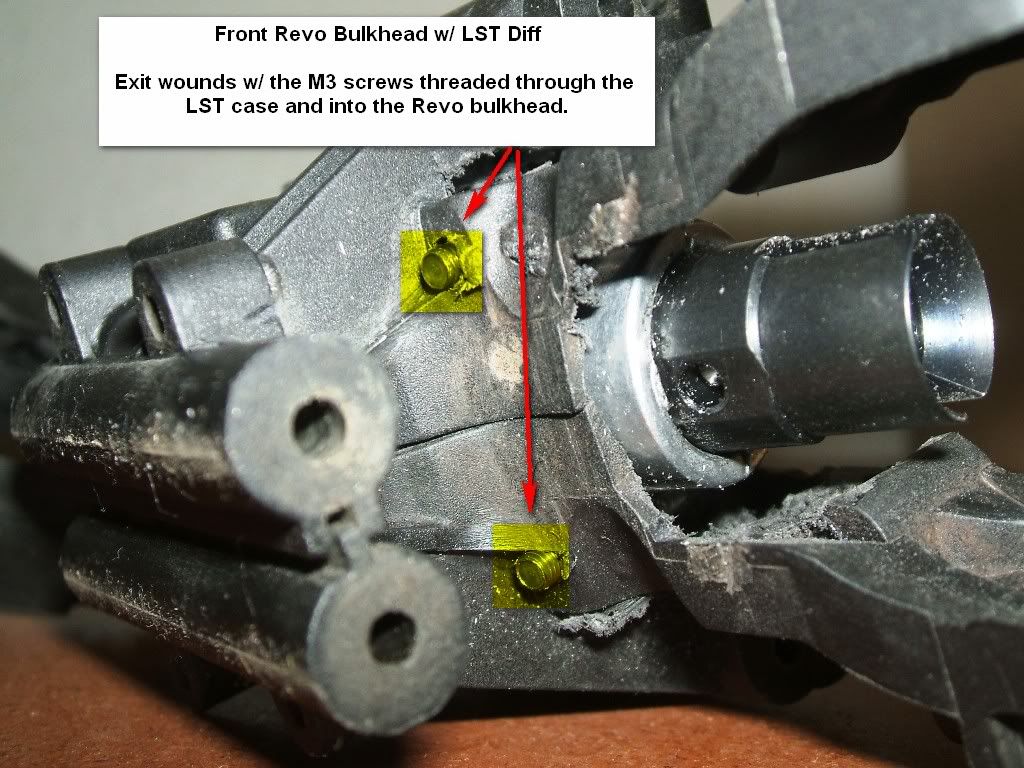 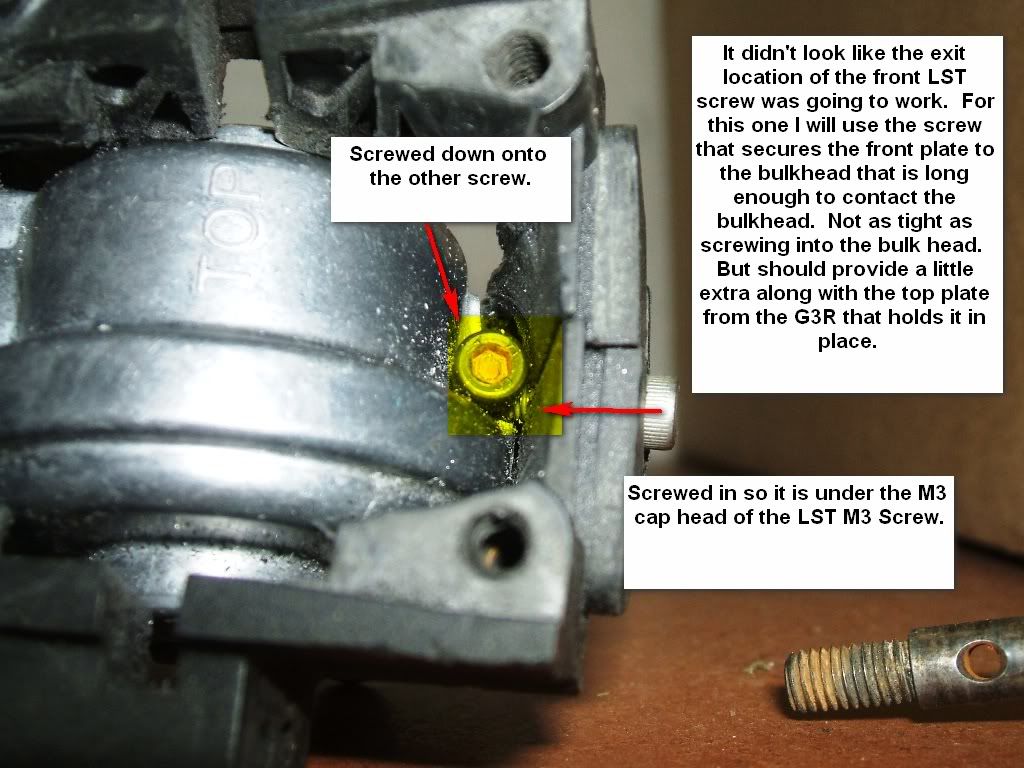 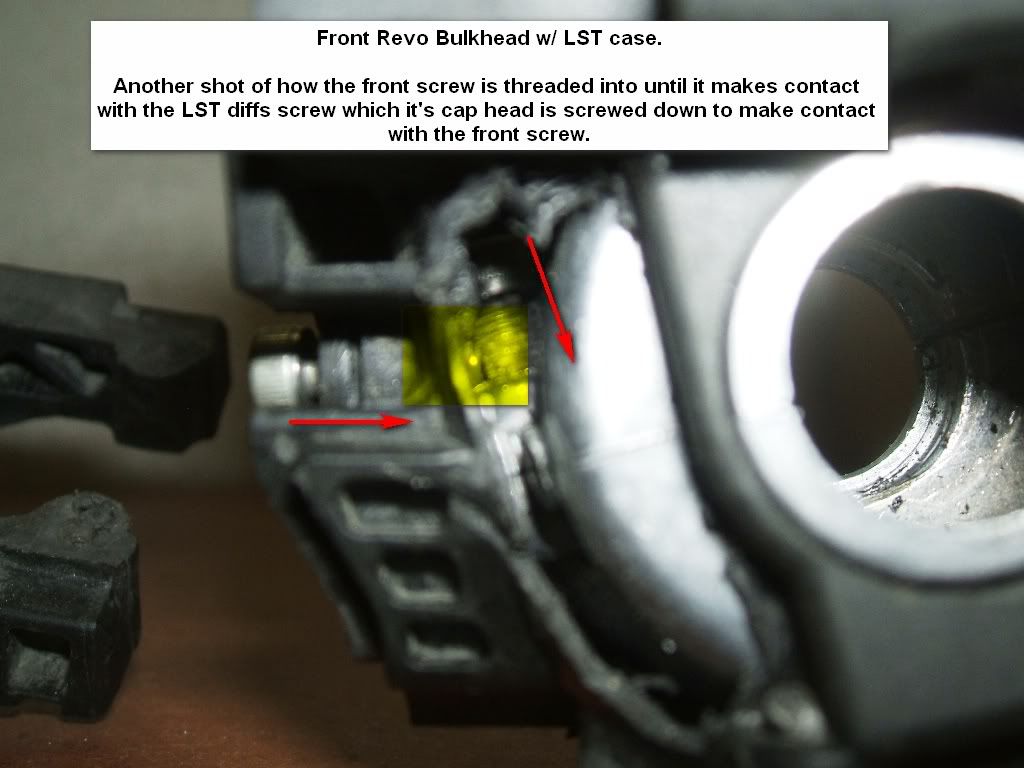 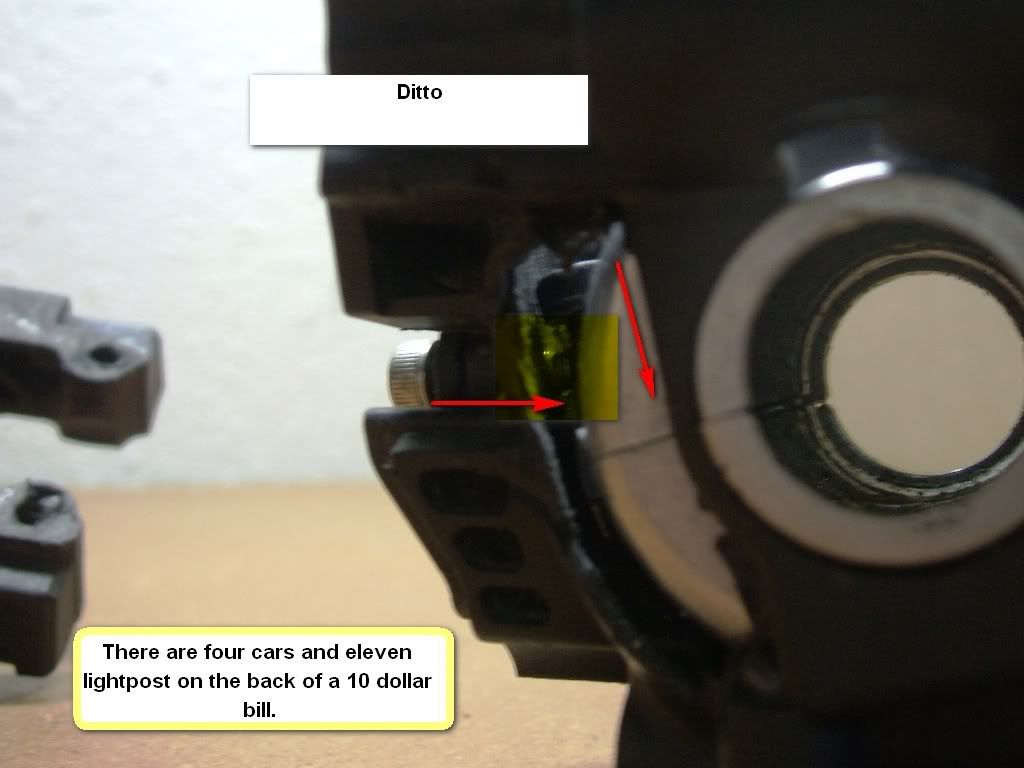 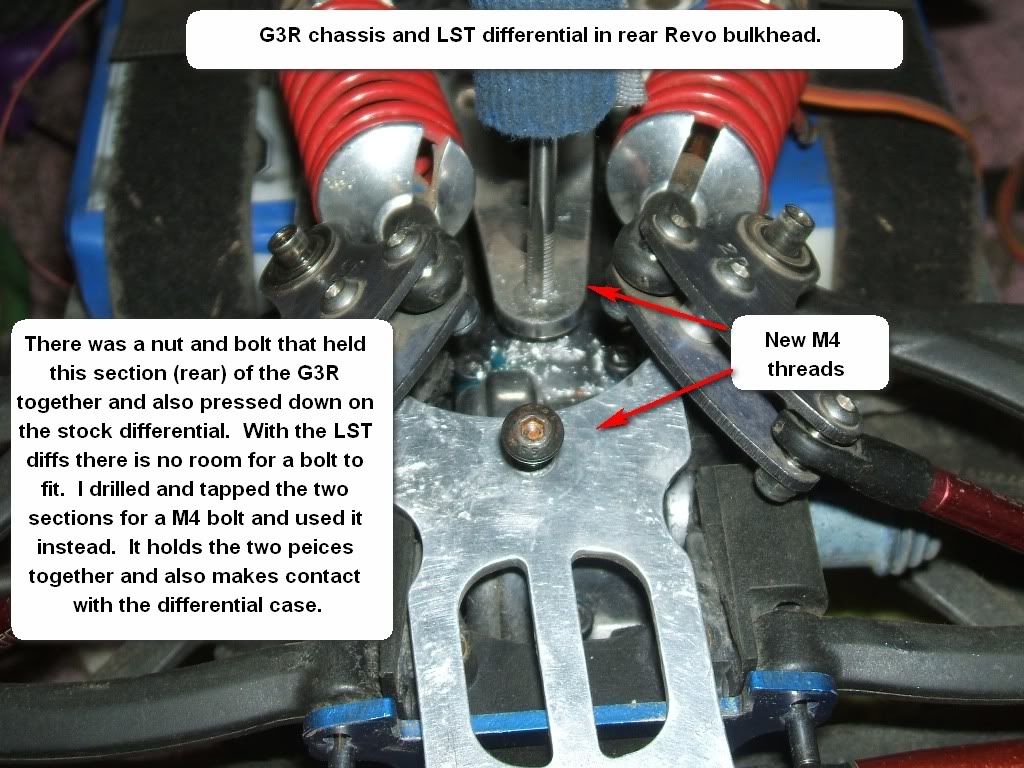
|
|
|

|
|
|
|
|
(#2)
|
|
A Horse's Ass
Offline
Posts: 1,065
Join Date: Oct 2007
Location: Spokane WA
|
10.06.2009, 11:24 PM
      I didn't run into any problems with the screws that hold the lst case to the bulkhead conflicting with the steering. There was plenty of clearance. The links to MisterCrashes pictures are broken in the other thread. I will see if maybe he can repost or provide a link to them. I looked in his photobucket when I was doing mine. MisterCrash was way ahead of me again. He added a link to the pictures in the other thread which is this link here. http://www.rc-monster.com/forum/show...&postcount=294 |
|
|
|
|
|
|
|
(#3)
|
|
Check out my huge box!
Offline
Posts: 11,935
Join Date: Aug 2007
Location: Slidell, LA
|
10.06.2009, 11:37 PM
Looks good Guy. Nice to see people taking cue from my weird ideas and coming up with great results I like the addl attachments you did, should hold the diffs in real nice. Good engineering. I never did build a revo with lst diffs, but my maxx with the lst diffs is holding up great, as are my various lsts! I do have the stretched chassis revo that will most likely need the lst diffs to handle the extra weight! Winter projects for me, too much going on with the house and work right now!
Now all we need to see is a decent set of al bulks with the addl material removed by a mill... That would be very sweet, al bulks that fit lst diff cases. You could even thread the all bulks to allot the m3 screws to attach directly thru the diff cases and into the bulks. |
|
|
|
|
|
|
|
(#4)
|
|
Supermaxx
Offline
Posts: 2,031
Join Date: Oct 2007
Location: Earth
|
10.07.2009, 02:39 AM
You can try some Ofna/Mugen center diff output cups. I know the Ofna center diff output cup is longer than the regular 1/8 front/rear diff cups.
Predator with OS .21TM Supermaxx with Mach .26 Revo with OS .18TZ Kyosho ST-RR Conversion Ofna CR with Tekin ESC/Motor (2) |
|
|
|
|
|
|
|
(#5)
|
|
Guelph, Canada, eh!
Offline
Posts: 1,083
Join Date: Sep 2007
Location: Guelph, Ontario, Canada
|
10.07.2009, 12:05 PM
A mayfly doesn't have a digestive system, it doesn't live long enough to need it. My very first attempt at LST diffs in the Revo looked exactly like what you did. And I thought that way too much material was removed from the bulks so I tinkered with the project and after going through several bulkheads bought on ebay, I finally went with shaving material off the LST diff cases instead of the bulkheads. Very little material has to be removed from the bulkheads with this way of doing. Yes the Ofna center diff output drives are longer than the losi ones but only by half a millimeter. It might still help.
I also made what I call diff blocks so sandwich the diffs in place inside the bulkheads. They are awsome and if done correctly, the diffs don't move at all. My LST XXL diffs in the Revo bulkheads. Again, this all started with Linc's idea. |
|
|
|
|
|
|
|
(#6)
|
|
|
Check out my huge box!
Offline
Posts: 11,935
Join Date: Aug 2007
Location: Slidell, LA
|
10.07.2009, 01:25 PM
Quote:
|
|
|
|
|

|
|
|
|
(#7)
|
|
A Horse's Ass
Offline
Posts: 1,065
Join Date: Oct 2007
Location: Spokane WA
|
10.08.2009, 09:17 AM
Thanks James. I agree coming up with different alternatives or solutions for the different rcs has been whats helped keep my interest. Getting it done with just what's laying in the parts box(s) is another challenge. Unless you knew it was coming and planned ahead.....
Thanks for the tip on the ofna center diff guys. The only one I've had was the Ultra MBX (maybe). It had a smaller 4mm shaft that was seperate from the gear and the output cup. Just a piece of 4mm steel with a hole in one end and a flat spot on the other. I will search for the ofna cups you are talking about, but if they still pop out after this fix. I am thinking I just shorten the arms a little. MisterCrash, that is good to hear about your first set of bulks. Well maybe not good but I do feel better now. It makes MisterCrash more human vs the machine that gave us the "revo" thread that everyone should read. Perfect looking bulkheads and precisely trimmed lst cases in one sittting. Now I know there is some trial and error behind the curtain. lol I looked at your photobucket a couple times (real helpful) before I started on mine. Then looked again during and wondered how your bulkheads turned out so nice. "Must have more patients then me, or maybe he's a machine!" I thought. A nice job on the lst cases by the way. Looks like a stock black one from the pictures. I was curious just how much would be needed to be removed from the bulks without having to alter the cases any. Well that curiosity is satisfieed. A lot was needed. Your method looks to be easier and a cleaner way to do it. I've read through the revo thread of yours several times. Nice post and great ideas. The tips have helped me out, thanks. I had my lexan scrap peices all picked out to make some diff blocks like you did, but a slip of the drill and I haven't needed them yet. The screw downd method had been holding up excellent so far. I haven't even ran a full pack through it yet..... lol I don't have any races riding on my setups so I figured I would give the skeleton bulks and screw down method the abuse test and see how it holds up. THe lexan pieces are sitting by the the other bulkheads just in case. Lincpimp has come up with some great ones for us. He's gave me a lot of help when I needed it. Hell, I can even go to the grociery store again. Thanks James. The list of different RCs he's had has got to be 3 times longer then the list for his...... I put the link to the original thread at the begining to let everyone know where it all started and who to blame if it doesn't work for them. With the original thread in the General Disc forum, yours in the Revo section, and "It's Me"'s lst in the Maxx thread in the maxx forum. I figured the gorilla maxx forum needed one. That should either make them surrounded or at the least mean our wagons are in a semi circle. You never know when the midgets will be coming to get their pony back. I was able to sqweek another mm or so for the shaft and cup problem that came out of the install. The backs were easy just crank the knuckles down then back them out one or two turns. Actually, you could dremel a little area for the ball to recess into and eleiminate the rear camber. Nah.... The fronts were more of a problem, cranking the knuckles down just eliminates your steering completely. I shimmed the axle so the steel shaft didn't slide out towards the tire any. Also removed the boots off the new knuckles, the old knuckles did have them. I cut off the little nub on the the knuckle that the boot retainer clips into. I also had to put a notch in the top arm of one of them. My front diff is not exactly sitting at 90 degree. One side is slightly lower then the other. Not by much but enough for me to dremel the end of the upper arm so the knuckle has some range of movement. Should be plenty strong with the ball screwed into the arm as far as it is now. I don't get the full steve hayden lock anymore on the steering but should be enough to turn around in the street without having to use reverse. I will give it a hard time tomorrow and see how it works. There isn't a hole lot of material on the stock arms, I have the RPMs installed an they have a lot more material surrounding where the ball gets screwed into. It's going to be nice to not hear that clicking coming from the stock differentials. That was a dreaded sound because I knew I was going to have to open it up again and replace it, again. Okay, here are a couple pictures. Pardon the typos in the comments. I must of nodded of while typing again (old work habit). They are a PIA to edit them once they are saved so I didn't fix them. Nice tidbit about the mayflys digestive system or lack of. Gotta love/hate those "Absolutely Usless Trivia" popus from the old VH1 days..... I didn't find the light posts or cars on the back of the new 10 dollar bill. Will have to check when and old one come my way. Anyone check your Canadian currency for them? 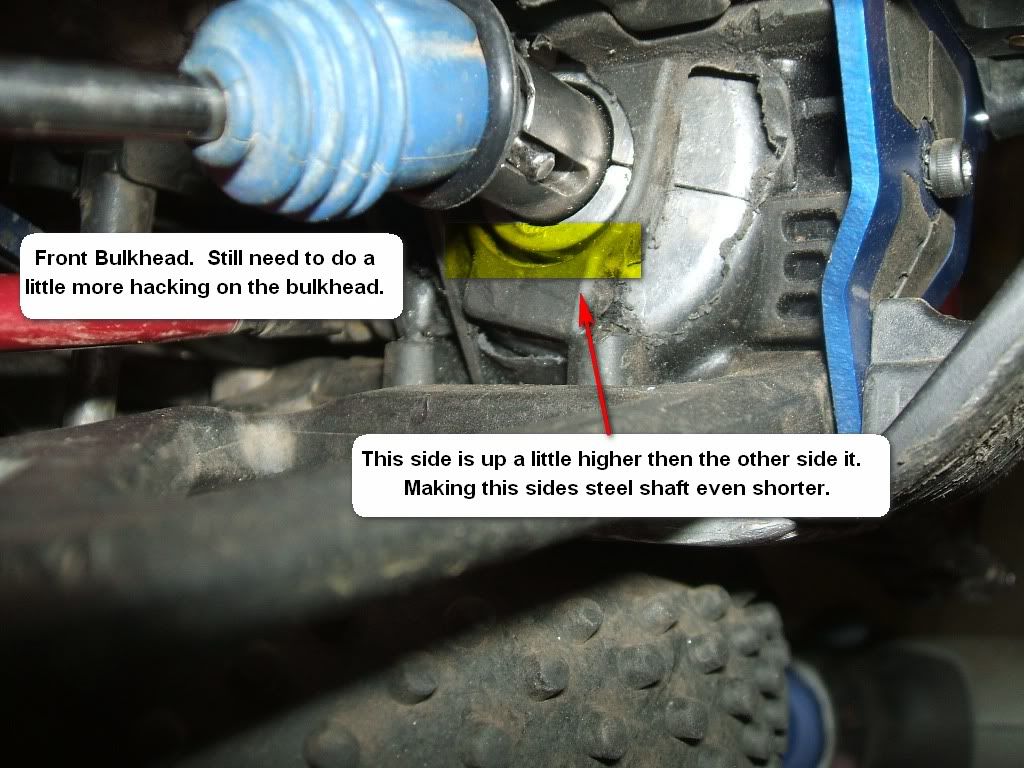 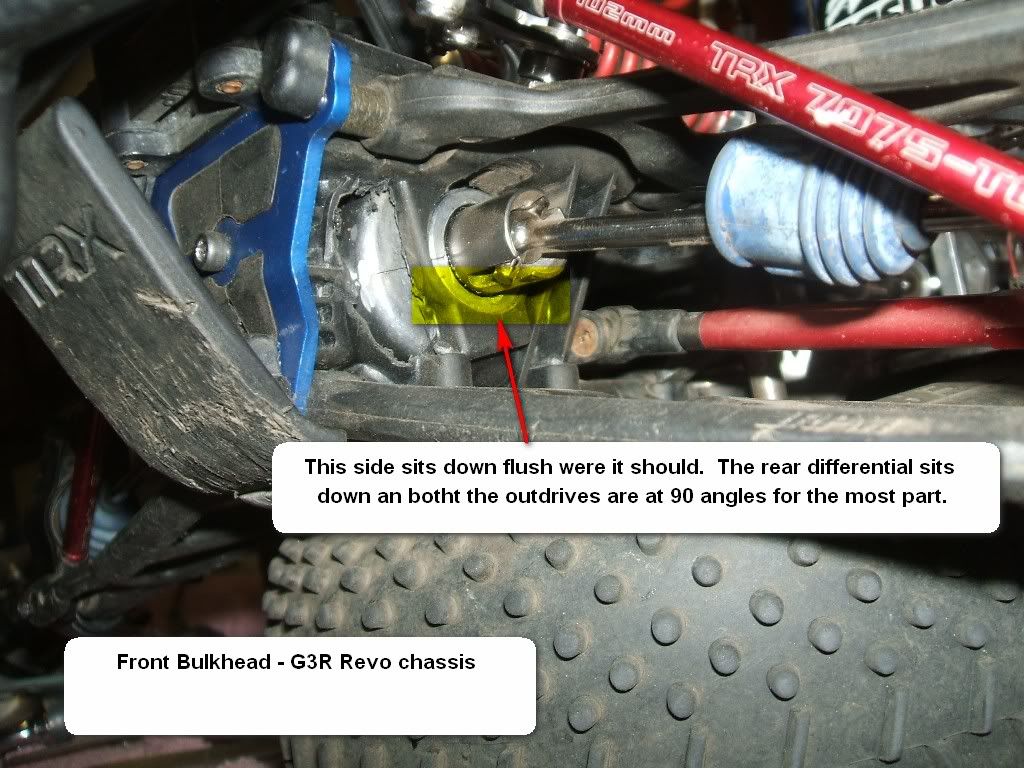 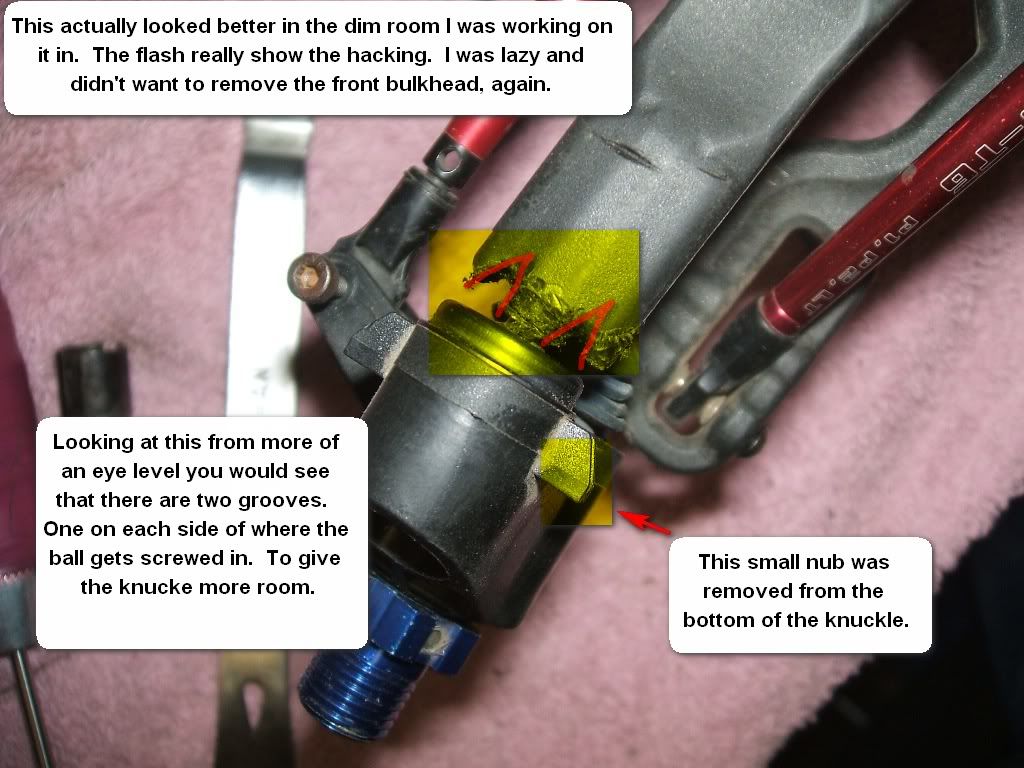 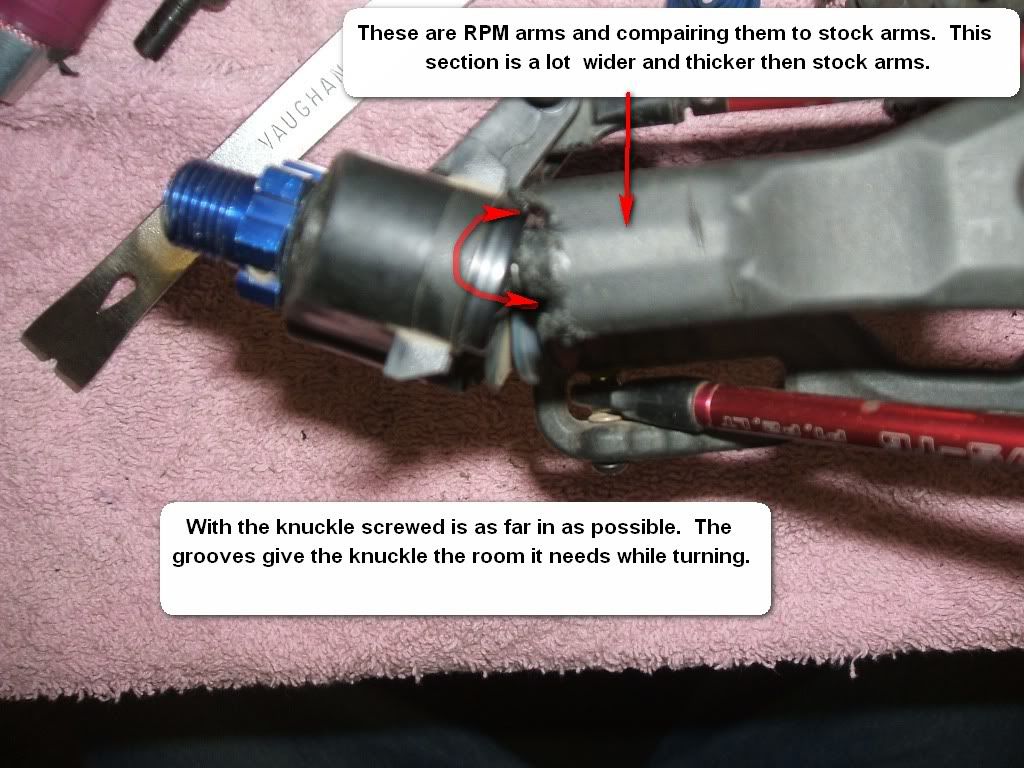 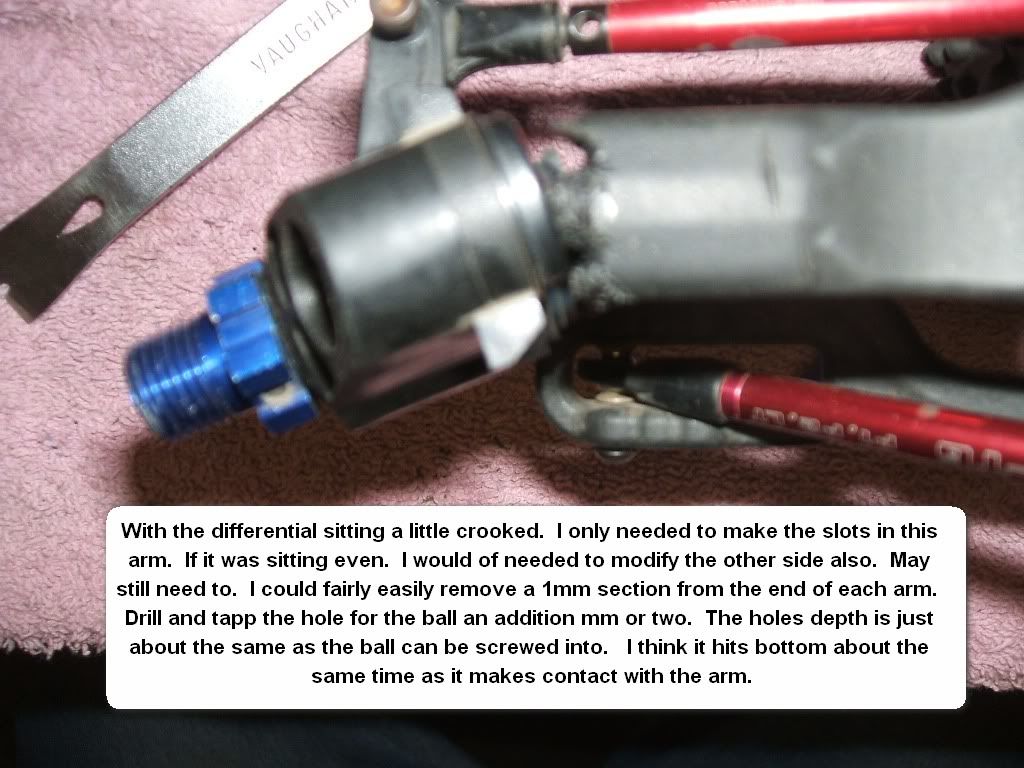 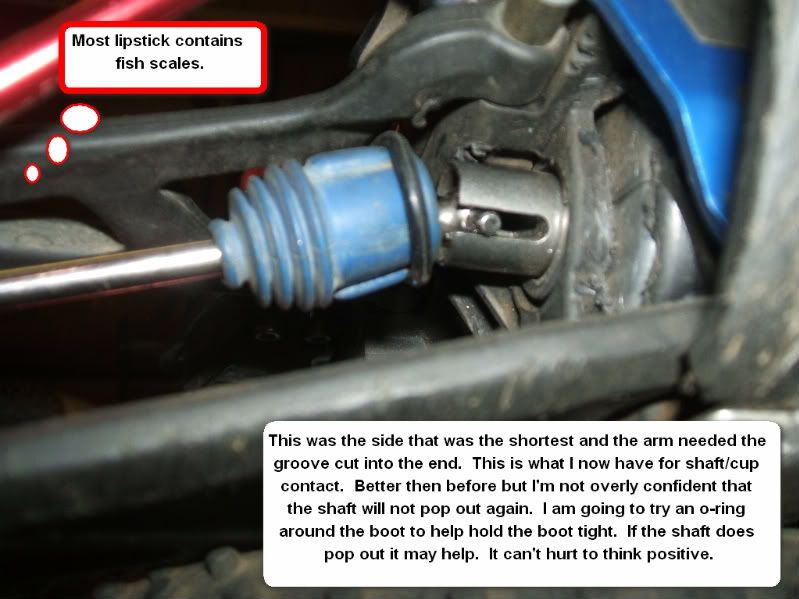
|
|
|
|
|
|
|
|
(#8)
|
||
|
Guelph, Canada, eh!
Offline
Posts: 1,083
Join Date: Sep 2007
Location: Guelph, Ontario, Canada
|
10.08.2009, 10:49 AM
Quote:
 Quote:
The lines show where I take material off the cases.  
|
||
|
|
|
|
|
|
|
(#9)
|
|
|
A Horse's Ass
Offline
Posts: 1,065
Join Date: Oct 2007
Location: Spokane WA
|
10.08.2009, 02:29 PM
Quote:
We'll that sucked, I just fat fingered the F5 and found out what does when you are in a thread. It qoutes the last post. Unfortanutley it also wipes clean all the rambling that you had previously typed. Must be your lucky day... The pics with the lines doesn't show up for me in photobucket but I can pretty much see the line in the thumbs when I get close enough to the monitor. How many turns out do you go with you knuckles. I was trying to remember where I had mine origanally set to. I am thinking it was (careful don't hit hte F5 key again) 6 on the top and 8 on the bottom for the base settings. Well that little bit did the trick, ran three 6s packs through it this afternoon and no shaft dislocations. Great idea James! The stronger diffs are just what the old girl needed. The romance is back on..... 
|
|
|
|
|
 |
«
Previous Thread
|
Next Thread
»
| Currently Active Users Viewing This Thread: 1 (0 members and 1 guests) | |
 Linear Mode

|
|

Powered by vBulletin® Version 3.8.11
Copyright ©2000 - 2026, vBulletin Solutions Inc.
vBulletin Skin developed by: vBStyles.com
Copyright ©2000 - 2026, vBulletin Solutions Inc.
vBulletin Skin developed by: vBStyles.com