

|
|
Brushless Truggy Part 2 |

|

|
(#1)
|
|
RC-Monster Carbon Fiber
Offline
Posts: 468
Join Date: Nov 2006
Location: Los Angeles, CA
|
Brushless Truggy Part 2 -
03.25.2008, 03:35 AM
I had converted a CEN Arena truggy to brushless awhile back. It was crazy fast but I was not happy with the brake modulation and battery perfomance. I sold that truggy and concentrated on converting my 1/8 buggy and CRT.5, which were lighter vehicles and would be easier to convert. I had such great success with those conversions, especially getting the mechanical brakes working, that I decided to convert another truggy. I had a second CEN truggy that was not being used. I stripped it down and started to figure out what I needed and where everything would go. First I needed to make a special motor mount that set the motor back so that it would clear the disc brakes. I could have used the combo RC-Monster mount I had with a spacer to move the motor back, but I decided to make a custom mount that was separate from the center diff mount. I then replaced the CEN center diff with a Kyosho diff. I added Kyosho bonded semi-metalic brake pads/rotors. I cut and formed the new motor mount and drilled all the holes I needed to mount it. Coming up next I will add the motor, ESC, carbon fiber batt tray and brake servo.
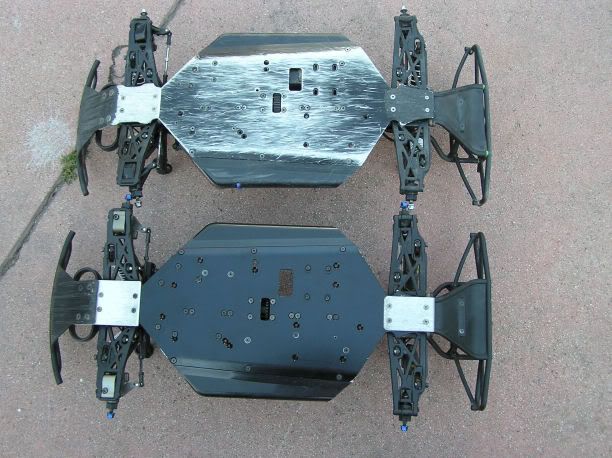 Here is my previous brushless truggy, it used motor braking. I sold this one a while back.  Here is the aluminum bar I used to create the motor mount.  Here is the rough motor mount being test fitted. I needed to get it close to the diff so I could use small pinions, but it also had to clear the brake rotor.  Here is the mount and motor/pinion being test fitted.  Top view showing fit of motor, brakes and center diff. It is extremely important to keep everything parallel when using a separate motor mount. Motor = Neu 1515 1Y or Feigao 8XL Battery = Maxamps 4s2p 6000mah ESC = MM Diffs = front/rear CEN diffs with cross pin mod Center diff = Kyosho with plastic 46T spur Battery tray = custom carbon fiber |
|
|

|
|
|
|
|
(#2)
|
|
Old Skool
Offline
Posts: 7,494
Join Date: Feb 2007
Location: Devon, England
|
03.25.2008, 06:36 PM
It must be nice having a vertical mill, I really need to get a cheap one sometime- so many ideas, so few resources.
Looks good so far, the seperate motor mount does make using mech brakes front & rear alot easier = options. |
|
|
|
|
|
|
|
(#3)
|
|
RC-Monster Carbon Fiber
Offline
Posts: 468
Join Date: Nov 2006
Location: Los Angeles, CA
|
03.26.2008, 02:09 AM
It's a real cheap mini-mill, I got tired of drilling and hand filing. I spent more time working on the mill (getting it true) than on making parts. I have an RC-Monster motor mount that I could have used with a spacer to set the motor back, but it was an older model and wasn't machined for the brake parts. So I decided to make a simple mount from scratch. Eventually my setup will include a rear support for the motor so all the stress doesn't fall on just two endbell screws.
 My Neu motor cost more than this mill. |
|
|
|
|
|
|
|
(#4)
|
|
RC-Monster Carbon Fiber
Offline
Posts: 468
Join Date: Nov 2006
Location: Los Angeles, CA
|
03.26.2008, 02:38 AM
Update:
Here is a test fitting of the carbon fiber battery tray. Eventually the tray will have two sets of straps and a small aluminum brace to keep the battery from hitting the center diff/spur. When it is all done it should weight about 3.5 ounces.   Here is a similar tray in my buggy. This is what the finished version should look like. |
|
|
|
|
|
|
|
(#5)
|
|
RC-Monster Carbon Fiber
Offline
Posts: 468
Join Date: Nov 2006
Location: Los Angeles, CA
|
03.28.2008, 05:07 PM
Ran, into my first major issue. The CEN TR uses 26T/9T front/rear diff gearing (2.888888) which is pretty high. The nitro CEN uses a 52T spur to make up for the high diff gearing but I am using a 46T plastic spur. Even with an 11T pinion I get a top speed of around 50mph, too high for what I need (track). I was going to pop in some spare Kyosho diffs I have, but I remembered that the CEN TR has really long outdrives and the Kyosho has shorter ones, using the Kyosho outdrives will cause the dogbones to pop out. So I guess I will try and mate the Kyosho ring gear and pinion to the CEN diff.
|
|
|
|
|
|
|
|
(#6)
|
|
RC-Monster Mod
Offline
Posts: 4,217
Join Date: Apr 2006
Location: Chicago, IL
|
03.28.2008, 05:57 PM
Actually the CEN Matrix BUGGY uses 26/9 gears in the diffs. The truggy uses 38/11. Its still rather high for a truggy (actually very close to what most buggies use, 43/13) but not as bad as what you originally thought.
When I converted my CEN truggy I found the same thing. I started off with a very low KV motor to compensate for the tall gearing and 46T center gear. Eventually, I actually switched to the Hot Bodies 43/10 truggy dif ring and pinion to lower the ratio and allow the use of a 46T spur gear without a super small motor pinion. The HB ring gear and pinion fit the CEN difs with a little careful shimming to get the mesh right. EDIT: What are you planning to use for chassis braces? The stock over the top braces dont look like they will work with your center dif arangement. Here is a link to my CEN Matrix TR thread in case you are interested. http://www.rc-monster.com/forum/show...ight=matrix+tr to make it... or break it... Silent...But Deadly |
|
|
|
|
|
|
|
(#7)
|
|
RC-Monster Aluminum
Offline
Posts: 538
Join Date: Apr 2007
|
03.28.2008, 10:15 PM
Very Nice dude!
|
|
|
|
|
|
|
|
(#8)
|
|
RC-Monster Carbon Fiber
Offline
Posts: 468
Join Date: Nov 2006
Location: Los Angeles, CA
|
03.31.2008, 11:56 PM
 Here is the section that caused the damage. The arrow on the left is where you are supposed to land. The arrow on the right is where I landed. |
|
|
|
|
|
|
|
(#9)
|
|
RC-Monster Carbon Fiber
Offline
Posts: 468
Join Date: Nov 2006
Location: Los Angeles, CA
|
04.02.2008, 03:45 AM
Ok after reading some of the other post on this site related to the Tekno clutch I decided to pull the trigger and I ordered one on Monday. It arrived today and I spent most of the night fabricating a new motor mount. I started by raising the center diff to give me more room, I then mounted the motor, attached the Tekno clutch (currently I am using MIP shoes) with a traxxas 15T bell. I also had to move the brake servo slightly to clear the bell. I hooked everything up and ran it on the bench just to see if it worked. The clutch acts just like a nitro clutch. When I gave it throttle the motor would spin but there was a slight lag before the bell would move, then as the speed picked up the motor spun the bell/spur at full power. This is just what I was looking for. Tomorrow I will put some street tires on and give it run in the yard to see how it performs under a load.
 Here is the new motor mount next to a RC-Monster mount and my originally mount. The new mount has been extended to provide more support.  Here is the mount and Tekno clutch attached to the chassis. |
|
|
|
|
|
|
|
(#10)
|
|
RC-Monster Carbon Fiber
Offline
Posts: 468
Join Date: Nov 2006
Location: Los Angeles, CA
|
04.06.2008, 01:31 AM
Update:
I was worried that the stock Revo 2 shoe clutch wouldn't be able to handle the weight of my truggy. So I ordered a special 3 shoe flywheel which arrived yesterday. So today I turned it down so it was even with the bell. This flywheel is the special NewEra flywheel made for the Revo. A little background, I have the Tekno adpater that allows you to use a standard Revo flywheel/bell, which uses two shoes and is smaller than a 1/8 scale bell. I wanted to use a heavy duty 3 shoe fullsized 1/8 scale flywheel/bell which is taller and normally wouldn't fit (too long front to back). The flywheel I got is specially made to be much thinner and allows a full size 1/8 bell in the same space as the stock Revo flywheel/bell. I hooked it up with alloy shoes with no springs (so it engages sooner) and hooked it up. I took it for a spin and the clutch works great, it spools up smoothly before it engages, but once it engages it is very strong. Unfortunetly it was a little too strong and the combination of sticky tires, super powerful motor, wornout diffs and 100% traction blew out the rear diff. The diffs on this project have a lot of milage on them and were in need of a rebuild anyway. I spent the remander of the afternoon rebuilding both diffs. I hooked everything back up and ran it on workbench and it seemed to be working perfectly (too dark to run on the street). Off to the track tomorrow to see how it performs.  NewEra flywheel and full size 3 shoe 1/8 scale Ofna bell.  Stock Revo 2 shoe flywheel/bell. |
|
|
|
|
|
|
|
(#11)
|
|
Check out my huge box!
Offline
Posts: 11,935
Join Date: Aug 2007
Location: Slidell, LA
|
04.06.2008, 02:05 AM
That is nifty, any chance of a link to the flywheel? I like the idea, as I had wanted to use a clutch setup in my 2 speed yusa, and modded a 4tec 2 speed bell to work. The newera flywheel sounds like a much better idea.
Is this it? http://www.neweramodels.com/item.cgi...=&part_id=2643 |
|
|
|
|
|
|
|
(#12)
|
|
|
Guest
Posts: n/a
|
04.06.2008, 02:40 AM
Quote:
|
|
|
|
|

|
|
|
|
(#13)
|
|
RC-Monster Carbon Fiber
Offline
Posts: 468
Join Date: Nov 2006
Location: Los Angeles, CA
|
04.07.2008, 01:12 PM
lincpimp, yeah thats the flywheel I am using. Like I said I had to turn it down even with the bell so it would clear the brakes/diff mount. The portion of the flywheel that is normally used to start a nitro engine using a starter box is not needed and gets in the way when used in a brushless setup. I have a small lathe so I chucked it in there and just shaved off what I didn't need. I guess you could do the same using a drill and a file.
bluonyx, yes that is Hot Rod Hobbies. I am normally out there on Sunday's practicing/tuning my setups, with an occassional race squeezed in on Saturday. I was out there this past Sunday and Jimmy B. was having an on-road event so some of the expert nitro guys were there helping him out. Afterwards they came over to the dirt track and were driving their nitro buggies and they noticed me out there with my brushless buggy clearing the entire section in the picture above. They couldn't believe the brushless power/accelleration my buggy had and actually stopped to watch. |
|
|
|
|
|
|
|
(#14)
|
|
RC-Monster Carbon Fiber
Offline
Posts: 468
Join Date: Nov 2006
Location: Los Angeles, CA
|
04.07.2008, 02:05 PM
Update: Took the truggy out this weekend for some testing. The clutch worked great and really did smooth out the brutal brushless power delivery. It felt almost nitro like with a lot more snap, but it was kind of weird because there was no nitro noise. Unfortunetly about half way thru the day I again stripped the plastic spur after landing hard. Apparently the clutch does not offer as much slip in this situation as I had hoped. I had a back-up diff with a steel spur that I mounted in the truck. I ran the rest of the day with no futher issues. Wear on the steel gears was minimal at the end of the day. I am still concerned with the stress on the drivetrain (enough to rip 4 teeth off the spur) so I would have liked a little more give with the clutch system (guess I have to wait for the slipperential). I did like the way the clutch smooths out the power delivery. So I now I need to decide if I should run the clutch or go with a hardened pinion and eliminate some of the complexity/maintenance that comes with using the clutch setup. I think I will run it as is for a litte while longer then decide.
|
|
|
|
|
|
|
|
(#15)
|
|
Im not dark, Im over ripened! xD
Offline
Posts: 5,607
Join Date: Sep 2007
Location: Westampton NJ
|
04.12.2008, 04:21 PM
did u try puting heavier springs in the clutch?
R/c Monster Team Driver Jq the car, LST, Sportweks turmoil pro Unconventional Techniques, Superior Results |
    |
|
 |
«
Previous Thread
|
Next Thread
»
| Currently Active Users Viewing This Thread: 1 (0 members and 1 guests) | |

 Hybrid Mode
|
|

Powered by vBulletin® Version 3.8.11
Copyright ©2000 - 2026, vBulletin Solutions Inc.
vBulletin Skin developed by: vBStyles.com
Copyright ©2000 - 2026, vBulletin Solutions Inc.
vBulletin Skin developed by: vBStyles.com