

|
|
5s2p A123 ? |

|

|
(#1)
|
|
RC-Monster Carbon Fiber
Offline
Posts: 467
Join Date: Jul 2006
|
5s2p A123 ? -
12.11.2007, 09:22 AM
hI !
were can i buy 5s2p A123 packs in side by side config ? http://http://www.maxamps.com/prodim...at_Details.jpg |
|
|

|
|
|
|
|
(#2)
|
|
Guest
Posts: n/a
|
12.11.2007, 12:54 PM
I'd guess you can get Maxamps to do a custom pac for you sinc they sell 5S1P, but at that price, I'd build my own.
I bought a DeWalt 36v batt and its real easy to make 2 5S1P cells as they come out of the DeWalt box. I'm going to use them as a 5S2P, but it will be two pacs so I can balance the weight easier - pac on each side. I'm waiting on a set of balance taps and mine will be done except form some shrink. The two 5S1P pack will have cost me $115- I got mine from Amazon.com (free shipping) and you can do better off ebay, but it takes some watching. My next a123s will come from ebay. |
|
|
|
|
|
|
|
(#3)
|
|
RC-Monster Mod
Offline
Posts: 6,597
Join Date: Apr 2007
Location: NJ
|
12.11.2007, 02:46 PM
Duster - I was looking to do the same - Any tips on making those packs? How much soldering involved? thanks
|
|
|
|
|
|
|
|
(#4)
|
|
RC-Monster Carbon Fiber
Offline
Posts: 79
Join Date: Oct 2007
|
12.11.2007, 05:04 PM
speedy - listen to Duster_360, teach you he can...
It is VERY easy to make 5S2P packs from the DeWalt battery packs. There is an excellent tutorial by LBMiller5 on the topic here: http://www.rcgroups.com/forums/showthread.php?t=599316 . Read in conjunction with http://www.rcgroups.com/forums/showthread.php?t=587606. Not much soldering, although a little more if you do the solder-braid-in-parallel-across-the-existing-joints trick. A 5S pack weighs within 2% of a 7-cell Sanyo 2400 NiMH set. Be careful of these batts- they put up with lots of abuse but they can weld themselves if you touch the terminals wrongly during assembly. I love them! Regards David / ICUBoy |
|
|
|
|
|
|
|
(#5)
|
|
Guest
Posts: n/a
|
12.11.2007, 07:48 PM
We are getting some new flooring installed today - at least the 1st steps, what a mess, haven't been around a PC much today.
Those are the 2 links I read to get started - read everything that they link to and you'll find there's been testing that shows the stock DeWalt cell connectors seem to do fine as far as high amp loads are concerned. They're are being run that way and thats the way I'm planning on running mine - I did not bridge the thinned stock connector thats supposed to fucntion as a fusible link at ~100a with a short piece of 12ga - again, these are being run that way (without the 12ga) and I've not seen any mention of any prob. Less soldering the better! I couldn't wait for harbor freight order to show up (if you haven't bought, buy the Northern set instead (linked later in the how to on removal) - little more $$, way better quality and they're longer - will reach those 2 end screws with no drilling), but if you have a t10 torx bit, the pegs that are supposed to stop the regular bit from being used - on my pac, they broke right off when I tried to engage the bit, didn't provide much in teh way of security! I did have to drill the bigger holes to get to the two end screws as LBMiller5 showed - the entire removal process took maybe 5min and I was being careful! The de-soldering is straight forward - a soldering gun worked really well here, but an iron would work as well. The stock pac splits logically into 2 5S1P units, you have to break stock conns in two places - you get a 5 cell connected pac and a 2 and a 3 cell connected pac. The 2 and 3 are separate since DeWalt used them as the original + and - taps and they're on the same side. Simple matter to connect the 2 and 3 to get the 2nd 5 cell pack. I did the dremel cutoff wheel like shown and broke them by wiggling - as cautioned, think about this before you start so you don't let anything touch thats not supposed to! They are a little fragile - soon as I had the 5 cell separated, I used 2" wide Scotch strapping tape - two wraps and that provides the strength needed for handling. I wrapped the 2 and the 3 cells together and then soldered the bar to connect them, way easier to hold on to! Stock DeWalt connectors take solder easy - I use Deans solder - no problems. I used a single Novak c sized bar to connect the 2 and 3 cell pacs. This is really the only major soldering - handle it just like building a c sized pac - tin the terminals, tin the bar and heat them together. I'm using a 80watt Weller and it takes only a few sec to get it done. When I trimmed the tabs to solder the main output wires to - I trimmed them so they are square and let the soldered end of the wire rest parallel to the length of the pac - provides more area to solder the wire to and a stronger connection. I soldered the main power out wires last night - deans 12ga wire. Tinned wire, then the tabs. Put heat on both, hold it till solder cools - nothing unusual. I'm going to put the dean conns on one end rather than in the middle of the pac, so one wire is longer by the length of the pac - I made that the negative wire, but could be done either way. Soon as my hyperion 7 wire balance taps show up and I solder them on, I'll add one more wrap of scotch strapping tape and then shrink. Ready to charge and try them out! If you can solder deans, this will not be a prob, it was pretty easy and straight forward. I can take some pics if anyone wants. |
|
|
|
|
|
|
|
(#6)
|
|
RC-Monster Brushless
Offline
Posts: 2,184
Join Date: Nov 2006
|
12.11.2007, 09:53 PM
i would like some pics =)
|
|
|
|
|
|
|
|
(#7)
|
|
Guest
Posts: n/a
|
12.11.2007, 10:37 PM
Here's a few - this is both packs after separating and taping into 5S1P config. You can see the bar where the 2cell and 3 cell "pieces" were joined in the one on top -
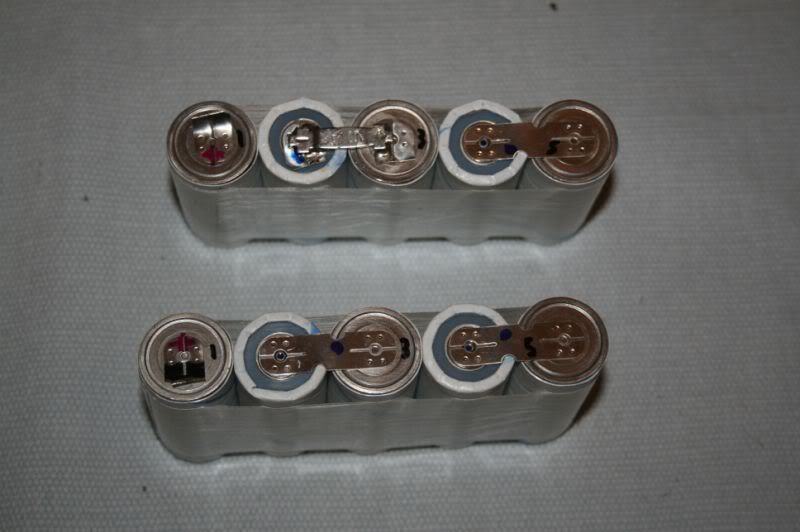 Here's a little detail on how the stock tabs were trimmed to "hold" the wiring, this is the same side of the pac with the bar. Note the + tab points down. The neg tab on this pac points down as well. The other pac is opposite to this due to the way the DeWalt pac is put together. I didn't want to remove the stock tabs and it wont really make any diff once balance taps and shrink are added. Thie wires will come out in the middle of the end. 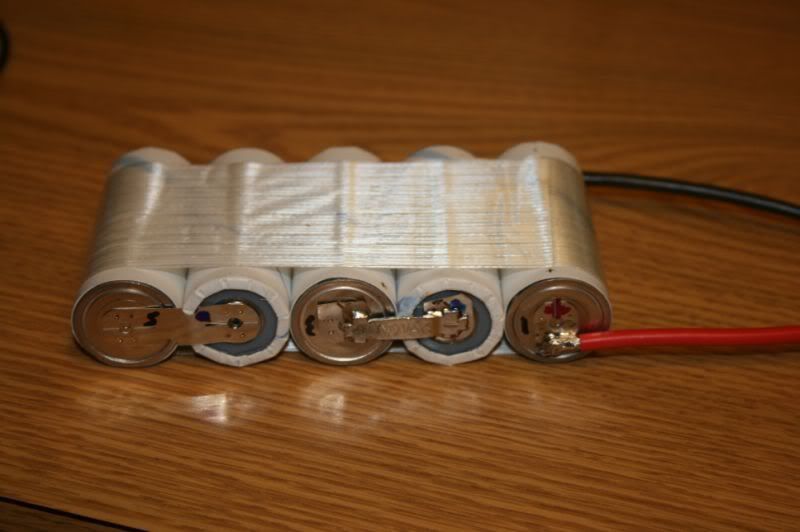 Here's the other side of this same pac. 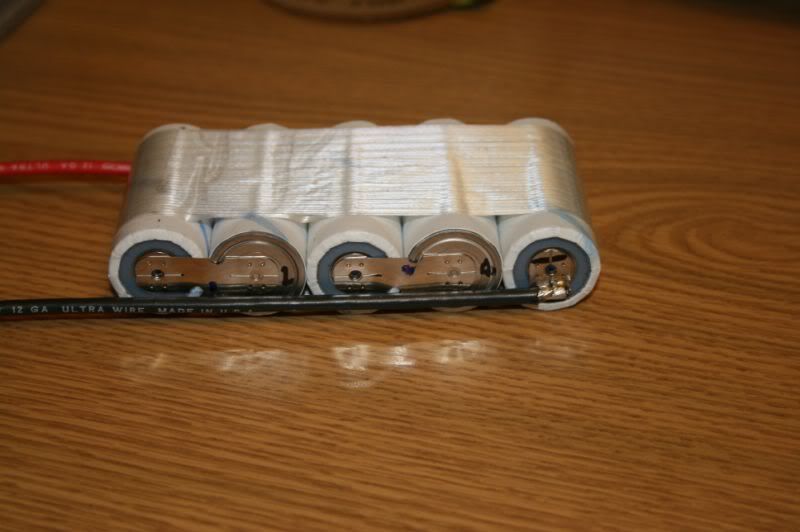 Last, here is the pac that is 5 cells straight from the DeWalt pac - it is the one with the fusible link - its between cells 2 and 3 (kinda hard to see due to the reflection of the wire, but the connector is reduced in area where the cells touch. 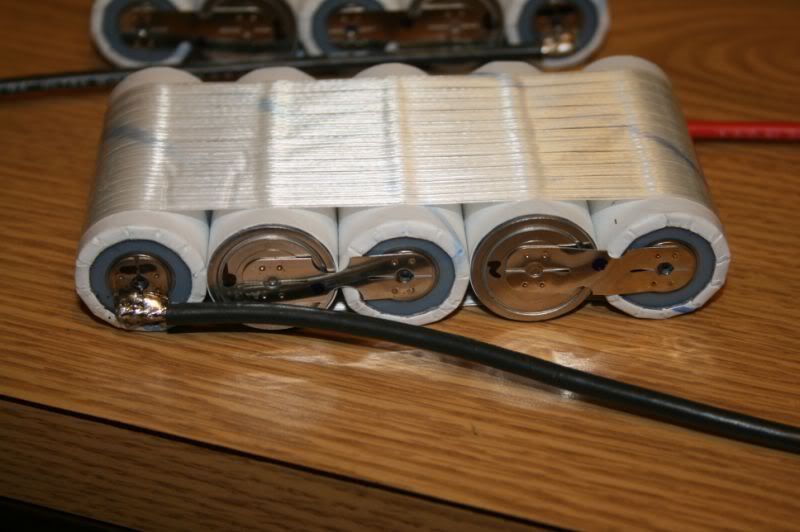 If this one was flipped over to point the wires in teh same direction as the others, the tab would be pointing up. Like I said, not a significant diff. I've numbered the cells as a guide in adding the balance taps. |
|
|
|
|
|
|
|
(#8)
|
|
Guest
Posts: n/a
|
12.11.2007, 10:47 PM
Forgot to add- after I add the balance taps, I'll wrap the cells end to end to keep everything insulated and then two layers of shrink.
I'd estimate if I had everything needed to build these starting from a 36v DeWalt, I'd have a pr of batts ready to charge in 2 or 3 hours. Soldering difficulty I'd place at maybe a touch more than average, but not much. Like I said earlier, if you can do deans, these won't be a prob. I would recommend nothing less than a 60watt iron though. I've just started using this 80watt Weller and I'm amazed by how quickly it will get the job done. |
|
|
|
|
|
|
|
(#9)
|
|
RC-Monster Mod
Offline
Posts: 6,597
Join Date: Apr 2007
Location: NJ
|
12.13.2007, 12:46 PM
Thanks this is great = Any chance of cleaning this up and making it into a sticky?
I think you've sold me on doing this now in the spring... I have to send off my EOS to get refirmwared to cope with the A123's first... PS where did you get the hyperion tap connector from. Thx |
|
|
|
|
|
|
|
(#10)
|
|
|
Guest
Posts: n/a
|
12.13.2007, 04:25 PM
Quote:
http://www.allerc.com/product_info.p...4548c713b08e78 None of the other places I looked had them labeled and at this point, I'm still following the how to off rc groups - just tailoring it to go with the 5S1P pacs I'm making, so it was key to understand the taps were the ones I needed. Mine have been shipped and I expect them Fri, so I hope to get my pair finished and on teh charger Fri night or Sat am. Looks like my new Quark may be getting a test this weekend! |
|
|
|
|

What if... |
|
|
|
(#11)
|
|
RC-Monster Carbon Fiber
Offline
Posts: 372
Join Date: Dec 2007
|
What if... -
12.15.2007, 10:22 PM
I did not want to do all the work described here, how could I take two A123 9.9V 3s1p cells and get 19.8V? i am looking at the package they have on their website and would like to make a saddle pack out of it.
|
|
|
|
|
|
|
|
(#12)
|
|
RC-Monster Admin
Offline
Posts: 14,609
Join Date: Nov 2005
Location: Des Moines, IA
|
12.13.2007, 01:18 PM
Mike has gotten me some Hyperion connectors in the past, and Maxamps had some as well.
|
  |
|
|
|
|
|
(#13)
|
|
RC-Monster Carbon Fiber
Offline
Posts: 484
Join Date: Dec 2005
|
12.13.2007, 02:30 PM
I got a pair of hyperion taps and shrink in the mail yesterday from Maxamps. I'm going to wire up a 5s2p pack this weekend from a dewalt pack.
|
|
|
|
|
|
|
|
(#14)
|
|
RC-Monster Brushless
Offline
Posts: 2,184
Join Date: Nov 2006
|
12.13.2007, 04:04 PM
once you do you should get some pics up!
|
|
|
|
|
|
|
|
(#15)
|
|
hold my beer... watch this...
Offline
Posts: 969
Join Date: Feb 2007
Location: berkley, michigan
|
12.15.2007, 10:33 PM
welcome.
 you could make a dean's plug serial adapter, or buy one cheap from here (bottom of the list). that's what i'm doing, only i have 2 wired together using a parallel adapter (3s2p) and connecting it in series to a 2s2p pack, for 5s2p total. what controller are you using, and what vehicle? 6s2p might give a more consistent result, as long as you have a controller that can handle that much. |
|
|
|
 |
«
Previous Thread
|
Next Thread
»
| Currently Active Users Viewing This Thread: 1 (0 members and 1 guests) | |

 Hybrid Mode
|
|

Powered by vBulletin® Version 3.8.11
Copyright ©2000 - 2026, vBulletin Solutions Inc.
vBulletin Skin developed by: vBStyles.com
Copyright ©2000 - 2026, vBulletin Solutions Inc.
vBulletin Skin developed by: vBStyles.com