


|
|
Official Erevo 1/8 scale center diff thread |

|

|
(#1)
|
|
Hyper 7 Erevo Center Diff
Offline
Posts: 1,195
Join Date: Dec 2005
Location: CNY (Syracuse/Binghampton area)
|
Official Erevo 1/8 scale center diff thread -
09.07.2009, 10:12 AM
Well , I decided to collect some of the info from MC, and my self and anyone else who has contributed to this CD, so it would be easy to find for everyone, I'll be copying & pasting in the info....
The birth of the 8th scale Revo CD - 08.31.2009, 10:30 PM (Mistercrash) I experimented with a few options and ideas posted on the net about these diffs. Two of them I found to be very interesting, a third one was made by a guy in France but it was almost a carbon copy of someone else's. The very first was made by CowboyRay some years ago for the nitro Revo 2.5. This was before Traxxas even came out with their own CD for the Revo. It was made with a Thunder Tiger S3 center differential, the TT spur gear was replace with a machined aluminum cap on which a custom plastic gear was secured with 4 M3 screws. I got my hand on a well used CowboyRay diff and inspected it carefully. The diff is smooth and the cap is very well machined, a thing of beauty. I noticed quite a bit of slop on the output shaft that went through the aluminum cap. Might be that a stronger and harder metal is needed there as the aluminum of the cap wore out and allowed the output shaft to wobble a bit too much for my taste. The other one was made by scjrss and with his coaching; I made three of his CDs. He came up with a clever solution to secure the Traxxas CD output gear to an Ofna Hyper 7 CD spur gear. The Hyper 7 spur gear had its teeth grinded off to transform it into a cap and 4 holes were drilled and tapped in it matching the holes of the Traxxas CD output gear. The Traxxas output gear could then be secured to the Hyper 7 spur gear (cap) with 4 M3 screws of the right length. A brilliant idea and it works. But the part I did not like is threading the 4 holes in the Hyper 7 spur gear. It’s hardened steel that is probably as hard as the steel from the tap. It can be done but really, it’s a PITA. I noticed some seepage of diff lube using those CDs. It seeps from between the threads made in the spur gear and the screws. Not a lot but enough to annoy me. Then there’s this guy that came up with a different way. I would like so much to remember where I saw the thread, I have searched and searched and can’t find it or remember where I saw it. If you know about it, please post his name here as this is HIS idea. He made four holes in the 8th scale CD spur gear and counter sunk from the inside. That way he was able to secure four aluminum inner threaded posts with M3 flathead screws and with some minor modifications, the Traxxas output gear could slide on the posts and secured to the posts with M3 screws. This post idea is the base of the CD I did last. I used a Losi LST XXL diff, just a regular diff, not a center diff. And instead of using four posts I used two. For the output gear, I used a different Traxxas gear since the Traxxas CD output gear is not sold separately. Once I was done with this last CD from a Losi diff, I decided to take the time to fit this new Traxxas gear to the CowboyRay CD and the sjcrss CD. It is good to be as precise as possible when modifying the parts to make these CDs, but it doesn’t have to be down to a thousandth of an inch, you’ll see from the pics that the parts I modified are not perfect. It doesn’t matter because the thing works anyway. We are not touching any internal components of the diff and as long as the output gear is centered on the diff, all is fine. So lets begin with the Losi CD, first you need a few parts, here is where I found the parts I needed. I give you the links to where I got the parts but you might have other sources to get parts from. The Losi LST XXL diff, I found and bought it on ebay, I am posting a link but it might not work for a long time, just do a search on ebay for ‘’Losi LST XXL diff’’ and a lot will pop up. http://cgi.ebay.com/NEW-LOSI-LST-XXL...d=p3286.c0.m14 The output shafts, made from the Traxxas 3.3 Revo CD output shafts. Part numbers TRA5415 and TRA5416. The shaft measurements can be seen on the pic. http://www.amainhobbies.com/product_...put-Shaft-Revo http://www.amainhobbies.com/product_...t-Gear-Revo-33 The Traxxas gear, part number TRA3985X. I think they were output gears for the old E-Maxx tranny. http://www.amainhobbies.com/product_...r-33T-2-E-Maxx For the aluminum posts, I had a few inner threaded aluminum posts and all I had to do was cut them to the length I needed. To find posts, just search on Tower Hobbies or A Main for ‘’post’’ and a lot of inner threaded aluminum posts will come up for servo trays, steering bellcranks etc. Just find the ones that would be easy for you to cut to the right length. I found these from Axial and I think they would work without any modification to them. http://www.amainhobbies.com/product_...mm-Post-Grey-2 Two 8X12X3.5 mm bearings http://www.amainhobbies.com/product_...all-Bearings-2 8x10 mm shims and 6x8 mm shims to center the CD perfectly in the tranny. http://www.amainhobbies.com/product_...mm-shim-kit-10 http://www.amainhobbies.com/product_...6x8mm-Shim-Set 1.5 mm thick carbon fiber. Aluminum or other kinds of metal can be used also. Even a simple washer of the right size. http://www.fullforcerc.com/Carbon.htm Four M3x6 mm flathead hex socket screws. No link here as I am sure everyone has a place to get them, hardware store, LHS or online. Here’s a link to some carbide bits that will help tremendously in drilling and counter sinking the holes in the ring gear Drill bit http://www.usacarbide.com/catalog/pr...ducts_id=17778 Counter sink bit http://www.usacarbide.com/catalog/pr...ducts_id=17916 Quark 125b Castle Creations-Neu 2200kv motor ((2s2p)(4s)7800mah 7.4v Lipo Pack E-Revo 1/8 scale Hyper 7 CD http://www.rc-monster.com/forum/show...1&goto=newpost |
  |

|
|
|
|
|
(#2)
|
|
Hyper 7 Erevo Center Diff
Offline
Posts: 1,195
Join Date: Dec 2005
Location: CNY (Syracuse/Binghampton area)
|
09.07.2009, 10:13 AM
(Mistercrash)
I started by modifying the Traxxas TRA5415 and TRA5416 Traxxas output shafts. You cut the gear part off and have to drill a 2.6 mm hole for the spider gear pin. The tricky part is having the hole perfectly centered in the shaft.  Here are two of the TRA3985X Traxxas output gears, you see them with the flat side of the spokes up. The left one is stock and the right one has been drilled in two holes with a 6 mm bit. If you use the Axial posts I linked above, the holes will have to be 7 mm or 9/32 inch. There are two of the gear’s spokes that are thicker than the rest. The holes have to be drilled next to those thick spokes and which side of the spoke you drill is also important. I drilled according to the rotation of the gear inside the tranny, I wanted the forces exerted to the gear to be transferred to the posts from those thick spokes. The center hole has a little ridge that was cut off to allow the 8X12X3.5 bearing to sit a little deeper in the gear.  The two inner threaded aluminum posts that will be screwed to the diff cap. The length on the posts is about half a millimeter less than the thickness of the Traxxas TRA3985X output gear.  Now to start modifying the ring gear. I make the holes and I counter sink them first. To make sure that the holes were in the correct position, I used the Traxxas output gear and aluminum posts as a template. I slipped the two posts in the holes I made in the output gear and the 8X12X3.5 bearing in the center hole. The bearing is there just to center the gear perfectly on the ring gear. An 8X12 bushing would work also but I couldn’t find one. I take the Traxxas output gear with the posts and bearing and I slip it on the ring gear, I rotate it to center the posts between the screw holes of the ring gear the best I can and with a 2.3 mm drill bit chucked in the drill press, I go through the posts and make contact with the ring gear. The 2.3 mm bit will not touch or damage the threads in the posts, this is just to make a couple marks on the ring gear to show me exactly where to drill the 3 mm holes with the carbide bit. I take off the Traxxas output gear and then I can make the holes and counter sink them.  Then I take a 6 mm threaded rod I have and with two nuts and two washers, I secure the ring gear to the threaded rod. I can then chuck the rod in my drill press and with an angle grinder, I grind off the teeth until the gear is left with a half millimeter lip that will fit over the diff case.   This step is optional; I chuck the threaded rod in a power drill and with a belt sander, I can clean up the marks left by the grinder. Here’s the finished ring gear from both sides, now transformed into a cap. You can see the counter sink holes on the inside of the cap.   We’re ready to assemble the center diff. I start with securing the posts on the ring gear with the M3X6 mm flathead screws. I put blue Locktite on the threads.  
Quark 125b Castle Creations-Neu 2200kv motor ((2s2p)(4s)7800mah 7.4v Lipo Pack E-Revo 1/8 scale Hyper 7 CD http://www.rc-monster.com/forum/show...1&goto=newpost |
|
|
|
|
|
|
|
(#3)
|
|
Hyper 7 Erevo Center Diff
Offline
Posts: 1,195
Join Date: Dec 2005
Location: CNY (Syracuse/Binghampton area)
|
09.07.2009, 10:15 AM
(Mistercrash)
Then I put the 8X12X3.5 bearing on the cap. Here you can see a shim underneath the bearing, you can do without it. I had the shim so I used it, it just positions the bearing in the middle of the output gear.  I assemble the diff with my choice of diff lube. I like to run 100k for a stiff diff. On 4S, this lube is thick enough to allow some wheelies but unloading to the front is minimal. 50k will give you a looser diff with more unloading to the front but on 4S wheelies are practically inexistent.  I slip on the Traxxas output gear over the posts and bearing.  Now for the carbon fiber disk to hold the gear in place with two M3X6 mm flathead screws.   The last part is one of the plastic spacers that come with the stock output gear and shaft of the ERBE. I sanded it down to the right length and it serves as a spacer so the CD can butt against the bearing in the tranny case.  I slipped it on the output shaft and in the carbon fiber disk until it is well seated against the cap and put a drop of CA glue to glue it to the carbon fiber disk.  Now install the CD in your ERBE and enjoy some trouble free CD action for racing. Next posts will be the Traxxas TRA3985X output gear installed on the scjrss and CowboyRay CDs. Quark 125b Castle Creations-Neu 2200kv motor ((2s2p)(4s)7800mah 7.4v Lipo Pack E-Revo 1/8 scale Hyper 7 CD http://www.rc-monster.com/forum/show...1&goto=newpost |
|
|
|
|
|
|
|
(#4)
|
|
Hyper 7 Erevo Center Diff
Offline
Posts: 1,195
Join Date: Dec 2005
Location: CNY (Syracuse/Binghampton area)
|
09.07.2009, 10:16 AM
(Mistercrash)
TRA3985X output gear on the scjrss CD - 09.01.2009, 11:57 AM So here's how I installed the Traxxas output gear on the Hyper 7 CD that scjrss made. Here's the cap made from the Hyper 7 spur gear with the 4 holes that are threaded with M3 threads.  The red you see in the holes is just something I am trying to stop lube seapage between the threads and the screws. It's very sticky and tough tape used to tape the seams when you put vapor barrier on your house's walls.  Here's the CD assembled ready for the output gear.  Other than the center hole that was trimmed to let the 8X12X3.5 bearing go deeper in the gear, it didn't need any more modifications. The thick spokes of the output gear are lined up between the threaded holes of the cap.  Four M3X16 mm flathead screws that were trimmed down to 14.5 mm in length to secure the output gear to the CD.  And here is the final product ready to use. 
Quark 125b Castle Creations-Neu 2200kv motor ((2s2p)(4s)7800mah 7.4v Lipo Pack E-Revo 1/8 scale Hyper 7 CD http://www.rc-monster.com/forum/show...1&goto=newpost |
|
|
|
|
|
|
|
(#5)
|
|
Hyper 7 Erevo Center Diff
Offline
Posts: 1,195
Join Date: Dec 2005
Location: CNY (Syracuse/Binghampton area)
|
09.07.2009, 10:16 AM
(Mistercrash)
TRA3985X Traxxas output gear on the CowboyRay CD - 09.01.2009, 12:06 PM Finally here's how I put the Traxxas output gear on the CowboyRay CD. Here's three shots of the machined diff cap. This is a well used cap so that's why it looks a little grungy.  A shot of the stock Traxxas output gear on the left and the modified one on the right. Some grinding was needed in the spokes for the screws to meet the holes in the cap and some grinding of the spokes from underneath the gear so it would fit on the cap's elevated portion.  Here's the CD assembled.  And here is the output gear on the cap lining up with the cap's holes for the screws.  The finish CowboyRay CD with the Traxxas output gear using 4 M3X8 mm flathead screws to secure it to the diff cap.  Quark 125b Castle Creations-Neu 2200kv motor ((2s2p)(4s)7800mah 7.4v Lipo Pack E-Revo 1/8 scale Hyper 7 CD http://www.rc-monster.com/forum/show...1&goto=newpost |
|
|
|
|
|
|
|
(#6)
|
|
Hyper 7 Erevo Center Diff
Offline
Posts: 1,195
Join Date: Dec 2005
Location: CNY (Syracuse/Binghampton area)
|
09.07.2009, 10:21 AM
(Sjcrss)
Here is the 4 hole drawing dimensions here is the drawing for the bolt pattern to drill & tap the 3mm holes in the ofna ring gear, after i finish my shafts, I'll get those dimensions and add them to the drawing as well....FYI, scroll down a bit, pic is at the bottom......sorry dang scanner placed it there...lol 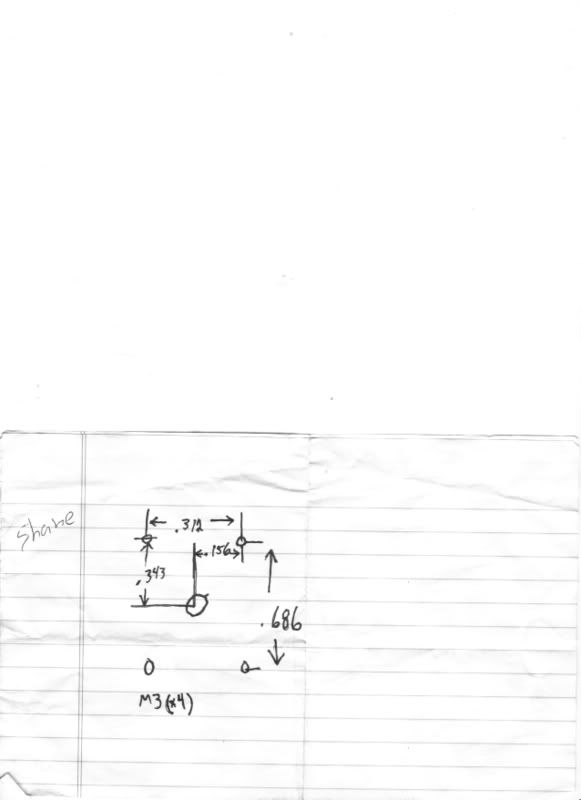
Quark 125b Castle Creations-Neu 2200kv motor ((2s2p)(4s)7800mah 7.4v Lipo Pack E-Revo 1/8 scale Hyper 7 CD http://www.rc-monster.com/forum/show...1&goto=newpost |
|
|
|
|
|
|
|
(#7)
|
|
Hyper 7 Erevo Center Diff
Offline
Posts: 1,195
Join Date: Dec 2005
Location: CNY (Syracuse/Binghampton area)
|
09.07.2009, 10:28 AM
If I missed anything let me know or just add it directly to this thread, thanks everyone for the contribution
Quark 125b Castle Creations-Neu 2200kv motor ((2s2p)(4s)7800mah 7.4v Lipo Pack E-Revo 1/8 scale Hyper 7 CD http://www.rc-monster.com/forum/show...1&goto=newpost |
|
|
|
|
|
|
|
(#8)
|
|
RC-Monster Titanium
Offline
Posts: 1,884
Join Date: Jul 2009
|
09.07.2009, 02:00 PM
Very awesome guys. Glad all this info is in one place now and can grow even larger. I'm not even finished with my first one yet and already the wheels are turning on what to do next! Thanks for all the hard work everyone has contributed to make this easier on less experienced people like myself.
|
|
|
|
|
|
|
|
(#9)
|
|
Guelph, Canada, eh!
Offline
Posts: 1,083
Join Date: Sep 2007
Location: Guelph, Ontario, Canada
|
09.07.2009, 06:50 PM
I can't access my Photobucket account for some reason. All I get when I click one of my pics is this message:
The action that you were trying to perform has failed. Even if I try to log in to my account from the Photobucket page, I get the same message. |
|
|
|
|
|
|
|
(#10)
|
|
Guelph, Canada, eh!
Offline
Posts: 1,083
Join Date: Sep 2007
Location: Guelph, Ontario, Canada
|
09.07.2009, 08:41 PM
All is fine now, I wanted to get this and post it, it's sjrcss's. Or Shane's.

|
|
|
|
|
|
|
|
(#11)
|
|
RC-Monster Titanium
Offline
Posts: 1,884
Join Date: Jul 2009
|
09.07.2009, 10:58 PM
Here's my first question for the new thread: what are the smaller two o-rings used for in the Thunder Tiger diff internals?
|
|
|
|
|
|
|
|
(#12)
|
|
Guelph, Canada, eh!
Offline
Posts: 1,083
Join Date: Sep 2007
Location: Guelph, Ontario, Canada
|
09.07.2009, 11:10 PM
You won't have to use them, they went on the original outdrives of the Thunder Tiger EB4 S3 diffs and center diff.
|
|
|
|
|
|
|
|
(#13)
|
|
RC-Monster Titanium
Offline
Posts: 1,884
Join Date: Jul 2009
|
09.07.2009, 11:56 PM
Thanks, next question: what is the purpose of the new bearing you've fitted on the cap/spur side of the diff?
|
|
|
|
|
|
|
|
(#14)
|
|
Guelph, Canada, eh!
Offline
Posts: 1,083
Join Date: Sep 2007
Location: Guelph, Ontario, Canada
|
09.08.2009, 11:35 AM
The 8X12X3.5 bearing is simply to center the TRA3985X output gear perfectly on the spur/cap. An 8X12 bushing would do the same but I couldn't find one so I went with the bearing. It will not move or turn so even an old gritty bearing will do fine.
|
|
|
|
|
|
|
|
(#15)
|
|
RC-Monster Titanium
Offline
Posts: 1,884
Join Date: Jul 2009
|
09.09.2009, 01:12 AM
Got my parts into the machine shop today. Should have them back by tomorrow or Thursday. I'll post a pic of the finished product when I have it all pieced together.
What weight oil is everyone running? Heaviest I have on hand is 10k, but I'm not sure if that is a good starting point? |
|
|
|
 |
«
Previous Thread
|
Next Thread
»
| Currently Active Users Viewing This Thread: 1 (0 members and 1 guests) | |
| Thread Tools | |
| Display Modes | Rate This Thread |


 Hybrid Mode
|
|

Powered by vBulletin® Version 3.8.11
Copyright ©2000 - 2026, vBulletin Solutions Inc.
vBulletin Skin developed by: vBStyles.com
Copyright ©2000 - 2026, vBulletin Solutions Inc.
vBulletin Skin developed by: vBStyles.com