


|

|
(#16)
|
|
RC-Monster Aluminum
Offline
Posts: 916
Join Date: Jul 2005
Location: UK
|
03.13.2006, 05:01 PM
I just saw a picture of a 22 series in the BK store and it had 9 holes,so they would be 40 degrees apart (wierd),so the diagram in the dimensions section must be wrong.
The 19 series has the regular 540 distance from centre to the bolts(25mm),it just has 8 holes instead of 4 so uses a regular 540 mount. Edit:Yes i do like it! |
|
|

|
|
|
|
|
(#19)
|
||
|
Guest
Posts: n/a
|
03.13.2006, 06:12 PM
Quote:
Quote:
|
||
|
|
|
|
|
|
|
(#20)
|
|
RC-Monster Mod
Offline
Posts: 6,741
Join Date: Jul 2005
Location: VA in the US
|
03.13.2006, 06:28 PM
Does this mean i get a discount for helping? I have a savage and a electric motor option is great. Then again the motor mount may fit others to. As long as the bolt line up.
|
|
|
|
|
|
|
|
(#21)
|
|
Guest
Posts: n/a
|
03.13.2006, 07:27 PM
What would you guys think about making it 3 pieces and ditching the heat sink portion.. Basically there would be the base, the front motor mount plate and then the rear support. It would screw together through the base.
This would reduce costs quite a bit because I could just laser cut it or waterjet it instead of taking up tons of mill time. After the cutting there would just be a few holes to drill and tap which I could do by hand, or make a tool (If the demand is there) to do multiple parts at once in the mill :) |
|
|
|
|
|
|
|
(#23)
|
|
|
Guest
Posts: n/a
|
03.13.2006, 08:16 PM
Quote:
|
|
|
|
|
|
|
|
|
(#24)
|
|
RC-Monster Aluminum
Offline
Posts: 916
Join Date: Jul 2005
Location: UK
|
03.13.2006, 09:14 PM
A pair of screw holes in the rear support ring would be fine to add a rear clamp,like on the RC Monster heatsink/clamp.
|
|
|
|
|
|
|
|
(#25)
|
|
|
Guest
Posts: n/a
|
03.14.2006, 10:42 AM
Quote:
|
|
|
|
|
|
|
|
|
(#26)
|
|
RC-Monster Mod
Offline
Posts: 2,487
Join Date: Feb 2005
|
03.14.2006, 12:01 PM
Neat idea, man. Keep it up. Can't wait to see a finished product.
This is off topic, but it has to get out: Why on earth would somebody put an odd-numbers of holes in a motor? :032: :032: This is weird. |
|
|
|
|
|
|
|
(#27)
|
|
|
Guest
Posts: n/a
|
03.14.2006, 12:34 PM
Quote:
Anyways, I have a neat, lighter, adjustble motor mount with rear clamp for the 540 size Feigao/BK motors almost done. I'll post pics in a half hour or so. |
|
|
|
|
|
|
|
|
(#28)
|
|
Guest
Posts: n/a
|
03.14.2006, 12:49 PM
Setup for the Lehner without the back clamp and without the spacer for the BK/Feigao:
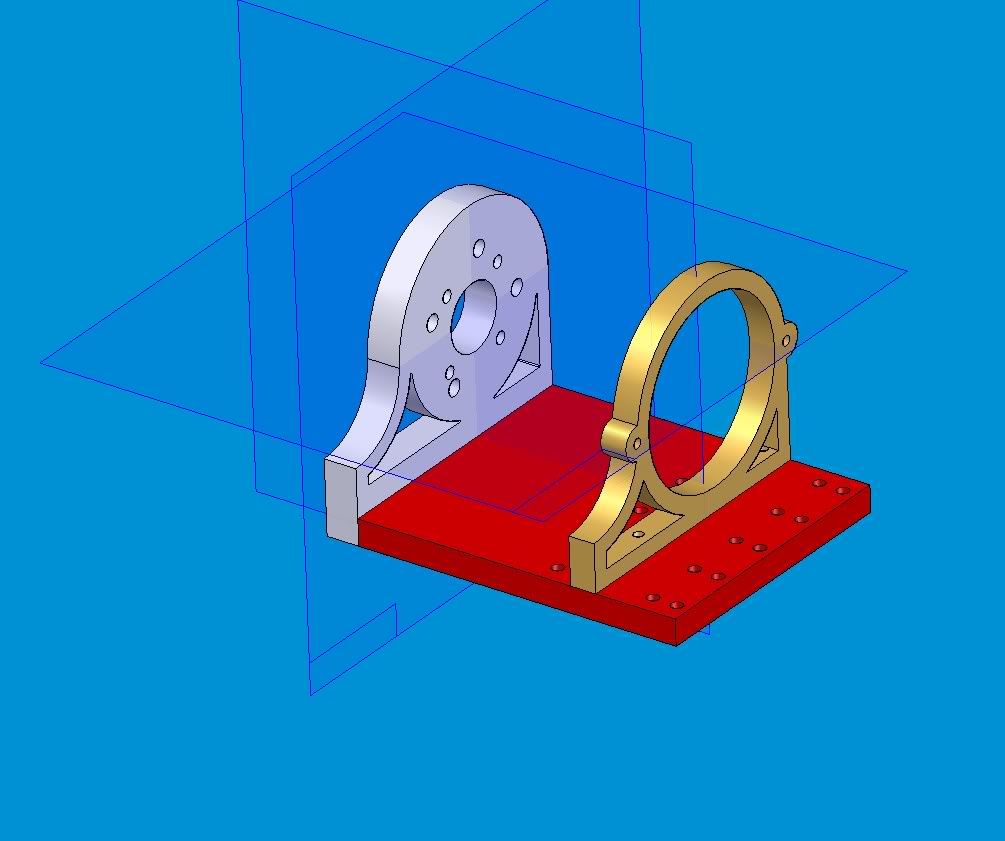 The white part is where the motor mounts. The 4 larger holes that are somewhat not even are for the LEhner motors. The other 4 are for the Feigao/BK motors. The white part secures to the Red part with 5 M3X10 Alen head screws. The Gold part secures to the Red part with 5 M3X6 Alen head screws. The Gold part can move to 4 positions for longer/shorter motors. All the material is 6.35mm thick (or 1/4"). All holes are counter sunk 3mm to keep the head of the screws from sticking out. I'll have pics of the assembled version for the BK/Feigao with the spacer and rear clamp posted in a bit.. I still have to draw up the spacer and clamp then do the assembly drawing. |
|
|
|
|
|
|
|
(#29)
|
|
RC-Monster Aluminum
Offline
Posts: 916
Join Date: Jul 2005
Location: UK
|
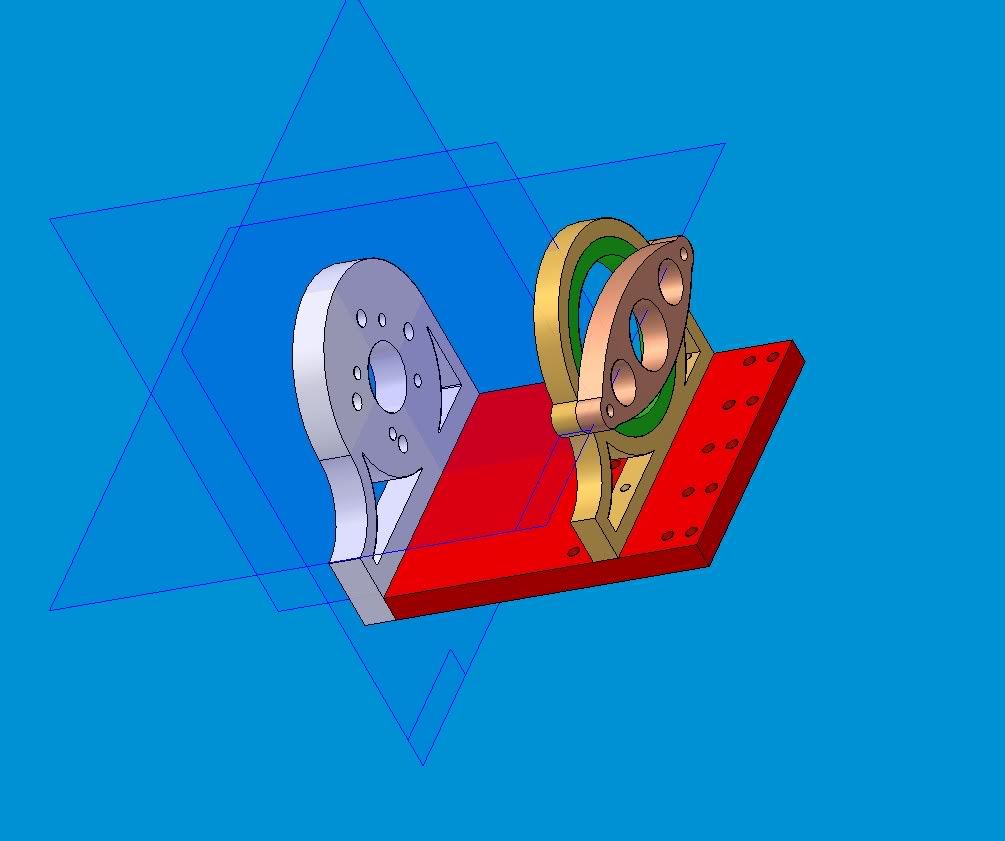
03.14.2006, 12:59 PM
Looks good,just one thing,the holes for the clamp need to be off centre (above or below) to allow for the clamp bar to clear the rear bearing.
|
|
|
|
|
|
|
|
(#30)
|
|
Guest
Posts: n/a
|
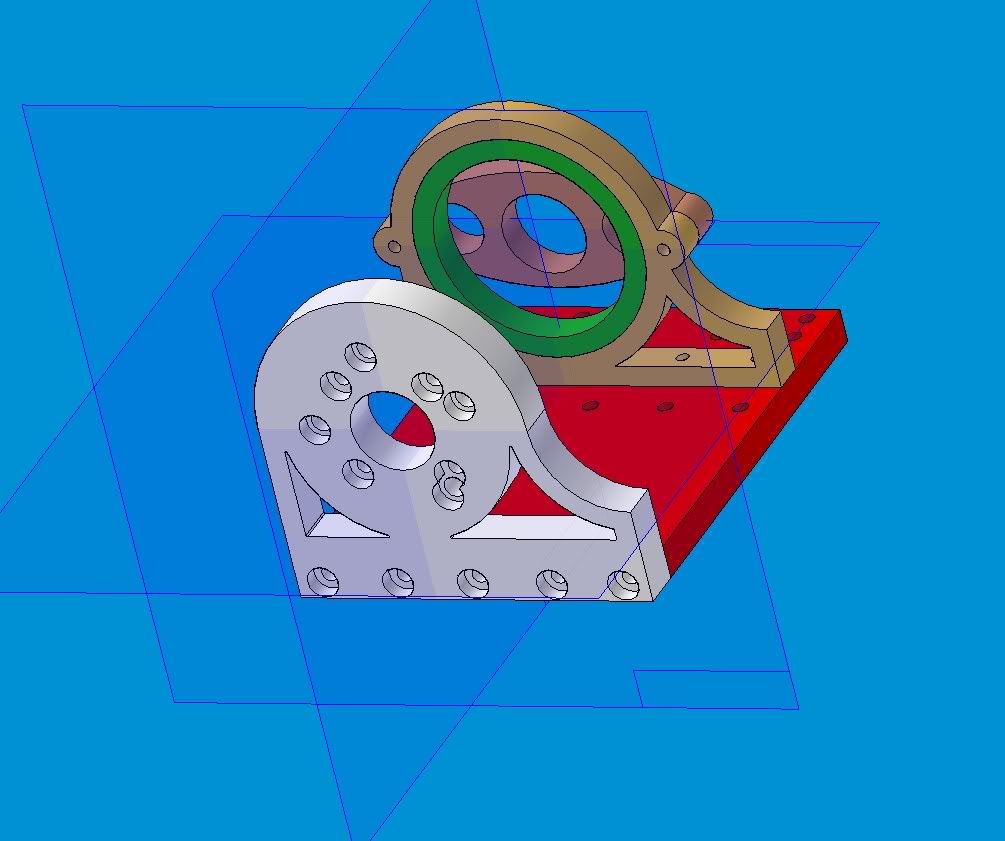
03.14.2006, 01:03 PM
Well, here is the mount assembled for a BK/Feigao motor. Again, the rear brace is move-able for different length motors. None of the screws are shown.. There is still a few details to add, like mounting screw holes on the base and a set screw for the adapter ring for the BK/Feigao motors.
|
|
|
|
 |
«
Previous Thread
|
Next Thread
»
| Currently Active Users Viewing This Thread: 1 (0 members and 1 guests) | |
| Thread Tools | |
| Display Modes | Rate This Thread |


 Linear Mode

|
|

Powered by vBulletin® Version 3.8.11
Copyright ©2000 - 2025, vBulletin Solutions Inc.
vBulletin Skin developed by: vBStyles.com
Copyright ©2000 - 2025, vBulletin Solutions Inc.
vBulletin Skin developed by: vBStyles.com