


|

|
(#166)
|
|
RC-Monster Aluminum
Offline
Posts: 768
Join Date: Jul 2009
Location: NJ
|
02.21.2011, 06:11 PM
Since I've been posting about the Pro-line extended 23mm hexes, I'll show how they look on my buggy. One of the four on the buggy must have bent slightly (or the axle itself bent) because I was unable to get it off the axle. I wasn't able to see any bend in it, but something must have happened to it at some point.
I've been rebuilding the back end, so just replaced the extended hexes with new ones. Since they extend beyond the axle, I can use a large 5mm bolt to hold the axle pin in place instead of fooling around with grub screws. It will look like this after the hex is put on: 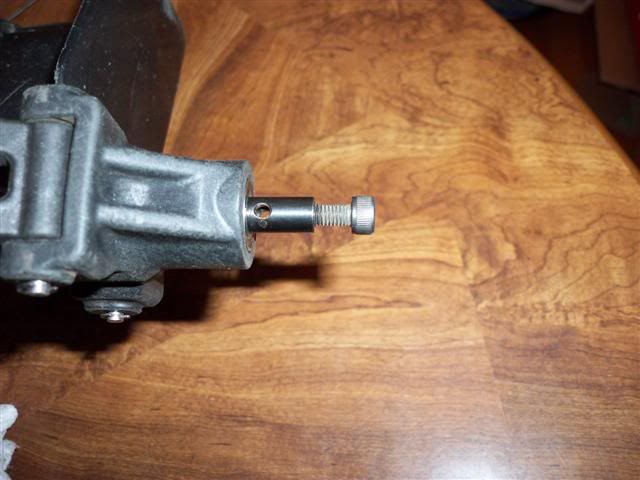 I use the hex, a 3mm pin, 2 shims, and the 5mm bolt. (These hexes also have holes for 2.5mm pins)  I put the extended hex on the axle, the pin through, and then can put the bolt in and tighten it down good: 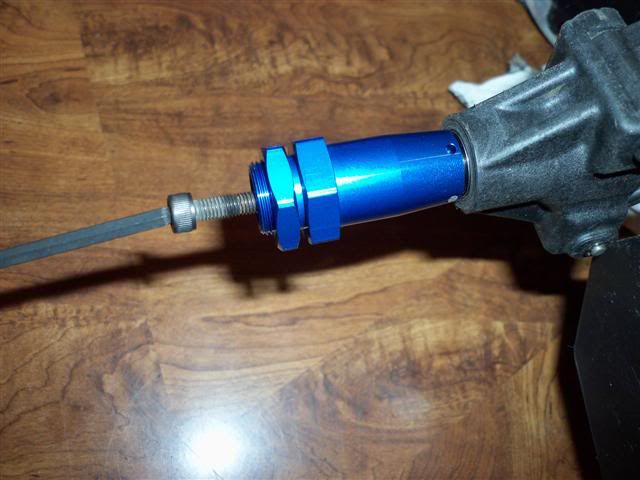 The ones up front already have aluminum tape around them: 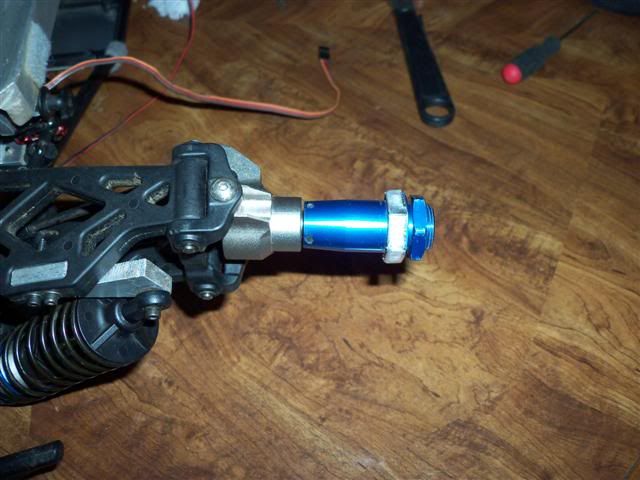 and they fit in the 24mm hex perfectly: 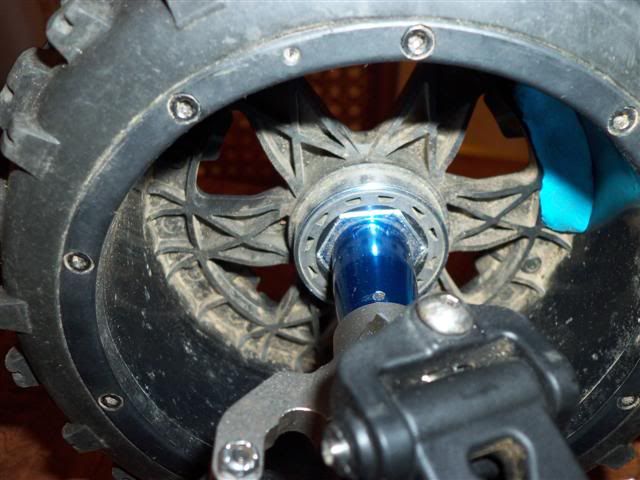 They do not stick out much, but it's enough: 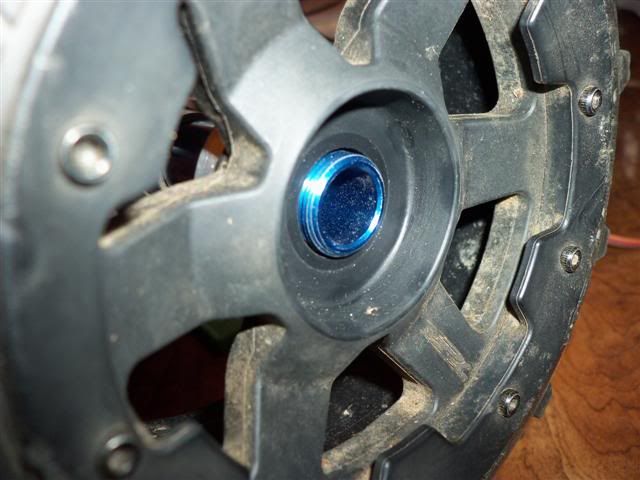 So I tighten down the nut with this: 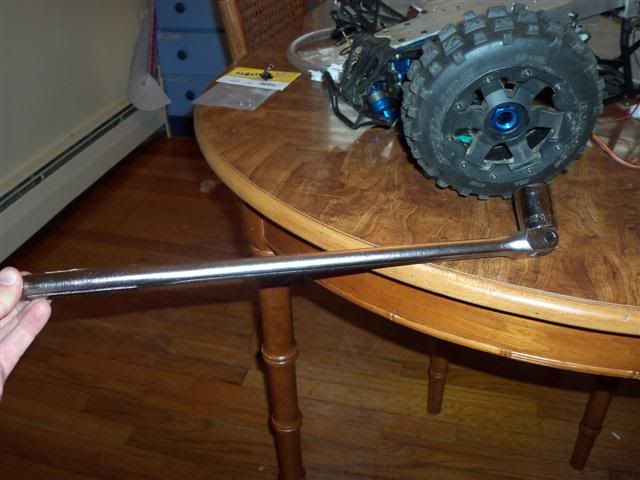 and then it looks like this: 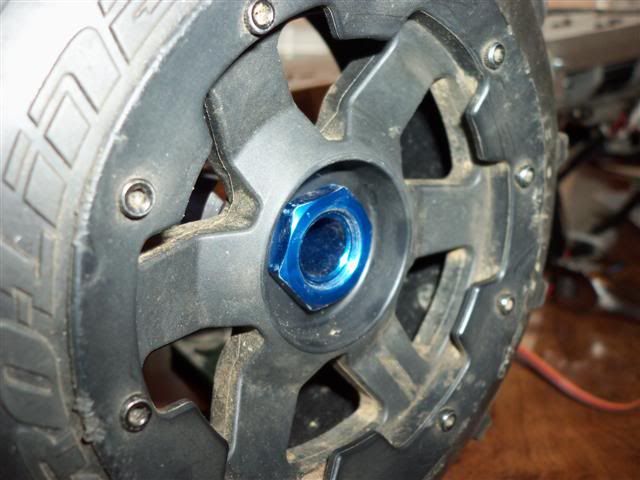 I've never had one of these nuts come off. |
|
|

|
|
|
|
|
(#167)
|
|
RC-Monster Carbon Fiber
Offline
Posts: 170
Join Date: Aug 2008
|
02.21.2011, 07:39 PM
How long are those extenders? I just scored 4 new pairs of PL Wabash wheels, dirt cheap, off ebay but they are revo offset and don't fit on my Muggy build. I'm hoping the extenders will get me to the correct offset. Thanks.
-JB |
|
|
|
|
|
|
|
(#168)
|
|
|
RC-Monster Aluminum
Offline
Posts: 768
Join Date: Jul 2009
Location: NJ
|
02.21.2011, 08:24 PM
Quote:
|
|
|
|
|

|
|
|
|
(#169)
|
|
RC-Monster Titanium
Offline
Posts: 1,007
Join Date: Apr 2010
|
02.21.2011, 09:20 PM
Nice write up... are those the stock LST Axles? no mods required? Just use the usual 3mm pin? Does the bolt come with the kit? does it securely hold the extended hex on? or just provide support ?
Thankns |
|
|
|
|
|
|
|
(#170)
|
|
|
RC-Monster Aluminum
Offline
Posts: 768
Join Date: Jul 2009
Location: NJ
|
02.21.2011, 09:56 PM
Quote:

|
|
|
|
|
|
|
|
|
(#171)
|
|
RC-Monster Titanium
Offline
Posts: 1,007
Join Date: Apr 2010
|
02.21.2011, 10:31 PM
thankls brian!
|
|
|
|
Gens Ace! |
|
|
|
(#172)
|
|
RC-Monster Aluminum
Offline
Posts: 768
Join Date: Jul 2009
Location: NJ
|
Gens Ace! -
03.05.2011, 03:44 PM
I have this big buggy back together and got my first chance today to try it out. I'm now running 2 of these Gens Ace 5s 25c 4000mAh packs and this was their first run:
http://www.hobbypartz.com/98p-25c-4000-5s1p.html So it weighs 18.9lbs. with these packs after the rebuild and I was running 10s geared for 50mph. Here is the log of the run: 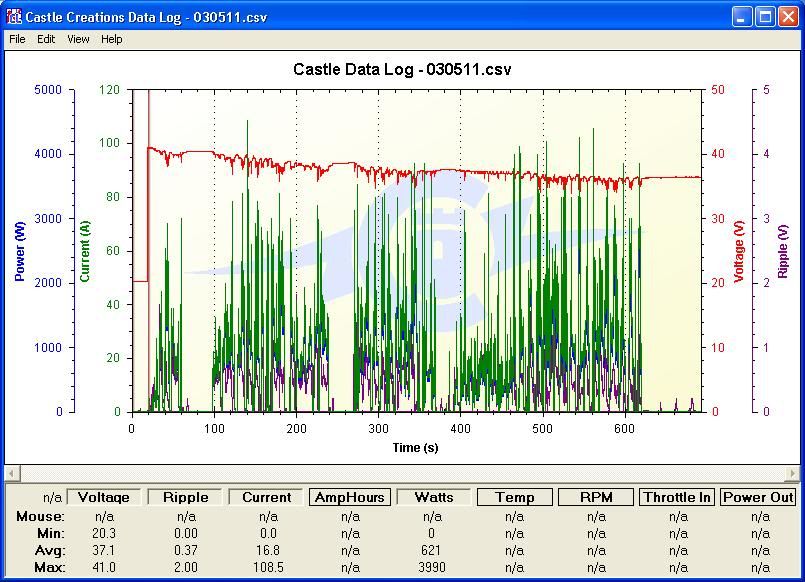 I pulled 3300mAh from the packs before tossing my pinion and losing the grub screw. But I'd say the buggy is running great and these packs are what I was hoping for. More power than when I ran 10s with my Turnigy 40c 5000mAh packs. Today I hit 3990 Watts (= 5.35hp)! The maximum ripple voltage was 2.0V, which, at around 5% of total pack voltage is a "good place to be" according to the man himself in this post: http://www.rc-monster.com/forum/show...2&postcount=11 I noticed that the buggy was handling better than when I last drove it. So I figured either it wasn't getting quite as much power as before or my shock absorber mods were helping. After looking at the logs and seeing the power I was getting, I'd say the shock mods are a big help to this. So, a good day, with good results. Edit: Here's a picture of it before I took it out and got it dirty again: 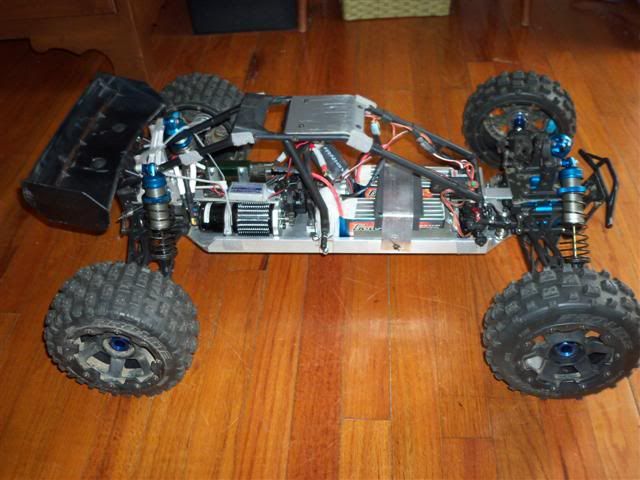
|
|
|
|
Pro-line extenders (shortened) |
|
|
|
(#173)
|
|
RC-Monster Aluminum
Offline
Posts: 768
Join Date: Jul 2009
Location: NJ
|
Pro-line extenders (shortened) -
03.06.2011, 10:23 AM
I have a bunch of these Pro-line extended 23mm hexes and they give an additional 30mm or so of width to each side:
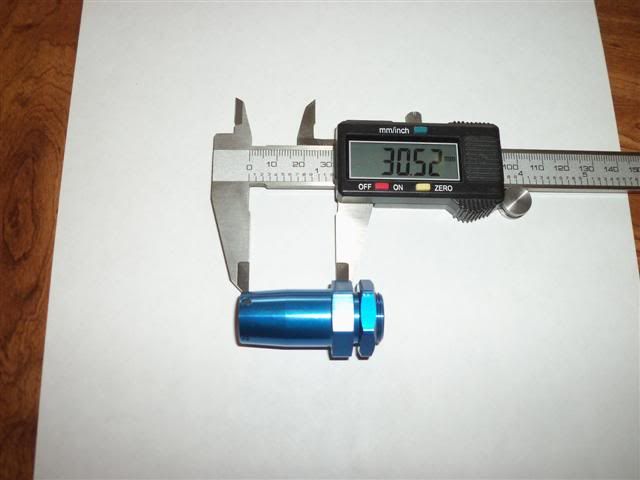 I decided to shorten some of them by half to give me more options with my current trucks and planned build. The inside diameter of the outer half of the extender is 1/2": 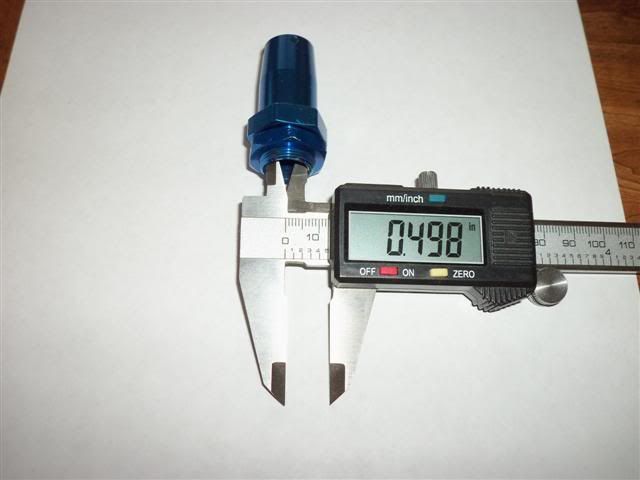 So I bought some 1/2" Aluminum rod and drilled 8mm holes in pieces of it: 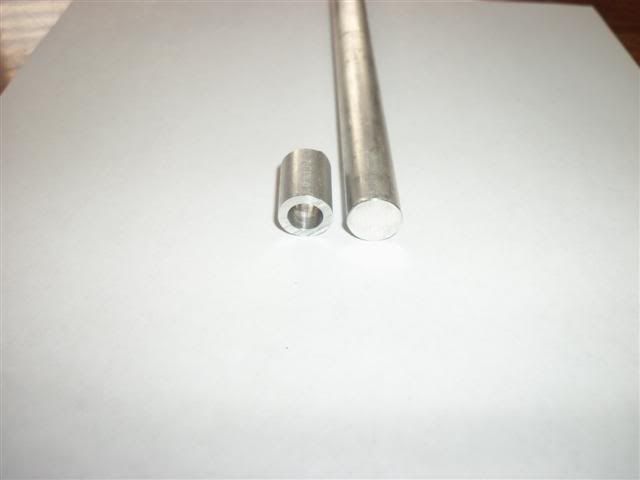 Next I cut the extender to half its normal length:  And inserted a piece of the 8mm id tube, then drilled a 1/8" through hole for the pin: 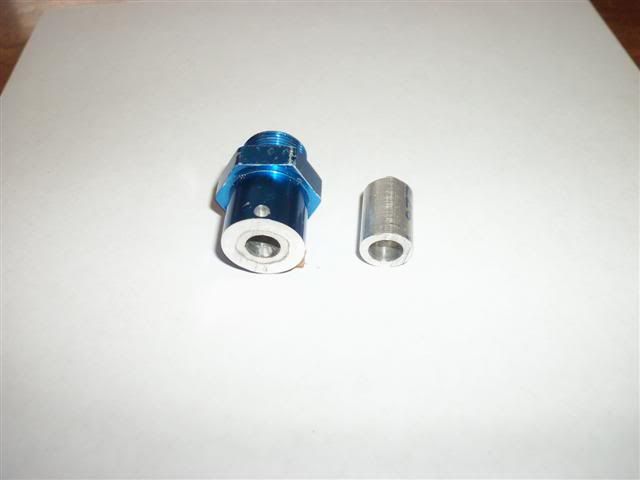 The final product extends the width approximately 16mm now: 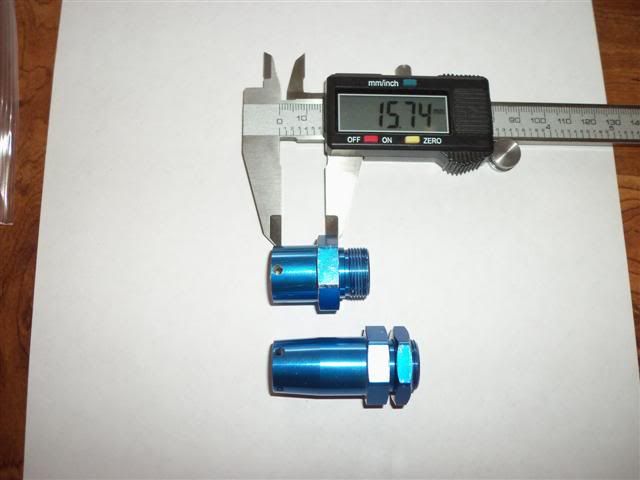 This is my prototype - I have more to make, but am pleased with how it turned out.
|
|
|
|
|
|
|
|
(#174)
|
|
RC-Monster Aluminum
Offline
Posts: 800
Join Date: Oct 2009
|
03.06.2011, 12:12 PM
Nice work. What ProLine part # are these as I haven't seen them before? I assume that its a standard 8mm axle, but what is the pin diameter, 3mm? Also how long is the threaded shank?
Finally I assume you used a drill press? What type of jig did you use to get alignment, etc. right? |
|
|
|
|
|
|
|
(#175)
|
|
|
RC-Monster Aluminum
Offline
Posts: 768
Join Date: Jul 2009
Location: NJ
|
03.06.2011, 12:25 PM
Quote:
http://cgi.ebay.com/Pro-Line-23mm-He...item230e21fdc9 Part #6034-03. The pins are 3mm. I actually use these hinge pins and cut them to length: http://www3.towerhobbies.com/cgi-bin...I=ASCC9620&P=K When I do some more, I'll take pics of how I did the drilling. |
|
|
|
|
|
|
|
|
(#176)
|
|
|
RC-Monster Aluminum
Offline
Posts: 800
Join Date: Oct 2009
|
03.06.2011, 01:05 PM
Thanks for the info. Be interesting to see how you jig it up.
Had thought about just using some 24mm Baja hubs, using a 8mm-12mm spacer, sorta like what you have here but it requires drilling a 4mm hole in the axle and at least with the RC8T, and the LST2 axles I believe too, axles there just isn't enough length to do it I think without losing strength. Drilling out the 3mm to 4mm (pin size for the 24mm hubs) I'm not sure would work either; it'd definetly mean grinding down the rear of the hex hub to get it where it'd be close to flush with the bearing and that wouldn't leave hardly any material behind the pin. Might you be willing to do a set for others once you've finished yours and are satisfied? Have the 23mm from Integy from my RC8T, but ProLines are probably better, but as you noticed they (and the ProLines) are just a bit too wide but don't really have expertise to cut em down and get them dead on. Quote:
|
|
|
|
|
|
|
|
|
(#177)
|
|
Destroyer of Tires
Offline
Posts: 626
Join Date: Feb 2009
|
03.06.2011, 05:49 PM
Thzero, with your 24mm Baja hex idea. How about using the rc8t size pin, and drill a new hole for it 90 degrees from the original holes? Or would the hole still be too close to the edge of the adapter even with he smaller pin? Brians look pretty darn close to the edge and his have held up...
Love this build btw Brian. |
|
|
|
|
|
|
|
(#178)
|
|
|
RC-Monster Aluminum
Offline
Posts: 800
Join Date: Oct 2009
|
03.06.2011, 05:54 PM
Can't use the 3mm pin, its too small for the Baja hexes. I had thought of doing the 4mm hole as you said 90 degrees from the origin holes, about 1 or 2mm away from the original hole. Same thing would work for the LST2 axles (or any other 8mm truggy/buggy style axle).
Issue really is I don't think I have the skill to drill a new hole in the axle dead-on. :) Quote:
|
|
|
|
|
|
|
|
|
(#179)
|
|
|
RC-Monster Aluminum
Offline
Posts: 768
Join Date: Jul 2009
Location: NJ
|
03.06.2011, 06:54 PM
Quote:
The way that I drilled the hole in my adapter was pretty straightforward - I used the flats of the hex and clamped it to my drill-press table - no need for a jig and it was easy to get the pin hole straight through the adapter at a right angle to where the axle would go through. My wife has the camera - so no pics for now. Edit: I'm not sure that you need that much material behind the pin - the pin is there to hold the hex in place, but the axle itself provides the mechanical support for the hex - so an impact is absorbed mainly by the axle, not the pin (in my thinking). |
|
|
|
|
|
|
|
|
(#180)
|
|
RC-Monster Aluminum
Offline
Posts: 800
Join Date: Oct 2009
|
03.06.2011, 09:08 PM
AH yes, good point about drilling a new hole in the hub. Had been approaching from the other direction.
Well that may be true, but what holds the hub onto the axle laterally? |
|
|
|
 |
«
Previous Thread
|
Next Thread
»
| Currently Active Users Viewing This Thread: 1 (0 members and 1 guests) | |
 Linear Mode

|
|

Powered by vBulletin® Version 3.8.11
Copyright ©2000 - 2026, vBulletin Solutions Inc.
vBulletin Skin developed by: vBStyles.com
Copyright ©2000 - 2026, vBulletin Solutions Inc.
vBulletin Skin developed by: vBStyles.com