


|

|
(#46)
|
|
RC-Monster Titanium
Offline
Posts: 1,007
Join Date: Apr 2010
|
11.02.2010, 04:29 AM
awesome build bud! that is one huge truck!
I love the work for the arms!!! those truggy arms look weaker than the stock arms? what do you think??? Im was going to give this a go, and you are definitely doing the right thing, modding the bulk to fit the arm... but i dont think i would want to mod an alloy bulk!!! maybe a plastic one? From you pictures, it looks like you have the lower arm on the bulk fine already? how much has to be taken off the bulk? The beetle body is HAAAUGE! something different! and should look sick when painted! Truck def needs to be wider! so im looking forward how much more the arms widen it by! gd job Thanks |
|
|

|
|
|
|
|
(#47)
|
|
RC-Monster Aluminum
Offline
Posts: 800
Join Date: Oct 2009
|
11.02.2010, 08:16 AM
Dunno, the body looks ok to me as is.
The arms should be fine, I've had no problem with my truggy and its been bashed as hard or harder than my Savages. The only really issue might be that truggy arms, since they are built for racing, are made of stiffer material so may not flex as much on an impact. |
|
|
|
|
|
|
|
(#48)
|
|
KillaHurtz
Offline
Posts: 2,958
Join Date: Apr 2006
Location: Bucks Co, PA
|
11.02.2010, 09:22 AM
They are def a very stiff plastic, and seem quite tough and thick. There is quite a bit more material around the pin, and that's where I always broke the savage arms.
So there may be a chance they will prove more fragile, but looking at them now I think the Mugen arms will prove stronger. I am trying to make it so I can undo it and put back on sav arms if needed. I know you can get very soft RPM arms that will never break, but I don't always like them as they bend so much handling gets a bit sloppy and other parts tend to bend with all the distorsion, particularly driveshafts. I looked at doing it with the plastic bulkheads as a test, but the new two peice design would make it extremely weak around the diff bearings, and I don't really want to do that. There might be some ways around it by making new braces to push the pins out a bit or something, but I'm not feeling bothered to try. I'll post a pic of where I marked off the bulkhead for modification. Its not too bad actually. The trick is where I want to keep the extra M4 hole on bottom that mounts the skidplate to the bulkhead. I don't think its critical, but I'm going to try and keep it since I will remove so much material on bottom. Can't put material back. ;) If I decided to ditch it, the bulk could just be modded with a hand file.Basically what you are doing is removing the block where the hinge pin passes thru. The arm will be entirely supported by the pin braces. This is a typical truggy setup. Doesn't do much good to have the pin passing thru material in the bulkhead at the center fo the pin. Just a place to get the pin stuck if an arm did break and bent a pin. From the pic, you are basically wiping out the area on bottom where "fastlane" is written. Otherwise If been doing a bit of finishing work to the bulkheads to remove some excess material where I can to slim it down a notch. Nothing radical, and just done by hand files. |
|
|
|
|
|
|
|
(#49)
|
|
KillaHurtz
Offline
Posts: 2,958
Join Date: Apr 2006
Location: Bucks Co, PA
|
11.02.2010, 09:32 AM
@ Jahay, I could get a plastic one to test, but looked like it would be more difficult to do, plus I'd have to test it out on my one good set, or buy a new set, and really don't feel like spending the time or $$. :)
Don't have it mounted yet, just a photo trick for a mock-up. Width should be ~10mm ea side over the XL width (ie w/ ext axles.) That's with 0 offset hubs. I wanted to get extended hubs to push it out a bit more. It wouldn't be hard to get 20+mm (.75-1.0") ea side over the XL. Maybe the body does look okay. It was just a bit shocking yesterday. Painted, trimmed and truck widened a bit and I think it will be great. |
|
|
|
|
|
|
|
(#50)
|
|
KillaHurtz
Offline
Posts: 2,958
Join Date: Apr 2006
Location: Bucks Co, PA
|
11.07.2010, 09:48 PM
So I finally got a good chance to work on the bulkheads. Got them cut down and the first set of arms mounted. Fairly easy once I got everything setup. Decided to leave the center skid plate screw hole and notch the arms around it. No arm braces yet for it. Also made a coupler from nylon to mount the upper arms as well. A little bulky, but came out stronger than I expected. Pretty happy so far.
IDK if this is a final solution, but something to get it working for now. I can make it pretty later. 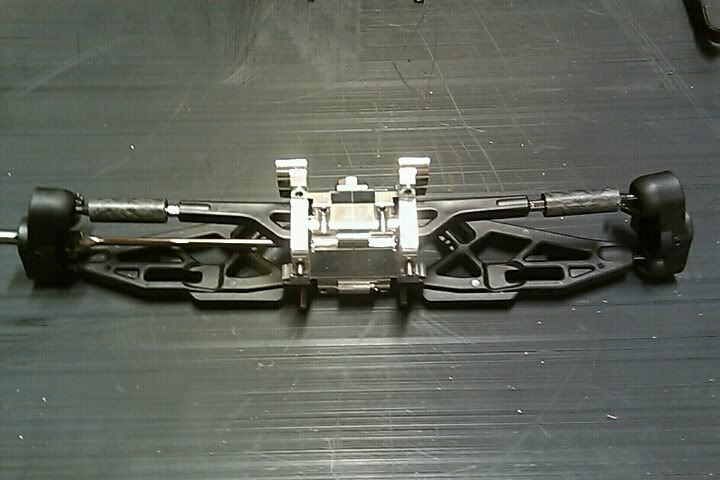  
|
|
|
|
|
|
|
|
(#51)
|
|
RC-Monster Carbon Fiber
Offline
Posts: 339
Join Date: Aug 2005
Location: Indiana
|
11.08.2010, 03:45 AM
It looks really good. Have you tried the LST2 arms? they are wide and u can use the knuckle and CVDs. from what i've heard they are bullet proof.
|
   |
|
|
|
|
|
(#52)
|
|
RC-Monster Titanium
Offline
Posts: 1,007
Join Date: Apr 2010
|
11.08.2010, 06:27 AM
I am trying to revolve what ever i do around the availablity, strength of the drive shafts...
I did hear that the LST2 shafts were strong (they are not as think as the SHD Savage shafts, but i think they are made of a better material? What i didnt like is that the LST2 kunckles and hubs have very limited steering... Is there anyway of improving this??? Also LST2 arms are bascially the same length as savage arms... Finn you did a nice job on the arms and bulks... could you take a picture of the modified area of the bulks without the arm attached so i can see how much you removed? |
|
|
|
|
|
|
|
(#53)
|
|
|
RC-Monster Carbon Fiber
Offline
Posts: 339
Join Date: Aug 2005
Location: Indiana
|
11.08.2010, 06:41 AM
Quote:
As for the length of the arms, its kinda of weird though since LST2 is much wider than Savage. |
|
|
|
|

|
|
|
|
(#54)
|
|
RC-Monster Titanium
Offline
Posts: 1,007
Join Date: Apr 2010
|
11.08.2010, 06:43 AM
I think the reason it looks much wider is because they run stupidly un necessarily PPPHHAAATTT wheels and tyres!!!
i put an LST CVD next to a SHD shaft... The SHD was maybe 1mm or so thicker.... BUT i think the stainless steel the LST CVD was made from, was stronger? Anyway... i am quite tempted by going this route with LST Arms (try something different) but i hate the turning radius. |
|
|
|
|
|
|
|
(#55)
|
|
KillaHurtz
Offline
Posts: 2,958
Join Date: Apr 2006
Location: Bucks Co, PA
|
11.08.2010, 05:05 PM
Here's a thread I started comparing arm sizes. The LSTs were not any bigger, but a shape that would be a pita to deal with and make work.
So, I do have some disappointing news to report.. When I did my original width extension measurements.. I had the carrier on upside down  The carrier is offset top to bottom, so all of the increased width I was measuring was due to this. I only figured it out after I had the whole thing together and the droop was so bad. The pillow balls were bottoming out on the carrier as it wasn't designed to move that much in that direction. Doh! So I flipped it around properly, and its actually the same exact width as the savage arms, going from outer bearing to outer bearing! So all this work and I've just given myself different arms and a better potential steering setup, as well as proper 8mm axles. Oh wells. I always assumed this was a possibility, so I never did anything to the bulkheads that would preclude me from using the sav arms if I decided to go back. I will go forward with it for now, and still get some hub extenders with proper 17mm wheel nuts. My width increase over the XL width is now looking like 5mm  . Least they are good ofna adapters, and not crappy integy adapters that strip easy. . Least they are good ofna adapters, and not crappy integy adapters that strip easy.
|
|
|
|
|
|
|
|
(#56)
|
|
KillaHurtz
Offline
Posts: 2,958
Join Date: Apr 2006
Location: Bucks Co, PA
|
11.08.2010, 05:15 PM
The other issue I ran into was the arms for the rear. Specifically, being able to position the rear arm to get 0 caster and not block the shock mount. I was planning on just flipping the upper arm around in back, and the caster would be close to 0. However, that then mounts the arm right above the shock mount. There is no chock mount for the other side, and going out from the upper arm makes the upper shock mount way off the shock tower.
Ideal solution would be a curved upper arm, like a LST. Otherwise I could try to come up with some compromise with the tower, else ditch the rear steer and just mount a mbx6t rear arm with fixed hubs and go from there. Had been mulling this anyway, as I have enough sav parts to make two Savs now, and maybe I'll make one a 4ws monster truck style with my current arms and bulkheads, the other a 2ws speed demon beetle. Looking at some of the TCS and other sav 5T conversions, the steering isn't that bad, and the truck would still shorter, with a CD, and the mugen steering setup. Basically. I don't think a truck with a 1520 on 8s would handle 4ws well anyway. |
|
|
|
|
|
|
|
(#57)
|
|
KillaHurtz
Offline
Posts: 2,958
Join Date: Apr 2006
Location: Bucks Co, PA
|
11.14.2010, 04:56 PM
So I finally got the final shape of the tvps I was happy with and went ahead and cut the tvps. Everything turned out pretty good, and the fit was good.
Mounted my template on two plates of alu. Cut out around the template markings, then cut the bulkhead screw holes w/ the press. The actual cutting went pretty fast on the band saw. 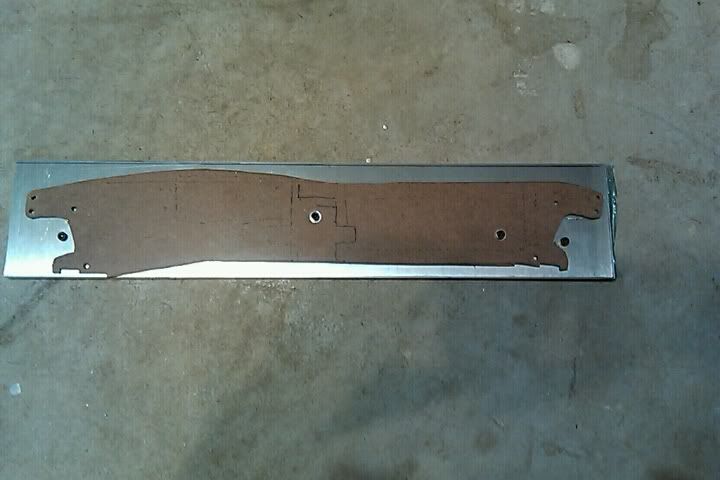   Also ordered some more parts as the monthly rc budget turns over. Decided I was going to just install a fixed rear end for now. Got mugen rear arms and hubs coming, as well as all the cvds. I'm thinking the steering is going to be good enough for for 2ws. Its going to be a pita to figure out the 4ws with the top arms to get the caster right, as well as room for shocks. Plus there was no way to get the rear steering inside the tvps, as well as have room for batts and electronics. The rear arms are the same size as the fronts, so I can easily swap them later as I get it worked out if I want to. The other plus is I can have more power and speed. 4ws gets a bit unstable with higher speeds as even a strong servo in the rear has trouble holding the rear str rack solid @ neutral at high speeds. 40mph or so is about the max with the old setup before it got a bit wily. |
|
|
|
|
|
|
|
(#58)
|
|
KillaHurtz
Offline
Posts: 2,958
Join Date: Apr 2006
Location: Bucks Co, PA
|
11.15.2010, 12:20 AM
Couple more pix. Got the bulkheads attached as well as the str servo. Its purple, but will get stripped later. Just test fitting. Looks like the str is off a bit and will need different ball end mounts for proper clearance and to avoid bumpsteer
 If you notice on the left, I fit the Mugen captured hinge pins on the lower arm. Fits like it was meant to be there. Needed a little filing around the stock arm brace to clear the arm, but I will just make my own billet arm brace later once the shape is confirmed. Want to figure a way to capture the upper arm pins as well. Have an idea for later.. 
|
|
|
|
|
|
|
|
(#59)
|
|
RC-Monster Titanium
Offline
Posts: 1,007
Join Date: Apr 2010
|
11.15.2010, 09:24 AM
That is huge!!!!
I can see now how much you had to file of the bulks to get the arms to FIT!!! quite a bit!!! but should be fine anyway... keep me posted! :) |
|
|
|
|
|
|
|
(#60)
|
|
|
KillaHurtz
Offline
Posts: 2,958
Join Date: Apr 2006
Location: Bucks Co, PA
|
11.15.2010, 11:09 AM
Quote:
Also sat and played with the front str rack and servo placement a bit doing some brainstorming. Had an idea where I could move the motor up farther, move the servo from where its shown, and have enough room in back where I might just have enough room for a rear str setup. I think I'll go ahead with the fixed rear for now, but leave room for a rear str setup I can swap in later. The front and rear arms are interchangeable, so just an arm and hub swap and a couple other bits would be needed to change the rear over for 4ws. I might be able to work it out so its a quick swap. We'll see. |
|
|
|
|
 |
«
Previous Thread
|
Next Thread
»
| Currently Active Users Viewing This Thread: 1 (0 members and 1 guests) | |
 Linear Mode

|
|

Powered by vBulletin® Version 3.8.11
Copyright ©2000 - 2026, vBulletin Solutions Inc.
vBulletin Skin developed by: vBStyles.com
Copyright ©2000 - 2026, vBulletin Solutions Inc.
vBulletin Skin developed by: vBStyles.com