


|

|
(#46)
|
|
Soldermaster Extraordinaire
Offline
Posts: 4,529
Join Date: Apr 2007
Location: Plymouth, MA, USA
|
09.24.2007, 05:59 PM
Do you think you can open up the charger and solder in some larger caps? That might help a bit with the output filtering.
Yeah, my RS PSU was/is heavy! I think the X-former weighed about 10 pounds by itself. The whole unit is only like 12 pounds. Switching supplies are definitely the way to go. |
|
|

|
|
|
|
|
(#47)
|
|
RC-Monster Admin
Offline
Posts: 14,609
Join Date: Nov 2005
Location: Des Moines, IA
|
09.24.2007, 06:26 PM
You can certainly do that. If I was going to go that far, I'd solder several 2200-4700uF caps in parallel and then add a 0.01uF cap at the power input leads in the charger itself (helps to have the high F filters closer to the circuits) to help with any high frequency filtering.
|
  |
|
|
|
|
|
(#48)
|
|
Never Fast Enough
Offline
Posts: 914
Join Date: Jul 2005
Location: UT
|
09.29.2007, 12:16 PM
Howdy all,
I'm trying to find a good power supply for this mod. I just ordered a Hyperion 1210i with 2 LBA10 balancers. The manual says I need a power supply between 8A and 25A. Do you think this psu in the pic below would be a good candidate? Should I be looking at the 16A under 12v1 or the 18A under 12v2? For now I will be charging two 3s 5K packs or two 2s 6K packs at the same time while linked with the two balancers. I would like headroom though for when I get higher capacity and voltage packs in the future. Thanks! Brian 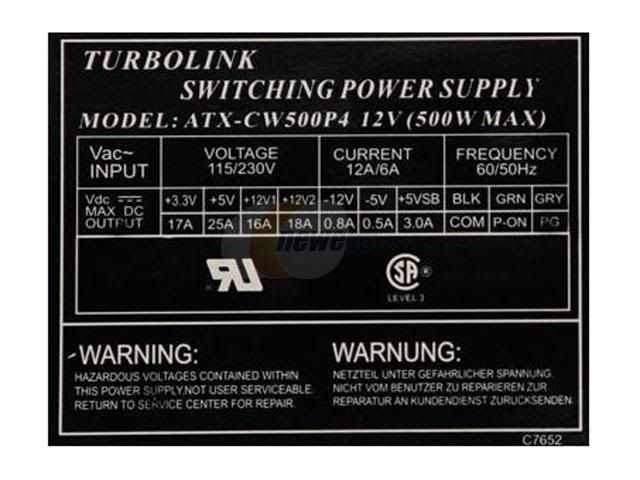
|
|
|
|
|
|
|
|
(#49)
|
|
RC-Monster Admin
Offline
Posts: 14,609
Join Date: Nov 2005
Location: Des Moines, IA
|
09.29.2007, 06:14 PM
Well, by the specs, it can supply 18A on one of the 12v rails. According to this, to utilize the full potential of the 1210i, you'd need at least around 25A. If you don't charge the max cell count at the max current, you might be ok.
Note how that PS has dual 12v rails. Most of the time, you'd be better off finding a PS with only one 12v rail since the current will be greater. Also, the cheaper PS units tend to drop their voltage when drawing the rated current to the point where the charger might not like it. It's not uncommon for the 12v output to drop below 11v under high currents. This one would suit you better IMO. I know it's getting a little pricey, but high currents aren't cheap. Note how it is good for up to 34A. That means it will most likely maintain a more solid voltage at "only" 25A. Depending on the unit, there may be an internal potentiometer to tweak the 12v line to something a little higher, say 12.5-13v. Higher voltage will make the charger pull a little less current. |
|
|
|
|
|
|
|
(#51)
|
|
RC-Monster Admin
Offline
Posts: 14,609
Join Date: Nov 2005
Location: Des Moines, IA
|
09.30.2007, 02:52 AM
Yeah, that should work. 30A is a litle more than you need, which is good. That means the 12v line shouldn't dip too much. The voltage might be more stable if you load the 5v with a couple resistors, but there's no way of knowing until you get it and run it.
|
|
|
|
|
|
|
|
(#52)
|
|
Guest
Posts: n/a
|
06.26.2008, 04:49 AM
alright i know this is old but i need to ask will. will my 300w ATX power supply be enough?? it puts out 10 amps at 12 volts and at 5 volts 24 amps. i want to get this hyperion charger ; http://www.maxamps.com/EOS0610i.htm would it be good or would i be pushing it?? the most biggest packs i will use are 8000mah and maybe 10000mah if i parrallel up my 5s1p batts taht i ordered.
|
|
|
|
|
|
|
|
(#53)
|
|
RC-Monster Carbon FIBRE NOT FIBER!
Offline
Posts: 701
Join Date: Apr 2008
Location: Brisbane, Australia
|
06.26.2008, 05:28 AM
simple sum. 5s = 5x 4.2v x 10A charge = 210W of power going INTO the battery... the charger isnt 100 percent efficient and would need 20%+ to be safe = around 250W
now, your supply can supply at 100% *assuming the stats are correct...* atound 10A at 12v = 120W... you need something more than 2 times this to run these high voltages!! ok, so how many A could you charge at? well, 120W divided by (4.2x1.2(to get 120%, safety margin))5 = 120W/25v = 4.8A, and that is using the supply to its greatest, and wht voltage would only be like 10.5 or less, so you would most likely only be able to charge @ 3.5A Monster Max Still Working... JR SX3 Neu 1512 2D/S 12t pinion 4800 zippy-r XRAY xt8 MMM Neu 1512 3D/F 11t pinion 6s 5000 Flightmax/ 4s 4000 Turningy |
|
|
|
|
|
|
|
(#54)
|
|
Guest
Posts: n/a
|
06.26.2008, 06:47 PM
hmm wow this supply i guess isnt powerful enough for it then. i found this one in my room so that means im looking for 600w power supply? i think i might have another one with more wattage. even if i have to go out and buy one its cheaper than buying and rc car one.
also i know this might sound stupid but what if i combine the 12 volt and 3 volt wires to make 15 volt??? or that isnt possible? thanks again |
|
|
|
|
|
|
|
(#55)
|
|
RC-Monster Admin
Offline
Posts: 14,609
Join Date: Nov 2005
Location: Des Moines, IA
|
06.26.2008, 07:01 PM
No, that's not possible. What you would get is a dead 12v line and/or a blown fuse. The 12v would try to "charge" the 3.3v line and the resulting current flow would be huge until the PS shut down. You are thinking of wiring in series, but you can't do that either as both rails share a common ground.
|
|
|
|
|
|
|
|
(#56)
|
|
Guest
Posts: n/a
|
06.26.2008, 07:18 PM
hmm i figured that would be the answer just couldnt help myself but ask. so iether i use this to slowly charge my cells or use it on low capacity batts?? then i guess im going to get me a bigger supply then. thanks alot. and when i make the connections do i hook up +12 and then -12 or +12 and GND ??? that is what is confusing.
|
|
|
|
|
|
|
|
(#57)
|
|
RC-Monster Carbon Fiber
Offline
Posts: 114
Join Date: Jun 2008
|
06.26.2008, 09:55 PM
should i plug my charger into the -12v for black and +12v for red?
|
|
|
|
|
|
|
|
(#58)
|
|
RC-Monster Admin
Offline
Posts: 14,609
Join Date: Nov 2005
Location: Des Moines, IA
|
06.27.2008, 09:46 AM
BL_Maxx:
No. If you hook your charger across the +12v and -12v leads, you'll have 24v and at low current (the -12v rail is rated for low current). Use the yellows (+12v) and equal number of black wires (ground). All the rest of the wires aren't being used. The only exception is the green "power-on" wire, and maybe a red & black and/or orange & black pairs in case one or both need to be loaded with resistors. |
|
|
|
|
|
|
|
(#59)
|
|
RC-Monster Carbon Fiber
Offline
Posts: 114
Join Date: Jun 2008
|
06.27.2008, 12:22 PM
is there any way i can raise the voltage because i need 5 more amps(15A@12v)
|
|
|
|
|
|
|
|
(#60)
|
|
RC-Monster Admin
Offline
Posts: 14,609
Join Date: Nov 2005
Location: Des Moines, IA
|
06.27.2008, 12:33 PM
Depends on your PS.
Sometimes, adding a 1A-2A load on the 3.3v line (orange wire), or the 5v line (red wire) can make the feedback regulator work better and bring up the 12v line more. Sometimes, the PS has a small trim potentiometer than you can tweak the output a bit. Sometimes, you can "trick" the rail with the feedback line into thinking it is lower than it really is, and the result is that it will boost it accordingly. This requires that a seperate feedback wire be present and is usually the same color as the rail it's monitoring, and connected at the connector (probably to negate v drop due to wire losses). But, determining how to use this wire is too complex for this thread IMO. Here is a hint though: use the feedback wire and a voltage divider of the right values. That's all I'm gonna say on that. |
|
|
|
 |
«
Previous Thread
|
Next Thread
»
| Currently Active Users Viewing This Thread: 1 (0 members and 1 guests) | |
 Linear Mode

|
|

Powered by vBulletin® Version 3.8.11
Copyright ©2000 - 2026, vBulletin Solutions Inc.
vBulletin Skin developed by: vBStyles.com
Copyright ©2000 - 2026, vBulletin Solutions Inc.
vBulletin Skin developed by: vBStyles.com