


|
|

|

|
(#1)
|
|
RC-Monster Titanium
Offline
Posts: 1,419
Join Date: Dec 2008
Location: Louisville, KY
|
10.24.2012, 01:19 PM
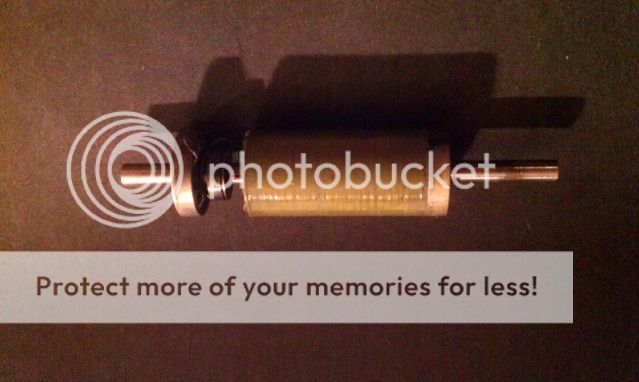
Hey Neil and thanks yeah I should take a picture. It's not the can endcap for the stator its those metal pieces at each end if the rotor. Rotor caps. It will come off. Here is what I am thinking. They are just there to add rotor balancing paste to. This end happily does not have any of that paste.
|
|
|

|
|
|
|
|
(#2)
|
|
working on a brushless for my wheelchair.....
Offline
Posts: 4,890
Join Date: Mar 2007
Location: minnesnowta
|
10.25.2012, 06:06 AM
Not sure I understand the diff question. Pics? Sounds like you need a BFH. (Big Fricken Hammer)
It's "Dr. _paralyzed_" actually. Not like with a PhD, but Doctor like in Dr. Pepper. |
|
|
|
|
|
|
|
(#3)
|
|
RC-Monster Titanium
Offline
Posts: 1,419
Join Date: Dec 2008
Location: Louisville, KY
|
10.29.2012, 09:57 PM
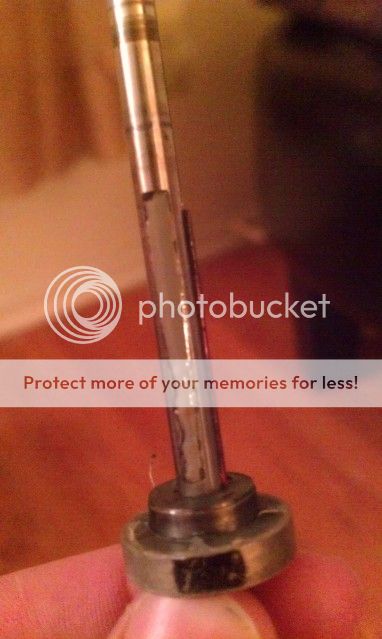
 This is perhaps worse than I thought. However the magets so the rotor does seem to be keyed. I think I can tell that now. So hopefully it won't slip but may play back and forth. But should not the brass tubes keep that in check. The BFH worked on the diff. It's good now what about this rotor? Zack. |
|
|
|
|
|
|
|
(#4)
|
|
Old Skool
Offline
Posts: 7,494
Join Date: Feb 2007
Location: Devon, England
|
10.30.2012, 09:09 AM
I'd suggest some green locktite to fix that back in place permanently. The little brass tubes / shims should stop the rotor moving back & forth, though even then they will still move slightly, maybe 1-2mm ( most people report the same thing when enquiring about it from what I've seen ).
|
|
|
|
|
|
|
|
(#5)
|
|
RC-Monster Titanium
Offline
Posts: 1,419
Join Date: Dec 2008
Location: Louisville, KY
|
10.30.2012, 05:10 PM
Im pretty worried about this still even with green locktight. I did have an extra rotor(the orginal sale price of $25!!) But I gave it to my cousin. I may be getting that back soon!
I think I know what caused this. One day I had to use a lot of pressure to get a pinion off. I think it used to much. The pinion actually did come off but I think it weakened the grip the rotor had on the shaft so that this last time I worked the pinion off it broke the grip completely with little effort. All that to say this was probably the pinion in combination with me in regard to the fault and not Castle. Also i am not sure in my case that the brass tubes or shims will stop the shaft because the whole shaft is 5mm and could come out through a bearing hole without taking the motor apart!! I am working on a lot right now and will have an update soon!! -Zack ps thanks neil! |
|
|
|
|
|
|
|
(#6)
|
|
working on a brushless for my wheelchair.....
Offline
Posts: 4,890
Join Date: Mar 2007
Location: minnesnowta
|
10.30.2012, 08:57 PM
Green loctite will do the trick, I guarantee it. Just move quickly, as it sets up fast, have everything ready.
Loctite auto corrects to lactate. Isn't that fun? 
It's "Dr. _paralyzed_" actually. Not like with a PhD, but Doctor like in Dr. Pepper. |
|
|
|
|
|
|
|
(#7)
|
|
RC-Monster Titanium
Offline
Posts: 1,419
Join Date: Dec 2008
Location: Louisville, KY
|
10.31.2012, 09:43 PM
|
|
|
|
|
|
|
|
(#8)
|
|
RC-Monster Titanium
Offline
Posts: 1,419
Join Date: Dec 2008
Location: Louisville, KY
|
11.01.2012, 10:43 AM
So the copper strip is keyed the old green glue is too alittle. Should I clean this? What should I do. I got the green locktite
|
|
|
|
|
|
|
|
(#9)
|
|
RC-Monster Titanium
Offline
Posts: 1,419
Join Date: Dec 2008
Location: Louisville, KY
|
11.01.2012, 05:09 PM
I think I just nailed it!! I was so anxious to do it right! I ended up cleaning everything off the shaft! Including the copper strip. I mounted it back though of course and with that same green lock! I had to clean out that slot that the copper strip inserted into first. I did this with the point of a razor blade I then laid the razor blade flat to scrape out the old green glue in the two big slots. I covered those locations in green lock already have my pinion stop ready I grabbed the rotor and very quickly slid into until it stopped necessarily at my pinion stop. I had to make sure the strip went into the grove on the inside of the rotor aswell! done! I will test it tomorrow!
|
|
|
|
|
|
|
|
(#10)
|
|
RC-Monster Titanium
Offline
Posts: 1,419
Join Date: Dec 2008
Location: Louisville, KY
|
11.02.2012, 08:29 PM
All is as it should be! Tested it a couple of hours ago! Thanks for the help
-zack |
|
|
|
|
|
|
|
(#11)
|
|
RC-Monster Carbon Fiber
Offline
Posts: 132
Join Date: Jan 2008
Location: Quebec Canada
|
11.03.2012, 07:30 AM
So zack, are you going to run a 1717.
Nice job with your motor. Fred |
|
|
|
|
|
|
|
(#12)
|
|
RC-Monster Titanium
Offline
Posts: 1,419
Join Date: Dec 2008
Location: Louisville, KY
|
11.06.2012, 10:59 PM
Thanks Fred! I will not be running a 1717 at the time. Maybe sometime.
|
|
|
|
|
|
|
|
(#13)
|
|
RC-Monster Titanium
Offline
Posts: 1,419
Join Date: Dec 2008
Location: Louisville, KY
|
09.14.2016, 10:21 PM
I am gearing up to finish. The next update is going to be major. I am heading to the machine shop tomorrow. :D
As a teaser here are the truck's newest shoes. Billet ALUMINUM 40 Series 23mm hub wheels, 40 Series Big Joes, and 40 Series Bowties. I found solid 23mm hexes that mount like regular truggy 17mm hexes. They mount unlike those wretched Proline 23mm hexes. I also have some VTR Calibers that I need to clean up. They are truggy tires. They are what I use most. I don't think that they weigh half of what these Big Joes weigh.          
|
|
|
|
|
|
|
|
(#14)
|
|
RC-Monster Titanium
Offline
Posts: 1,419
Join Date: Dec 2008
Location: Louisville, KY
|
09.14.2016, 10:22 PM
   
|
|
|
|
|
|
|
|
(#15)
|
|
Supermaxx
Offline
Posts: 2,031
Join Date: Oct 2007
Location: Earth
|
09.17.2016, 01:43 PM
Nicely done Zack. Damn, it's been awhile since I posted. My 9 year old daughter is getting me back into RC so I'm building her a kyosho ST RR Evo electric conversion. Just bought some battery straps, tray and kyosho motor mount a couple of weeks ago.
Predator with OS .21TM Supermaxx with Mach .26 Revo with OS .18TZ Kyosho ST-RR Conversion Ofna CR with Tekin ESC/Motor (2) |
|
|
|
 |
«
Previous Thread
|
Next Thread
»
| Currently Active Users Viewing This Thread: 1 (0 members and 1 guests) | |

 Hybrid Mode
|
|

Powered by vBulletin® Version 3.8.11
Copyright ©2000 - 2026, vBulletin Solutions Inc.
vBulletin Skin developed by: vBStyles.com
Copyright ©2000 - 2026, vBulletin Solutions Inc.
vBulletin Skin developed by: vBStyles.com