


|

|
(#736)
|
|
RC-Monster Carbon Fiber
Offline
Posts: 130
Join Date: Feb 2010
Location: Hilo, Hawaii
|
02.16.2011, 06:42 PM
does it happen at all speeds? does it happen while under load (running)? my Monster combo was kind of notchy at low RPM, particularly under minor load (CVA angle friction). If everything spins smootly when the motor is disconnected, then I wouldn't worry about it. If you're worried about it, turn down the dual rate to 85%. One of my LST2 CVA's did come slightly notchy, never figured out what it is but it works fine. try swapping the front and rear CVA's, it may just be those particular ones.
|
|
|

|
|
|
|
|
(#737)
|
|
Guest
Posts: n/a
|
02.16.2011, 06:44 PM
hmm, played around with it some more and when I try to rotate the wheels while holding them steered full left or right with a little pressure I can feel it get hard to turn every half rotation so It must just be too much of an angle for the cvd's.....I am a little suprised that my revo's steering angle is more than the cvd's can handle but I guess I'll just dial back my end points a few degrees untill the binding goes away, although I hate to give up any turning radius:(
|
|
|
|
|
|
|
|
(#738)
|
|
RC-Monster Carbon Fiber
Offline
Posts: 118
Join Date: Feb 2011
Location: Norway
|
02.16.2011, 06:46 PM
Mine did bind alittle as well, being to deep into the cups..
1mm out on the pivots, and i was all good.. |
|
|
|
|
|
|
|
(#739)
|
|
RC-Monster Carbon Fiber
Offline
Posts: 130
Join Date: Feb 2010
Location: Hilo, Hawaii
|
02.16.2011, 06:48 PM
you won't notice the less steering angle unless you are puttering around at 5mph. there are modifications that drifters (like me) do, is shaving the cup of the CVA stub axle so it can handle higher angle without hitting the CVA bone, but I don't think it will last very long in a heavyweight high torque and relatively high grip monster truck.
run the truck a couple of times and recheck the CVA's, the binding may go away as it breaks in. |
|
|
|
|
|
|
|
(#740)
|
|
RC-Monster Carbon Fiber
Offline
Posts: 163
Join Date: Mar 2010
|
02.16.2011, 06:51 PM
Looking good!.
How did you shim your diffs? I spent one and a half hour to find the sweet spot of shimming my lst diffs, I came up with this for my diffs, yours might be different: I removed all the shims that was installed in the diffs, inside and outside the bearings maybe there was one on the pinion too, I don´t remember. If I shimmed the pinion and not the ringgear there was some "unsmoothness" in the diff, a slight resistens, didn´t feel good. I tried alot of different shim setups, from 0.1mm to 0.5mm. I removed all the shims on the pinion and shimmed the ringgear insted, when I did this I could shim the diff really really tight and it still turned butter smooth! I have absolutley no play in the diffs, its not possible to move the pinion in and out in the diff case at all and you can feel each tooth on the gears while turning the diffs by hand, but they are very very smooth, the difference from the stock ones isn´t even comparable. I have now used this setup for about 20hours with my slipper completly locked ( with screws not just tightned the nut ) I am not gentle on the truck and didn´t get the stock diffs last half the time I have been running those. So I suggest that you try to shim the ringgear only, or maybe you have already found a descent shim setup? Have you checked if the truck still binds if you lower the rideheight? I wanted my lst shafts to go as far in as possible in the drivecups, so when I used Lt rockers with Pushrods setup for p2 rockers in the innermost hole in the a-arm it did bind alot, I just screwed out my pillowballs half a turn and problem solved. I hope you get things sorted out. Good luck! |
|
|
|
|
|
|
|
(#741)
|
|
RC-Monster Carbon Fiber
Offline
Posts: 163
Join Date: Mar 2010
|
02.16.2011, 06:58 PM
I really think it´s because of the cvd´s going to deep into the cups, it will wear in after a few hours, mine was exactly like that in the beginning too, I can take a picture and show the "wear" on mine that made the unsmoothness go away.
The savage has these spots "weared" from stock to make sure that everything goes smooth, look how it´s thinner in the ends: 
|
|
|
|
|
|
|
|
(#742)
|
|
Guest
Posts: n/a
|
02.16.2011, 07:01 PM
It seems mine are binding at the cvd end, not the cup/dogbone end. My dogbones are sitting just about dead center in the cups when the a-arms are level to the ground. I have my pillowballs screwed in as far as possible without the carrier "lips" hitting the a-arms when articulated but I can make a slightly wider PVC spacer to go behind the inner carrier bearing to move the cvd's towards the diffs another 1/8 inch if I need too.
Manne, I left the shims the way they were on my diffs, one was fairly smooth and the other is a little notchy but not so bad I'm worried about it. I think a few hours of running will wear it in. I may be going to heavier diff fluid at some point so I'll play around with the shims a little then....I only saw one shim on the non ring gear side on my diffs though, I'm not sure if it had any others but I didn't look real close. |
|
|
|
|
|
|
|
(#743)
|
|
Guelph, Canada, eh!
Offline
Posts: 1,083
Join Date: Sep 2007
Location: Guelph, Ontario, Canada
|
02.17.2011, 10:05 AM
I have some binding from the LST CVDs on full steering also. I blame it on the extreme Slayden Steering Mod. The binding gets less after running a few times as the CVD parts wear in. I can see on my CVDs where the binding occurs, maybe a little Dremelling on the parts would help but I didn't bother with it.
|
|
|
|
|
|
|
|
(#744)
|
|
|
Guest
Posts: n/a
|
02.17.2011, 04:25 PM
Quote:
I ran it for a half hour today and everything seems to be working good except for my inner carrier bearings. The aluminum duct tape I used to increase the OD of the bearing is working it's way off the bearings because it's just not fitting in the seat tight enough.... So I have to figure out some way to make those 21mm OD bearings fit tightly in the carriers 22mm seat. Anyone have any ideas? I really want to continue using my rdracing carriers if at all possible, mainly because the xxl cvd's sit perfect in the stock lst cups with them, plus I just really like them. I searched but couldn't find any 15x22mm bearings. |
|
|
|
|

|
|
|
|
(#745)
|
|
RC-Monster Carbon Fiber
Offline
Posts: 130
Join Date: Feb 2010
Location: Hilo, Hawaii
|
02.17.2011, 04:50 PM
^ I have an idea, dunno how feasible it is. You can try get a really cheap set of 8x22x7 mm bearings, gut the bearings, and use the outer race as a more solid shim. I believe that it's much cheaper (and probably easier) than finding a 21x22x? mm rod or shim. Those bearings are 7mm wide which will stick out past the end of the carrier; if it doesn't cause problems then I would just leave it as is, or if it does interfere with steering throw or suspension travel, then cut off some of the excess. I'm not sure if the ID of the outer race is 21mm, some dremel work may be necessary...but then again, you have over twice as many throwaway bearings as axles.
|
|
|
|
|
|
|
|
(#746)
|
|
|
Guest
Posts: n/a
|
02.17.2011, 06:27 PM
Quote:
I Have been going through all the different types of sheet metal I have in the barn and found that some zinc roofing rolls I have are almost the perfect thickness for the shim....I am still looking for something just a hair thicker though as I can still slide the bearing in and out a little easier than I like...it's snug enough that the bearing won't fall out on it's own but not quite as snug as a actual 22mm bearing would be in the carrier...it may work though if I can't come up with something better. I'm thinking I'll ca the sheetmetal shim into the carrier so I don't have to worry about it working it's way out over time which I'm sure it will do if it's not secured somehow. |
|
|
|
|
|
|
|
|
(#747)
|
|
Guest
Posts: n/a
|
02.17.2011, 08:56 PM
Ok, I think the these shims made from roofing zinc strips should do the job. I fitted them and then glued them in the carrier with some IC2000 rubberized ca and I don't think they will ever break loose on their own and the small bit of space the ca took up tightened up the fit to where I'm confident the bearings won't ever wallow out their seat and start moving on me.
I left the shims a little high to make it easier to get the bearings in and I don't think it will interfere with anything. Now I just have to do the other three wheels and I should be golden. :) By the way, this lst diff and xxl cvd setup even sounds better than the stock parts  Heres a few pics for reference in case anyone else is ever looking to use the rdracing carriers with xxl cvd's. 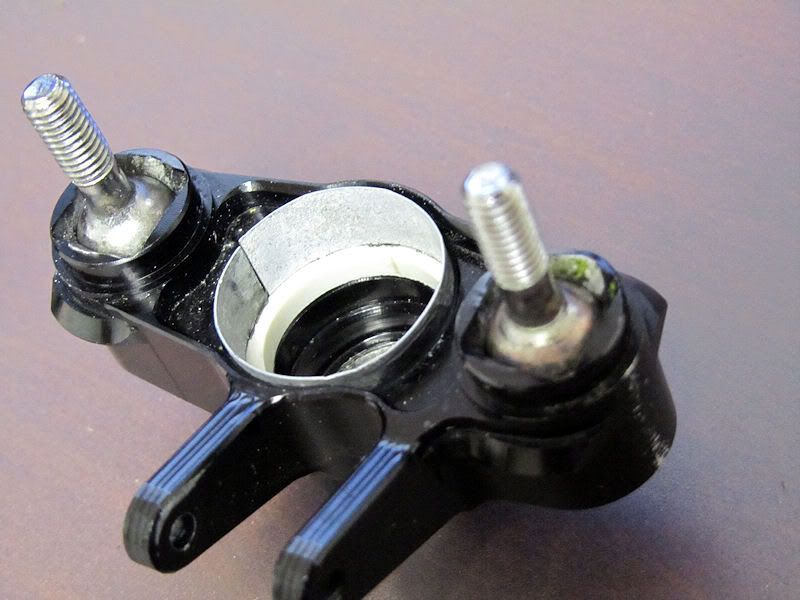 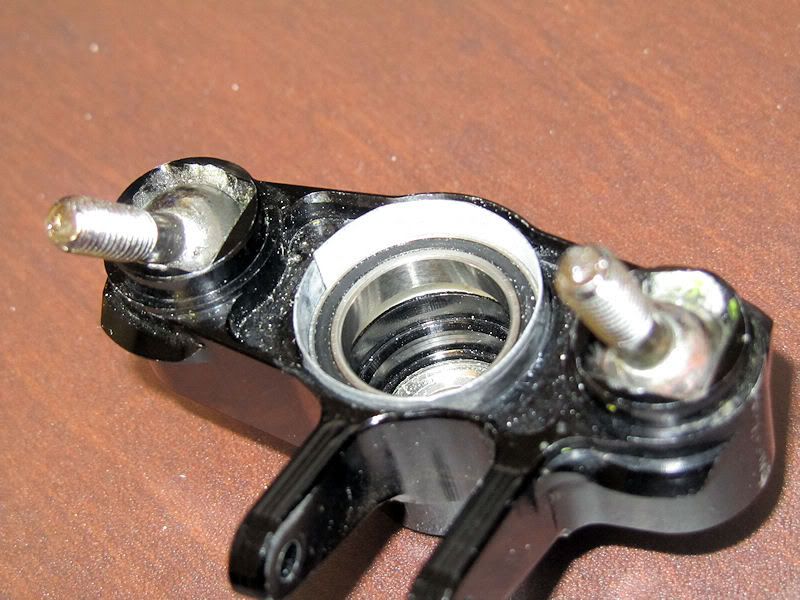
|
|
|
|
|
|
|
|
(#748)
|
|
Guelph, Canada, eh!
Offline
Posts: 1,083
Join Date: Sep 2007
Location: Guelph, Ontario, Canada
|
02.18.2011, 11:09 AM
Nice work on this, when I was running the RD Racing carriers, making shims out of a very thin sheet of brass is what I ended up doing. Yours looks better though.
|
|
|
|
|
|
|
|
(#749)
|
|
Guelph, Canada, eh!
Offline
Posts: 1,083
Join Date: Sep 2007
Location: Guelph, Ontario, Canada
|
02.19.2011, 10:33 AM
Since my MMM died in a cloud of smoke yesterday, I decided to go ahead and try the double bearing trick to use the stock LST diff cups and see if it would work with the extended Traxxas rear arms and the stock Traxxas carriers. It fits perfectly but since I don't have an ESC, I can't try it out. But just looking at it I don't see why it wouldn't work. I'll try to take pics this weekend and maybe do the front also. This simplifies the whole process a lot and cuts down on the number of parts needed.
|
|
|
|
|
|
|
|
(#750)
|
|
|
Guest
Posts: n/a
|
02.19.2011, 10:50 AM
Quote:
I wonder how the stock lst cups will hold up compared to the rcmonster cups? The rcmonster cups have double the surface area for the dogbone pins to ride on which should mean both the dogbone pin and the cup should take approx. twice as long to get the same amount of slop or wear on them as the lst diff stock cups. I was running the extended arms but I kept having the little cross member on the upper arms snap in two. So I have gone back to my old rpm arms. I don't care for how flexy they are on one hand but on the other I don't have to worry much about breaking them and at this point thats more important to me than a slightly longer wheel base or precise suspension. |
|
|
|
|
 |
«
Previous Thread
|
Next Thread
»
| Currently Active Users Viewing This Thread: 1 (0 members and 1 guests) | |
 Linear Mode

|
|

Powered by vBulletin® Version 3.8.11
Copyright ©2000 - 2026, vBulletin Solutions Inc.
vBulletin Skin developed by: vBStyles.com
Copyright ©2000 - 2026, vBulletin Solutions Inc.
vBulletin Skin developed by: vBStyles.com