


|

|
(#16)
|
|
Hyper 7 Erevo Center Diff
Offline
Posts: 1,195
Join Date: Dec 2005
Location: CNY (Syracuse/Binghampton area)
|
09.09.2009, 06:02 AM
I run 50k, center and 30k F/R, I think Mc runs 100k center, not sure on F/R, looking forward to the pics, and your input on the CD as well..... glad you enjoyed the build....
Quark 125b Castle Creations-Neu 2200kv motor ((2s2p)(4s)7800mah 7.4v Lipo Pack E-Revo 1/8 scale Hyper 7 CD http://www.rc-monster.com/forum/show...1&goto=newpost |
  |

|
|
|
|
|
(#17)
|
|
RC-Monster Titanium
Offline
Posts: 1,884
Join Date: Jul 2009
|
09.09.2009, 03:46 PM
Well, today was a very bad day. The machine shop called and said they drilled the holes in the output shafts but that the hardened cap was too hard and they weren't even able to make a dent in it. I can't see how this is possible. I told them people have drilled/tapped these in their home workshops and they just said "I don't know what they did but we can't do it, it's too hard". I think the are BSing me and just didn't want to do the work for the price they quoted me. When I first talked to the guy he said "I don't think this is as hard as everyone has told you". Yeah right....
So then I go pick everything up thinking "Well at least they drilled the output shaft pin holes" and the holes are drilled too far in on the shafts. The shafts aren't flush with the gear, they stick out past them. I had written 0.229" on my drawing but I haven't measured yet to see if they drilled the wrong distance or if 0.229" is wrong. It's my own fault for not double checking it myself. At this point I don't even know what to do. Output shafts can be ground down to make them flush, but they might be too short now, and I guess I'll have to try drilling/tapping the hardened cap myself without having access to proper tools. Everything was going so well.... EDIT: I'll post some pictures of the shafts with gears when I get home, maybe you guys can see if I'll still be able to salvage them. |
|
|
|
|
|
|
|
(#18)
|
|
Guelph, Canada, eh!
Offline
Posts: 1,083
Join Date: Sep 2007
Location: Guelph, Ontario, Canada
|
09.09.2009, 11:16 PM
Take your output shafts and mount them in the diff with all the gears and pins and gaskets and O rings but mount it dry, no lube in the diff. If you can tighten the screws of the spur gear in the diff case all the way down tight and snug that will be good. Now if the output shafts turn with no excessive binding then you're fine. If the shafts really are too long for you to tighten those screws on the spur then grind them down a tiny bit and still you will be fine. Remember that what bolts on the output shafts are ''slider'' shafts so even if you're off by 0.005'' it won't make a difference, it will still work fine.
|
|
|
|
|
|
|
|
(#19)
|
|
RC-Monster Titanium
Offline
Posts: 1,884
Join Date: Jul 2009
|
09.10.2009, 01:22 AM
Here are the output shafts with gears mounted in their current state. The pinholes are exactly 0.229" (5.8mm) from center to the end of the shaft, so please note that isn't the correct measurement to use. I did make the shafts a tiny bit longer just in case something like this happened. If they were going to be off I wanted them to be long. My main concern is that the part of the driveshaft that mounts to the outputs will be too close to the trans case and hit it or rub.
Currently the shafts are 29mm and 41mm. Each shaft wil have to be ground down another 2.5mm to be flush with the gear. This will leave the final lengths at 26.5mm and 38.5mm. Compared to the original measurement suggestions (27.2mm and 40.6mm) the smaller shaft will be 0.7mm short and the larger shaft will be 2.1mm short. So the total length I've lost is less than 3mm. As you can see by the difference in the 2.1mm and 0.7mm I wasn't very accurate in my original cuts, but hopefully that will work to my advantage since they are longer than suggested. Hopefully this won't be as big of an issue as I first suspected. The 0.7mm isn't much, but the 2.1mm lost from the longer shaft is what I'll be most concerned about. Now drilling/tapping the hardened steel, that will be a much more difficult issue. I still think there is something weird about the machine shop saying they couldn't do it. It's not a shop in someones garage, it's a huge shop with thousands of dollars of CNC mills, lathes, and other heavy duty machinery. And they want to tell me they can't do a job multiple people here have done in their basement workshops? Just doesn't add up... Anyway, I'm going to keep on trucking. I've put a lot of time (and a modest amount of money) into this and not going to give up now. Sorry to clog up the official thread with a bunch of my ramblings. Maybe it will help someone avoid the same mistake in the future. I'll post the exact measurement from pinhole center to the end of output shaft once I grind them down and make them flush against the gears. Thanks for all the help you guys. Wouldn't have been able to do this without everyone else helping. I know it will be awesome once everything is finished! 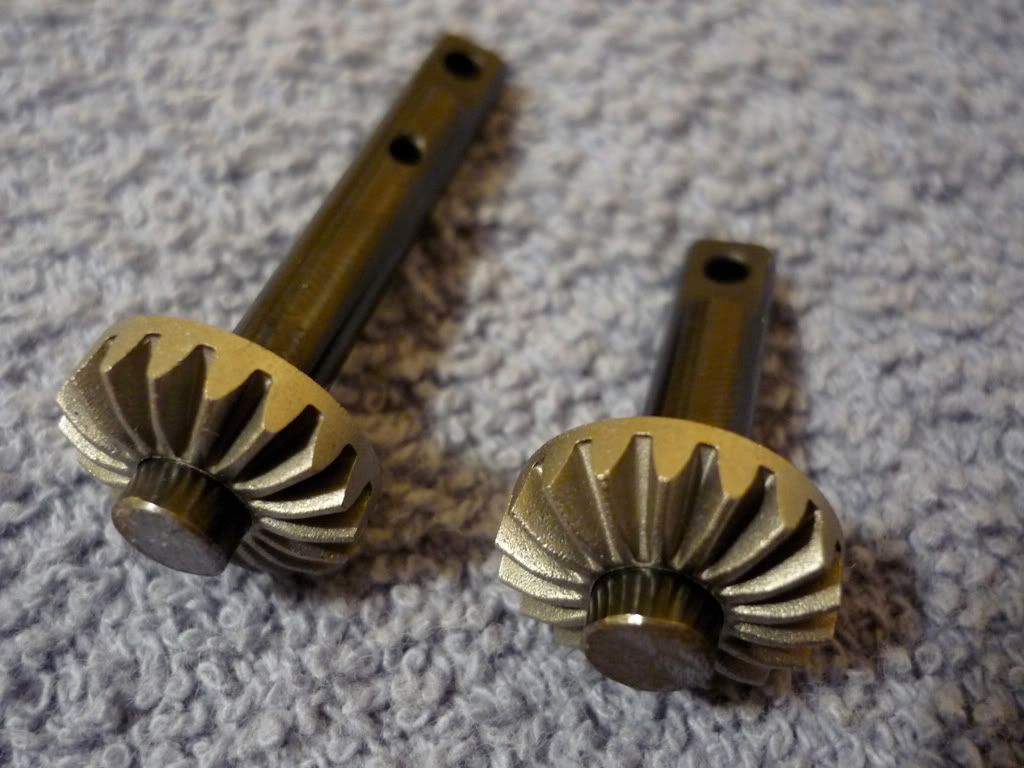
|
|
|
|
|
|
|
|
(#20)
|
|
Guelph, Canada, eh!
Offline
Posts: 1,083
Join Date: Sep 2007
Location: Guelph, Ontario, Canada
|
09.10.2009, 10:03 AM
I went in the garage and dug up the original output drives of my Ofna diffs and you are correct in saying that 0.229'' is wrong. I gave you that info and I'm sorry. I measured 0.190'' and that is from the original output drives of the diffs, not some bogus calculations from CAD drawings like I gave before. When putting the original output drives in the gear, they do stick out a little bit but definitely not as much as your pic shows. The part that sticks out on the OFNA drive I measured as 0.018''. As for the total length of both of your output shafts you'll be left with after you shorten them, you will have to try them to see if the drive shafts fit without rubbing on the tranny case like you said. That machine shop with the tens of thousands of dollars, if not hundreds of thousands of dollars in equipment should invest in a 20 dollar carbide drill bit and an 80 dollar carbide M3 tap. Unbelievable that they said they can't do it. I suspect they just don't want to do it and they should be honest and just say so and explain why.
|
|
|
|
|
|
|
|
(#21)
|
|
RC-Monster Titanium
Offline
Posts: 1,884
Join Date: Jul 2009
|
09.10.2009, 02:51 PM
No prob mistercrash. You were trying to help me and I should have been responsible for checking my own numbers and measurements. Worst case I'll probably be able to use the short output and might have to replace the longer one. No big deal.
I ground down the output shafts to make them flush with the gears. The overall total length of the assembled diff is now 72mm. The short shaft sticks out of the cup side a hair less than 13mm, the long shaft sticks out of the spur side 16mm. I forgot that I still need to wait for my 8x12 bearings to arrive before test fitting. I went to two different industrial tool shops today and everyone told me "If xxxxx machine shop couldn't drill/tap that metal I don't know what to tell you." They also said carbide is very brittle and I should try cobalt drill bits? I kept telling them that people have done this plenty of times with carbide and it can be done, but they didn't seem to want to listen. It's getting very frustrating. I think I'll just order the carbide bits online. What about trying to soften the metal a bit? Is that even in the realm of possibility? Might not work but I want to explore any options to make this easier. |
|
|
|
|
|
|
|
(#22)
|
|
RC-Monster Titanium
Offline
Posts: 1,884
Join Date: Jul 2009
|
09.10.2009, 03:17 PM
I just ordered a drill and tap. Hopefully these will get the job done:
http://www1.mscdirect.com/CGI/NNSRIT...PMPXNO=2209799 http://www1.mscdirect.com/CGI/NNSRIT...PMPXNO=1897620 |
|
|
|
|
|
|
|
(#23)
|
|
Old Skool
Offline
Posts: 7,494
Join Date: Feb 2007
Location: Devon, England
|
09.10.2009, 09:27 PM
Annealing the metal to make it soft, then drilling & tapping, then re hardening is something I've seen mentioned before on the subject of drilling difficult metal parts. May need to look that shizz up though as Im no blacksmith...
|
|
|
|
|
|
|
|
(#24)
|
|
RC-Monster Titanium
Offline
Posts: 1,884
Join Date: Jul 2009
|
09.10.2009, 10:03 PM
I have been doing a little bit of reading:
"Spot-Annealing Hack Saw Blades and Other Hardened Steel: Spot-annealing requires a drill motor and a nail or other steel rod about the diameter of the desired hole. Cut off the nail head and smooth the end, then chuck the nail into the drill motor. At high speed, attempt to drill a hole in the hardened steel. The attempt will fail, but the resulting friction will heat the metal until the point of contact turns straw, then bronze, then peacock, and, finally, blue. Stop the heating process and allow the steel to cool while you replace the nail with a drill bit of the desired size. At low speed, using a cooling/lubricating fluid, drill the hole through the softened steel." Anyone think this is a possibility? Seems like a weird way to heat up the metal, but maybe it would work? Otherwise I'm thinking of just heating up the cap with a torch. |
|
|
|
|
|
|
|
(#25)
|
|
Supermaxx
Offline
Posts: 2,031
Join Date: Oct 2007
Location: Earth
|
09.10.2009, 10:35 PM
I never had any problems drilling hardened shaft with carbide bits and my mini drill press.
Predator with OS .21TM Supermaxx with Mach .26 Revo with OS .18TZ Kyosho ST-RR Conversion Ofna CR with Tekin ESC/Motor (2) |
|
|
|
|
|
|
|
(#26)
|
|
Guelph, Canada, eh!
Offline
Posts: 1,083
Join Date: Sep 2007
Location: Guelph, Ontario, Canada
|
09.10.2009, 11:21 PM
It is true that carbide bits are very brittle, I drill at the lowest speed my drill press can go and I go slow, especially when the bit is just about to go through to the other side, that's when I am extra careful because that is the point where I lost a couple bits because they snapped like glass. I just go very slowly, not much pressure is needed because the bit just cuts through the metal like butter. I also have a set of numbered bits that I used successfully to drill in the hardened steel of the spurs. I have no idea what they are made of, I got them from an old neighbor, her husband had died of cancer and he was into model trains, she let me in his shop and let me pick whatever I wanted at a yard sale price. Only the tools, she wanted to keep the trains.
I don't know what the heck is wrong with the machine shops in your neck of the woods, looks like they're a bunch of woosses. |
|
|
|
|
|
|
|
(#27)
|
|
RC-Monster Titanium
Offline
Posts: 1,884
Join Date: Jul 2009
|
09.10.2009, 11:54 PM
Do you think it would be helpful to get some type of cutting fluid or other machining lubricant?
|
|
|
|
|
|
|
|
(#28)
|
|
Guelph, Canada, eh!
Offline
Posts: 1,083
Join Date: Sep 2007
Location: Guelph, Ontario, Canada
|
09.11.2009, 08:55 AM
I don't use cutting oil when I make the holes in the spur with a carbide bit. I don't let the bit get warm and the metal is relatively thin. I would use cutting oil with cobalt bits. I used cutting oil when I made the threads, it's more like a wax. Something like this.
http://www.fastenal.com/web/products...3126544&ucst=t |
|
|
|
|
|
|
|
(#29)
|
|
RC-Monster Titanium
Offline
Posts: 1,884
Join Date: Jul 2009
|
09.11.2009, 11:45 AM
I posted on a CNC machining forum yesterday to get a bit more advice. People recommended trying to do some spot annealling by taking a butane and/or propane torch and heating the cap for 10-15 min. (blue point of flame directly on area to be drilled) and then letting it cool to room temp. They said it should be a bluish tint after the process and that should mean the steel has softened up a little.
I'm going to try that. Then, I'll try the cobalt bits with the cutting fluid. If that doesn't provide any results I'll move on to the carbide bit. The place I ordered the bits/tap from actually had a free upgrade to next day shipping. I left a note for the UPS guy to leave the stuff at the door. Hopefully they won't need anyone to sign for it, but I'm not sure since it's next day service. I really would like to be able to finish this project over the weekend so there better be a package waiting for me when I get home! |
|
|
|
|
|
|
|
(#30)
|
|
Supermaxx
Offline
Posts: 2,031
Join Date: Oct 2007
Location: Earth
|
09.11.2009, 07:21 PM
Why don't you just use the carbide bits right away instead of trying the spot annealing and cobalt bits? To me, that's just a waste of my time. Work smarter not harder. Lowest speed setting on your drill press with the carbide bits work wonders when drilling hardened steel.
By the way, in order to prevent the bit from wandering initially due to the coating on the hardened steel, I sand or gring the surface to roughen it up. Predator with OS .21TM Supermaxx with Mach .26 Revo with OS .18TZ Kyosho ST-RR Conversion Ofna CR with Tekin ESC/Motor (2) |
|
|
|
 |
«
Previous Thread
|
Next Thread
»
| Currently Active Users Viewing This Thread: 1 (0 members and 1 guests) | |
 Linear Mode

|
|

Powered by vBulletin® Version 3.8.11
Copyright ©2000 - 2026, vBulletin Solutions Inc.
vBulletin Skin developed by: vBStyles.com
Copyright ©2000 - 2026, vBulletin Solutions Inc.
vBulletin Skin developed by: vBStyles.com