


Lightning 2 Pro carbon rallygame conversion |

|

|
(#1)
|
|
RC-Monster Aluminum
Offline
Posts: 522
Join Date: Jan 2007
Location: Sussex, England.
|
Lightning 2 Pro carbon rallygame conversion -
01.15.2010, 05:43 PM
Hi, I am starting this thread to document first the conversion of my Hot Bodies Lightning 2 pro to electric and then its conversion to rallygame spec for use on-road.
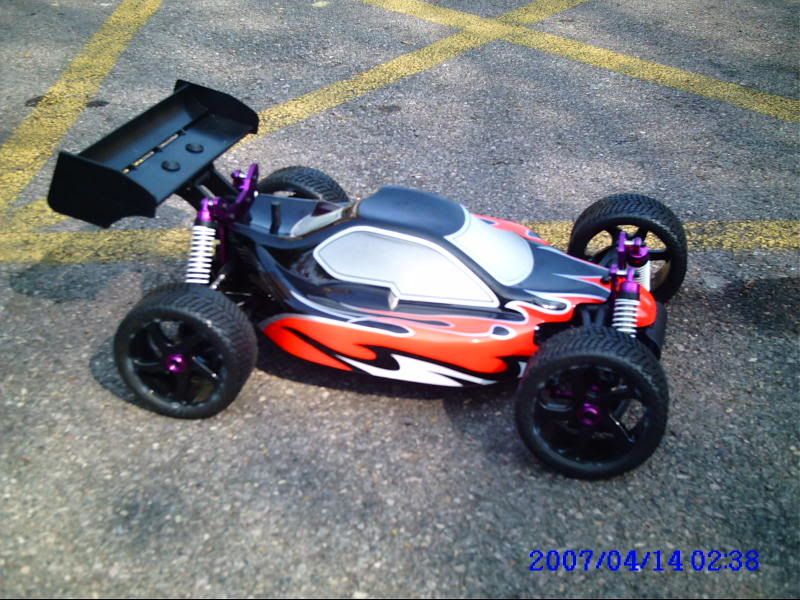
I already have a thread HERE but as it has now evolved so far from its origional form I feel a new thread is in order, I will be recreating the relevant posts from the original thread here so if any Mods read this can you delete the thread I just linked to please and then I'll edit this paragraph out. My gratitude goes to Sylvester, serum, BrianG and SqueeForever for all your help and advice during this my first four wheeled brushless project, without you guys I never would got past the first stages, thanks guys. Here is a teaser. 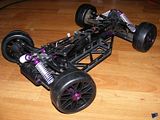
Tamiya F201 carbon, Mamba 7700, MM, 2s A123 2.3ah. Xray XT8, 1518, MMM, 4s5Ah. Lots of boats. fastelectrics.net |
|
|

|
|
|
|
|
(#2)
|
|
RC-Monster Aluminum
Offline
Posts: 522
Join Date: Jan 2007
Location: Sussex, England.
|
01.15.2010, 06:03 PM
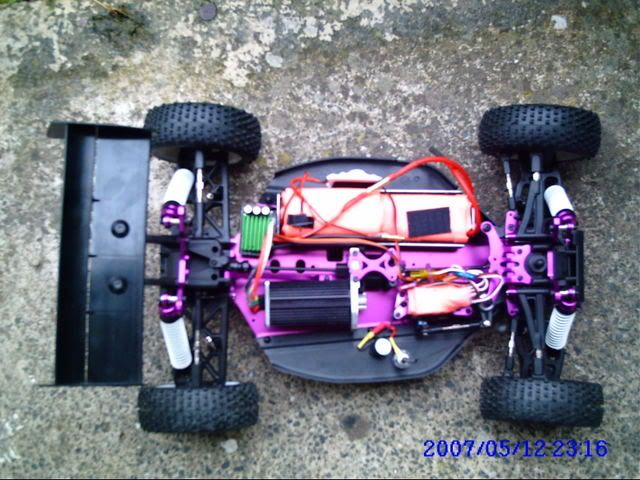
 The buggy as it came. 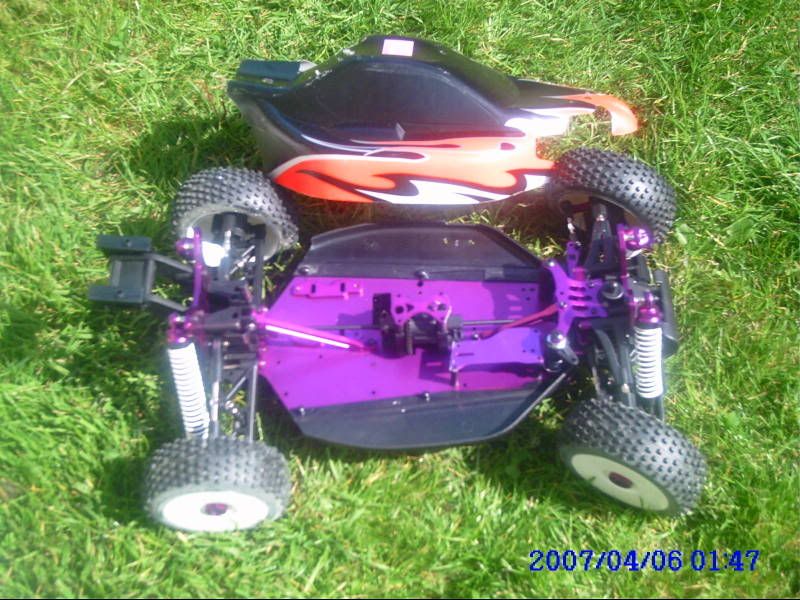 After rough cutting the centre diff top brace and servo plate the 7075 the L2P is made from is tough stuff and my dremmel kept on overheating whilst cutting it. 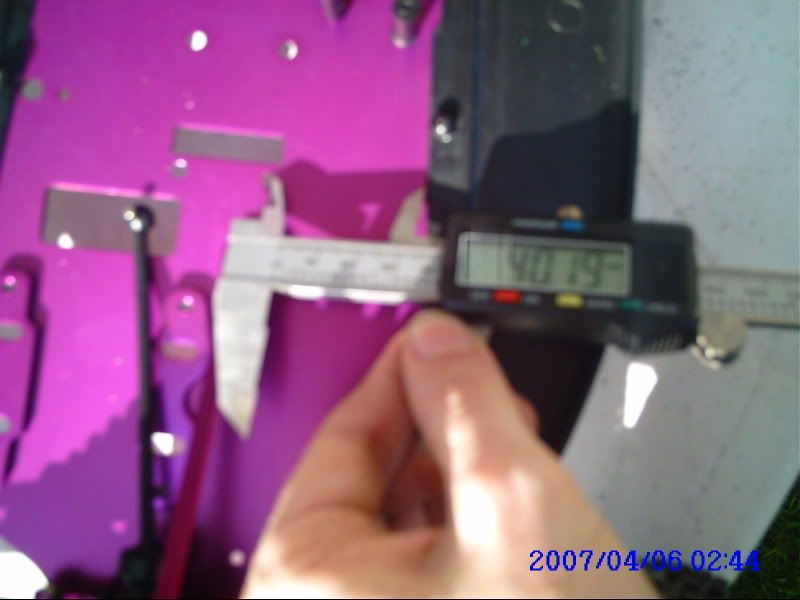 Measurements found the L2P to have a narrower chassis than the LSP and Mike's original style mount was 8mm to wide for the buggy chassis and I will have to chop the corner off it, Mike's new style LSP mounts are rounded at the end and i dont think they will need any modification.  I cleaned up the metalwork I did earlier and refitted it.  I fitted the rear wing. 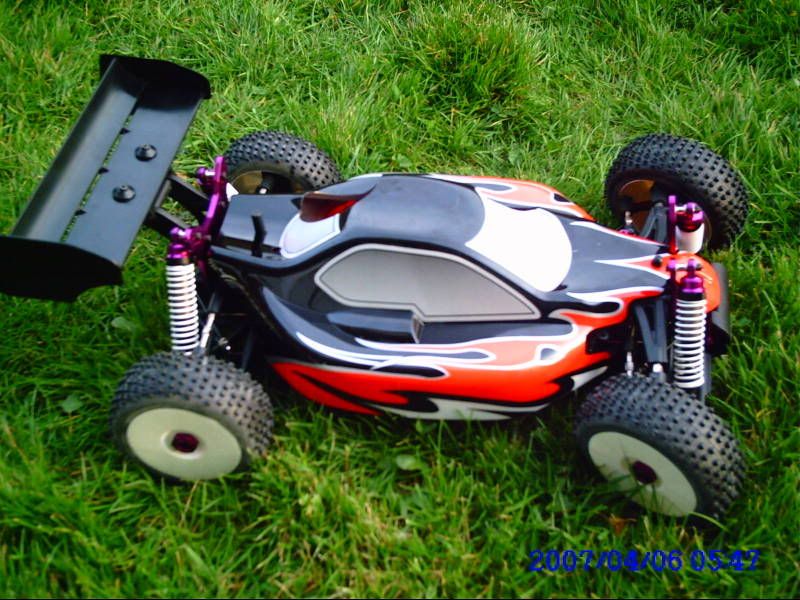 And applied a selection of the decals to the body. Tamiya F201 carbon, Mamba 7700, MM, 2s A123 2.3ah. Xray XT8, 1518, MMM, 4s5Ah. Lots of boats. fastelectrics.net |
|
|
|
|
|
|
|
(#3)
|
|
RC-Monster Aluminum
Offline
Posts: 522
Join Date: Jan 2007
Location: Sussex, England.
|
01.15.2010, 06:17 PM
I'm getting a little closer now, I put ball races in the steering and fitted the servo.
I re-formatted my 12cell pack, I made up a battery tray from alloy angle section lined it with foam and cut some carbon tube chassis stand-offs, but I'm waiting for longer bolts to fit it. Just an order from RCMonster and it will be runable. 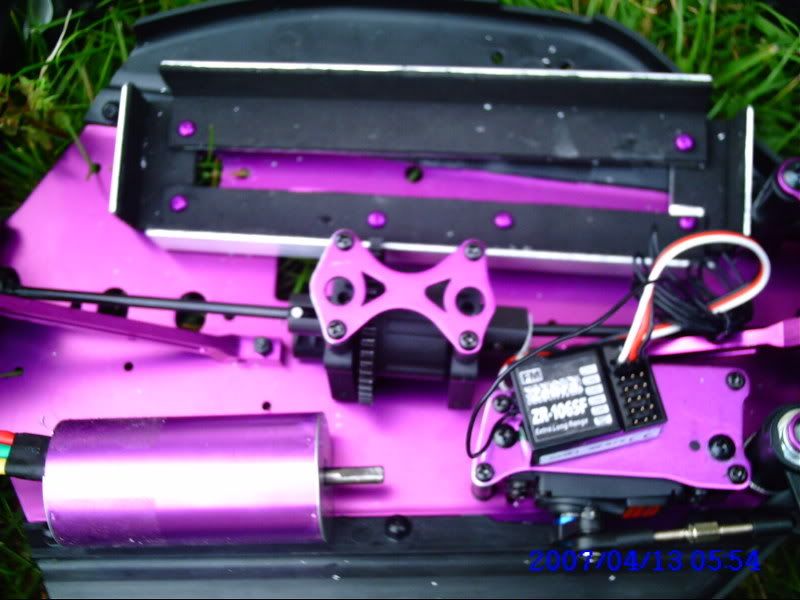 I made a battery tray from 1.5mm 6061 alloy angle covered in 2mm neoprene foam, held up over the mudguards on standoffs between the chassis and tray cut from 6mm carbon tube, also pulled an 8XL from one of my boats to see what it looks like in position. 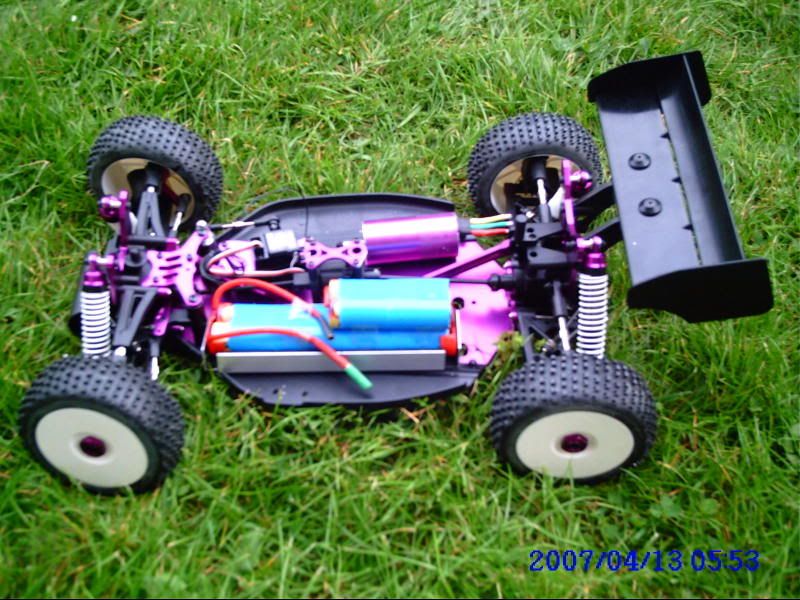 The battery tray is made for a 12 cell stick pack, with 8 cells on the bottom and 4 on top, I fitted my servo and RX too, so really am just waiting for my mount from Mike now.  With everything but the body, spur, pinion, motor mount, clamp heatsink, Mamba Max and Ubec. Tamiya F201 carbon, Mamba 7700, MM, 2s A123 2.3ah. Xray XT8, 1518, MMM, 4s5Ah. Lots of boats. fastelectrics.net |
|
|
|
|
|
|
|
(#4)
|
|
RC-Monster Aluminum
Offline
Posts: 522
Join Date: Jan 2007
Location: Sussex, England.
|
01.15.2010, 06:38 PM
I spent last night washing, taping and glueing a set of Proline Roadrages to a set of black hyper7 rims.
 They look great so I'm kinda hoping that my off road tyres will wear out fast so I can get black wheels for off road too. 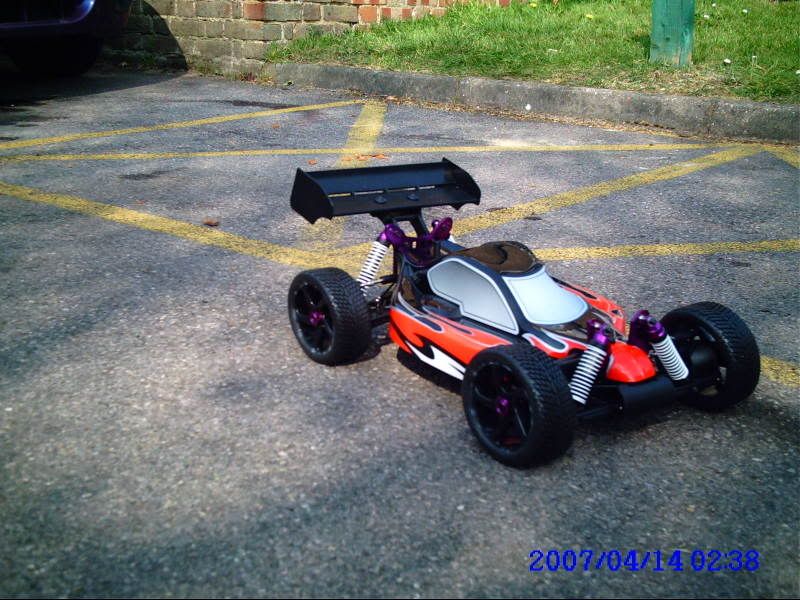 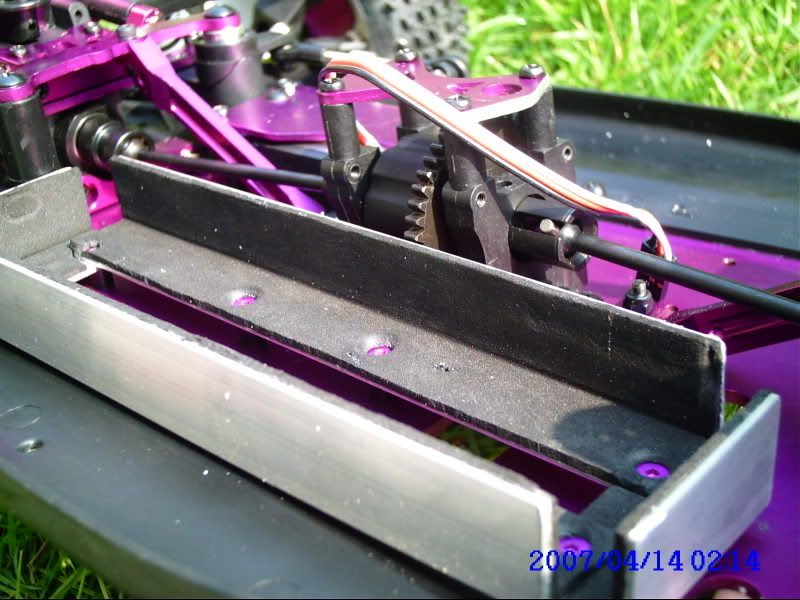 My new longer bolts arrived this morning, I countersunk the battery tray, drilled the chassis and bolted it in with the stand-offs, now its bolted it it feels very sturdy and it fits the battery so well I can lift one side of the buggy up just by lifting the battery, with no straps yet. My RCMonster motor mount, heatsink clamp and pinions arrived and after some unplanned modifications I got it running tonight, it was after dark so I just gave it a quick test less than a minute, I didn't let it get far enough away from me and the street light to try for top speed but I was impressed by the acceleration (as good or better than my wildest scale hornet setup (and that had totally RIDICULOUS power), and stunned by the handling it seemed perfect, neutral going into a corner with some lift off oversteer should you need to tighten up, I was drifting round my first few corners nicely which surprised me as I haven't driven an RC car for well over 10 years and when I was driving regularly I couldn't drift nearly as neatly or reliably with my Hornet or scale Hornet pan car the L2P is a very good chassis right out of the box. For anyone following me on this this the original mark one RCMonster Lightning stadium mount does not fit the lightning 2 pro due to:- The mount is too wide and without some trimming it will hit the turn up on the chassis (I knew about this) The portion of the mount below the diff hole is 3mm to tall, I had to drill out some locknuts and use them as spacers under the front diff mount to get the diff sitting level. The holes in the top don't Line up, I bodged it by drilling another hole in the diff brace and put 2 screws into the motor mount and just one through the new hole into the front diff mount, It won't stop me giving it a good thrashing tomorrow, but will make up a wider brace that will take all 4 screws before I hit any jumps. And a very minor one, it comes with countersunk screws and the L2Pro brace isn't countersunk. 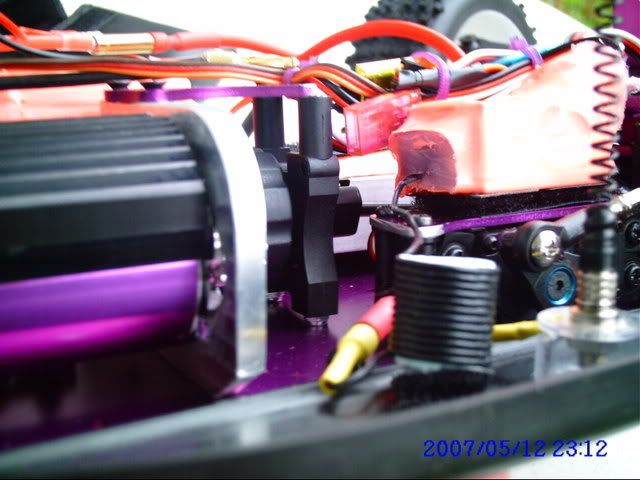 This picture shows the nuts I used as spacers under the front diff mount. 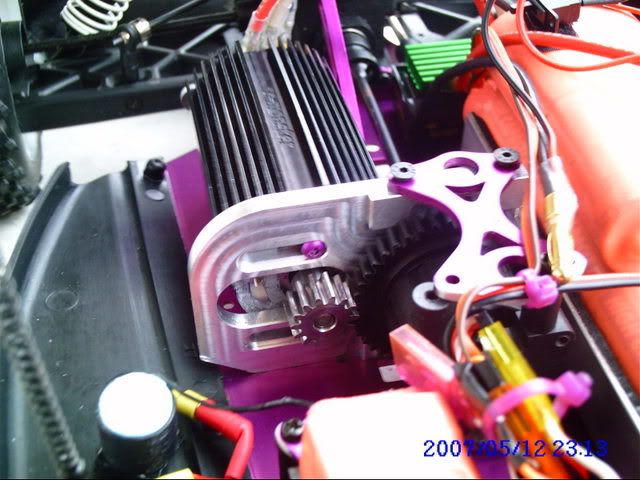 This one shows the cut out I made to clear the chassis turn up and also the misalignment of the holes in the top of the mount. 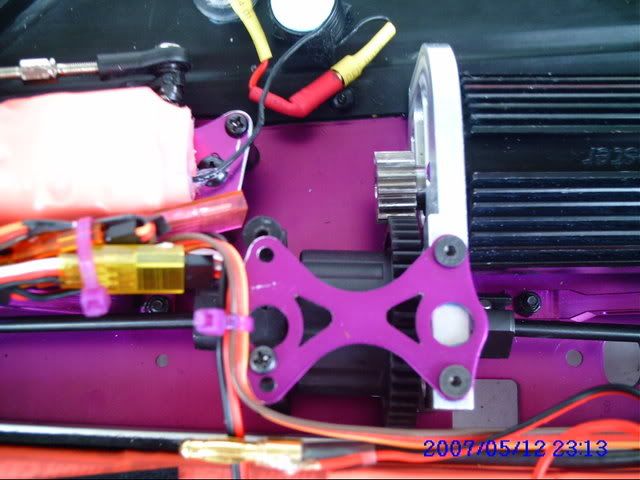 Top view of the diff brace showing my bodge and how far off the mount holes are. 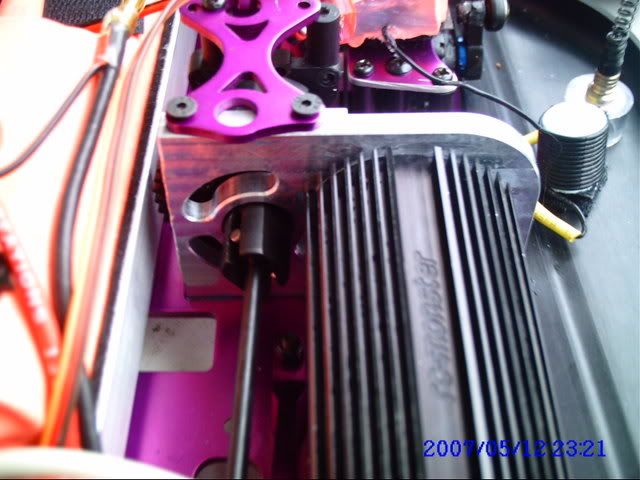 This is individual to my buggy and tray, but I chose to cut some of the curve off on the left hand side of the motor mount to get my battery tray as close to the centreline as I could without hitting my 44t kyosho plastic spur. Tamiya F201 carbon, Mamba 7700, MM, 2s A123 2.3ah. Xray XT8, 1518, MMM, 4s5Ah. Lots of boats. fastelectrics.net |
|
|
|
|
|
|
|
(#5)
|
|
RC-Monster Aluminum
Offline
Posts: 522
Join Date: Jan 2007
Location: Sussex, England.
|
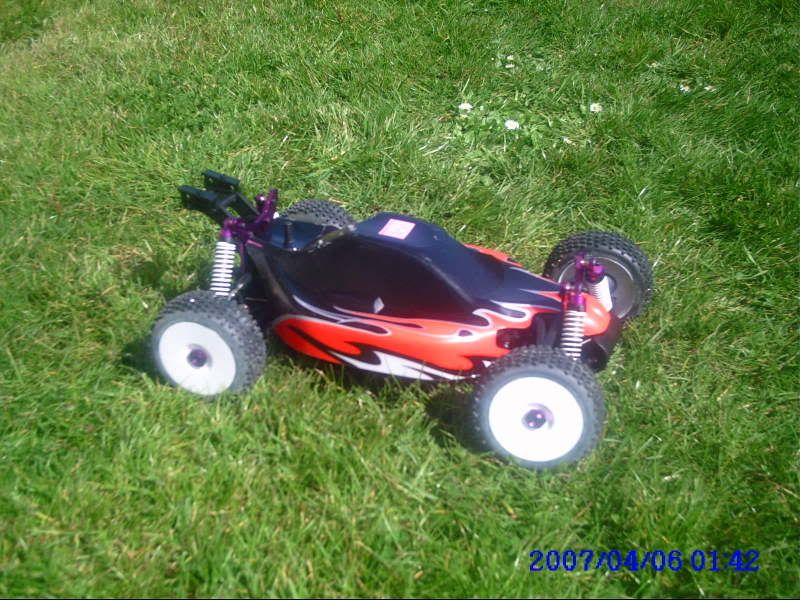
01.15.2010, 06:41 PM
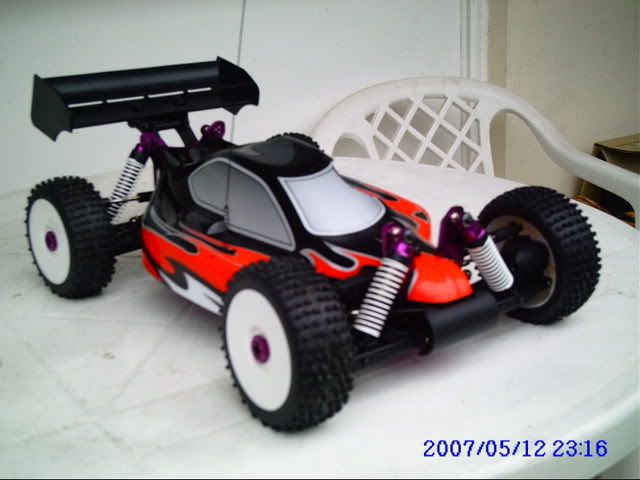
The buggy is all finished!
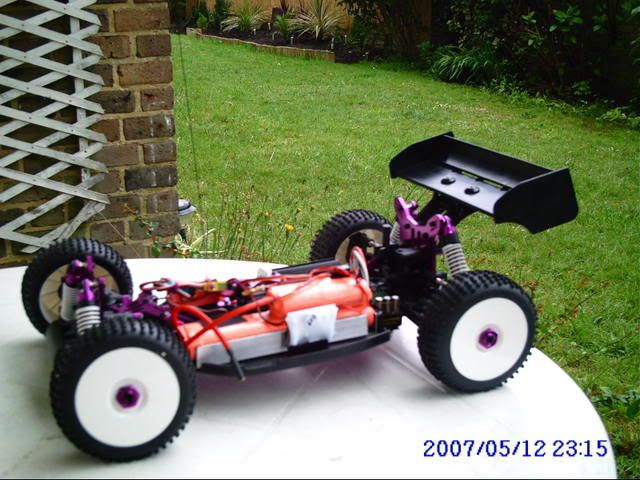   
Tamiya F201 carbon, Mamba 7700, MM, 2s A123 2.3ah. Xray XT8, 1518, MMM, 4s5Ah. Lots of boats. fastelectrics.net |
|
|
|
|
|
|
|
(#6)
|
|
RC-Monster Aluminum
Offline
Posts: 522
Join Date: Jan 2007
Location: Sussex, England.
|
01.15.2010, 06:47 PM
It rained last night and ths morning so in an effort not to cake it with mud I put the road rages on and used it on tarmac, with the road rages it didnt handle anything like as well, I was getting a lot of understeer, when I brought it in I realised why.
 The rear tyres are dirty all over so they have a big contact patch but the fronts have too much camber for the flater tyres so they are only making contact on the inside edges. I've taken nearly all the camber off the front wheels, after a run the tyres are dirty all over now and the handling has improved a lot but its not up to how it was with the off road tyres yet. I am still getting a little understeer in normal use, although it is close enough to neautral that with a dab of brakes and a Scandinavian flick I can make it oversteer sometimes, but I would like to get back to its original feel (very close to neutral with maybe a touch of overtseer). On a lighter note, I had my first big accident on the weekend,:026: I've rolled it a couple of times but this is the first time I've propperly crashed. I was running my buggy in the garage area behind my flat, running a course around a some puddles on the tarmac, with the straight next to the garage doors as they are slightly raised and theres a long line with no puddles, but I stayed too tight to the doors and started turning for puddle 1 too late, and hit this drain. 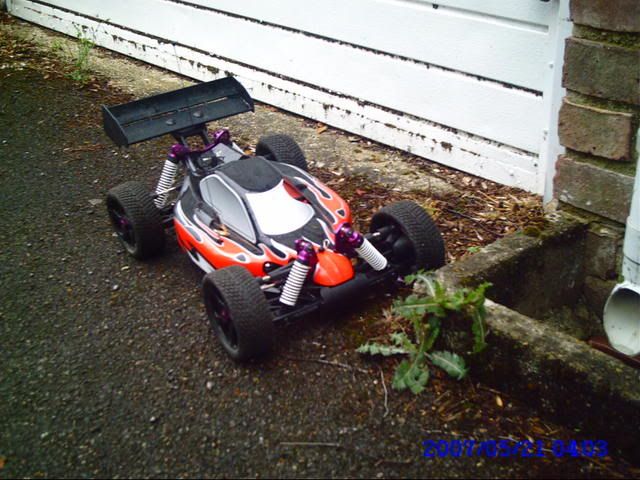 It was going fast and I knew it was going to be broken so I ran over to it but saw nothing obviously broken, I tried to reverse away but there was no movement,:013: so I took it inside for closer inspection, I was worried that I had bent/cracked/snaped some parts and that the shock had ripped some components off my ESC, BEC or RX leaving me with a large repair/replcement bill. I looked the mechanics over carefully and found nothing broken or bent. 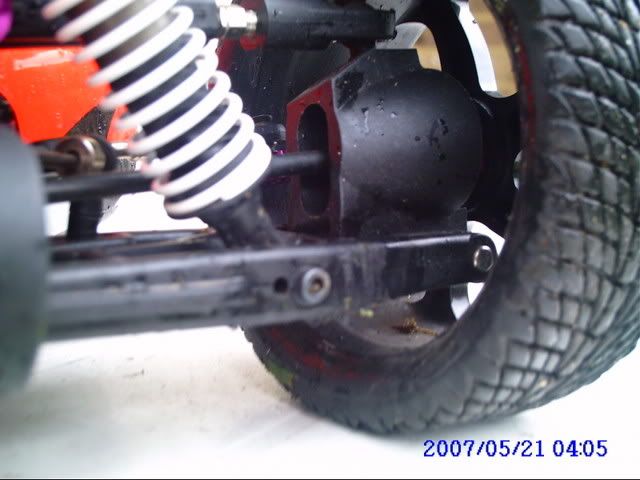 This scratch just to the right of the bolt in the lower arm was the only damage to the buggy. I am very impressed with the Lightning 2 pro's strength. I started troubleshooting the electronics trying a new battery first and everything came on-line and worked just fine, so I took a look at the battery and one of the wires that links the top 4 cells to the bottom 8 had pulled off at one end, My only repair was a quick solder job. Tamiya F201 carbon, Mamba 7700, MM, 2s A123 2.3ah. Xray XT8, 1518, MMM, 4s5Ah. Lots of boats. fastelectrics.net |
|
|
|
|
|
|
|
(#7)
|
|
RC-Monster Aluminum
Offline
Posts: 522
Join Date: Jan 2007
Location: Sussex, England.
|
01.15.2010, 07:02 PM
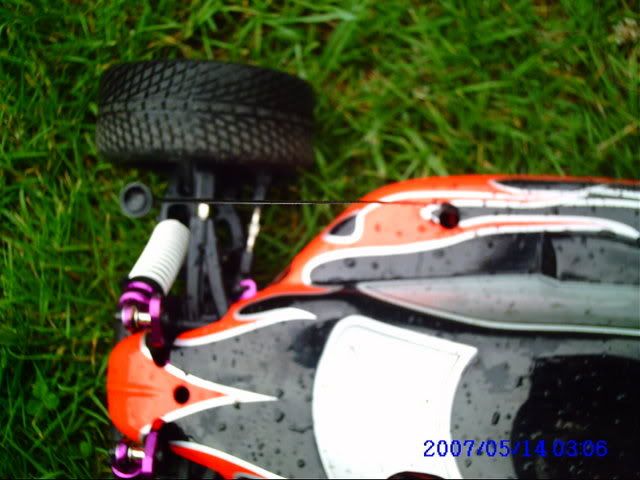
I picked up a set of Medial Pro Tarmac II tyres they only had them pre-mounted on yellow rims instead of the cool black Hyper7 ones I got for for the Road rages, not as good looking, but the tyres are 50 times stiffer and handle a million times better than the Crappy Proline Road Rages that flopped around like an elephant on stilts giving me understeer and making cornering erratic and unpredictable.
 The Medial Pro Tarmac II pre-mounted wheels and tyres, there not belted as such but they have a Honeycomb internal structure instead of using inner foams, that supports it VERY well, they feel like there made of solid rubber only they don't weigh enough.  I almost forgot there is a downside to them, they are a fair bit lower profile than the RoadRages, the peaks on my eagletree went down by 10-12 Amps and I lost a few MPH top speed, my 45 shore ones seem to grip better tho (there available in 25,35,45,60 shore) so acceleration hasn't suffered, I will be getting that speed back and more with LiPo soon so I haven't regeared but a bigger pinion could be used, if you want to check on Brian's Calculator my callipers make the Tarmac IIs 3.769" and the RoadRages 4.3165" I received my Flightpower 4s 4350 in the post yesterday, I ran the storage charge down at low throttle then charged up and ran it hard, from the start I thought I had blown something, it accelerated away slower than before and released a puff of smoke, I ran over and disconnected finding that the smoke had stopped and everything was still cool, it turns out the pinion had slipped and was burning off the threadlock causing the smoke, a quick reaplication of threadlock and retightening the grubscrew with the other end of the allenkey had it going again.  Holy [expletive of your choice]ing hell this things FAST and then some, easily half as fast again over the old setup despite the smaller tyres, I may get used to the power at some point but for now I think a 3s pack would have been enough, I need to set up some punch control on the MM and put my throttle thumb in some serious precision training as it will spin the wheels at what used to be its top speed. Tamiya F201 carbon, Mamba 7700, MM, 2s A123 2.3ah. Xray XT8, 1518, MMM, 4s5Ah. Lots of boats. fastelectrics.net |
|
|
|
|
|
|
|
(#8)
|
|
RC-Monster Aluminum
Offline
Posts: 522
Join Date: Jan 2007
Location: Sussex, England.
|
01.15.2010, 07:05 PM
I switched back to its original off-road tyres today for a bit of fun in the park, I was glad to find that the adjustments that I have made to get it handling well on-road haven't affected its off-road performance too badly, it still handles great.
It's a shame I dont have a camera man, it looked awesome with roostertails coming up from all 4 wheels. I was getting some nasty coging toward the end of the run, and it wasn't until I brought it back to me that I Discovered why, It had nearly doubled its weight with all the mud and grass all over it and it was completely enclosing the rear suspension and driveshafts making the rear wheels quite hard to turn. 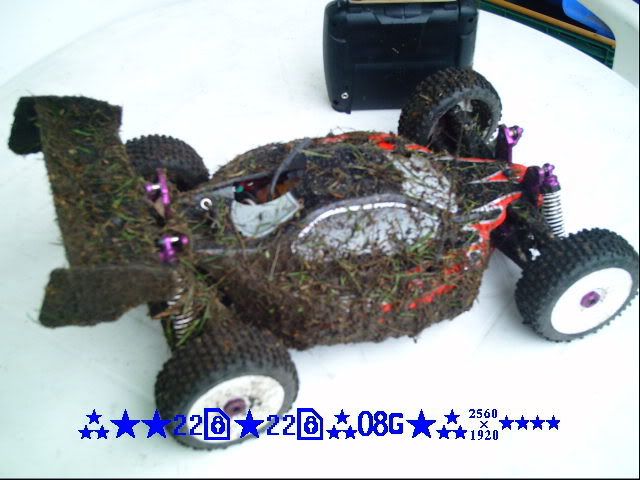 Mud, mud, glorious mud. 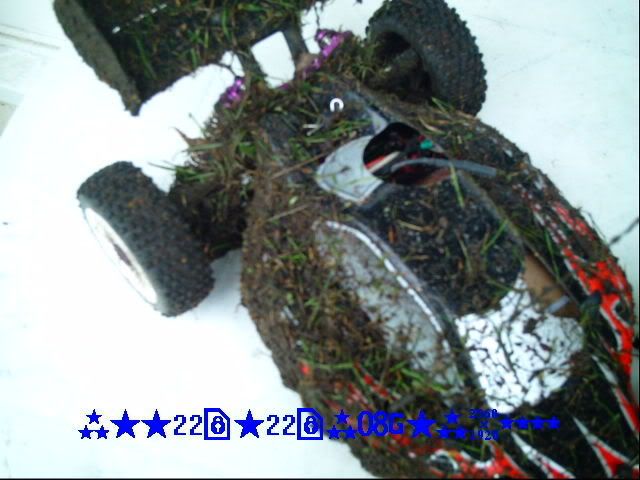 Poor ESC, there's some driveshafts in there somewhere. http://i22.photobucket.com/albums/b3...Picture119.jpg Special racing mud this stuff, it lowers my CoG. Well I learnt my lesson and I won't be taking it off road in the wet again, even after over an hour of cleaning it's still the dirtiest its ever been, and its been off-road in the dry a few times before. I chucked a couple of buckets of water over it and gave it a good scrubbing then I ran it again (on-road) and the cogging has gone back to normal, the MM seems to have lived through its torture session with no long term side effects, its a sturdy little fellow. Tamiya F201 carbon, Mamba 7700, MM, 2s A123 2.3ah. Xray XT8, 1518, MMM, 4s5Ah. Lots of boats. fastelectrics.net |
|
|
|
|
|
|
|
(#9)
|
|
RC-Monster Aluminum
Offline
Posts: 522
Join Date: Jan 2007
Location: Sussex, England.
|
01.15.2010, 07:05 PM
I got Mike to make me a diff top brace and a 3mm spacer to go under the front diff mount so I could get rid of the bodged up 3mm nuts acting as spacers and re-drilled top brace with only 3 screws attached as pictured earlier in the thread (very nice work Mike thanks).
 
Tamiya F201 carbon, Mamba 7700, MM, 2s A123 2.3ah. Xray XT8, 1518, MMM, 4s5Ah. Lots of boats. fastelectrics.net |
|
|
|
|
|
|
|
(#10)
|
|
RC-Monster Aluminum
Offline
Posts: 522
Join Date: Jan 2007
Location: Sussex, England.
|
01.15.2010, 07:16 PM
I blew my MM, I was running ovals in the road and suddenly under braking my brakes stopped working and I went flying into a kerb head on, bent a lower front hinge pin and MM works only intermittently now.
Tamiya F201 carbon, Mamba 7700, MM, 2s A123 2.3ah. Xray XT8, 1518, MMM, 4s5Ah. Lots of boats. fastelectrics.net |
|
|
|
|
|
|
|
(#11)
|
|
RC-Monster Aluminum
Offline
Posts: 522
Join Date: Jan 2007
Location: Sussex, England.
|
01.15.2010, 07:21 PM
I am getting an XT8 truggy for Xmas so this buggy will only ever be see on-road use now and is undergoing an extensive lightening and stiffening program currently with a carbon chassis, braces, towers, battery tray etc and a smaller motor, I'm tempted by smaller LiPos too but I have so many 4s 5000mAh packs I'm doubtful that will happen.
So that's the end of the Lightning 2 Pro off/on road buggy. Watch this space for the birth of the new Lightning 2 Pro Carbon Rallygame on-road conversion! Tamiya F201 carbon, Mamba 7700, MM, 2s A123 2.3ah. Xray XT8, 1518, MMM, 4s5Ah. Lots of boats. fastelectrics.net |
|
|
|
|
|
|
|
(#12)
|
|
RC-Monster Aluminum
Offline
Posts: 522
Join Date: Jan 2007
Location: Sussex, England.
|
01.15.2010, 07:29 PM
I am waiting for 3.5mm carbon for the chassis and shock towers, but I have some 2mm on hand for the rest of it, I hope to have more updates with carbon replacements for plenty of the alloy stuff soon
I made a new servo top plate. 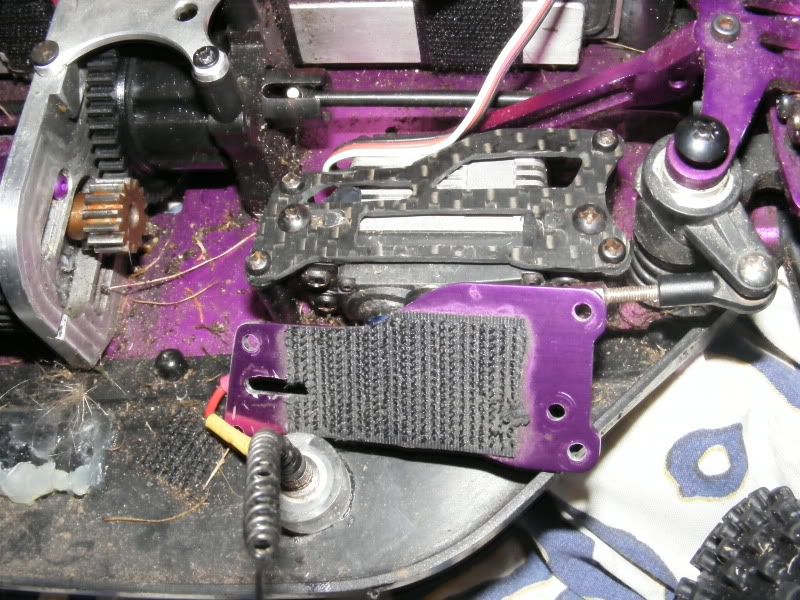 Ackerman plate, I've now sanded all of the forward adjustment holes off.  I cut out parts for a new battery tray that is not only much lighter but will lower the CoG too, as the alloy tray I have at the moment is raised off the chassis on spacers by about 5mm to clear the mudguards, I will mill groves in the chassis to hold it in position at the bottom. 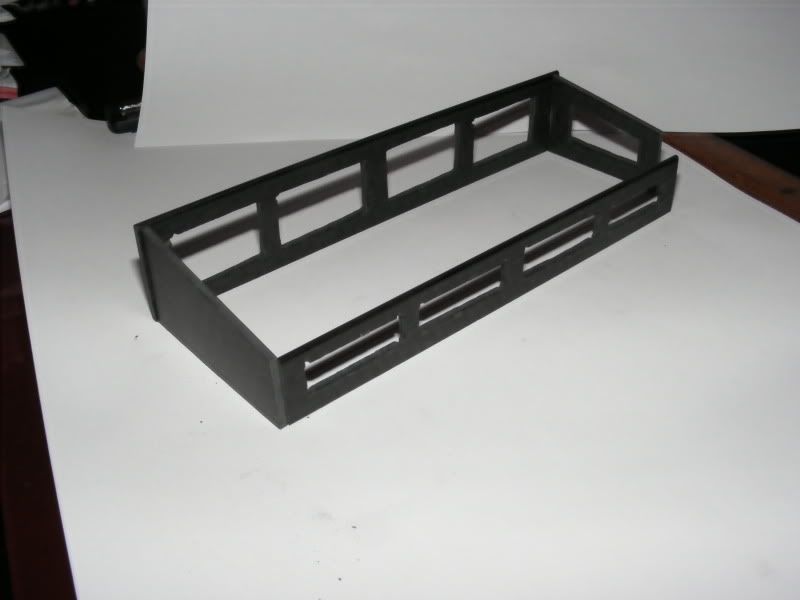 I made a full front diff/steering post/centre diff/rear diff top plate that stiffens the chassis a lot over the regular front and rear braces, but with a significant weight saving. 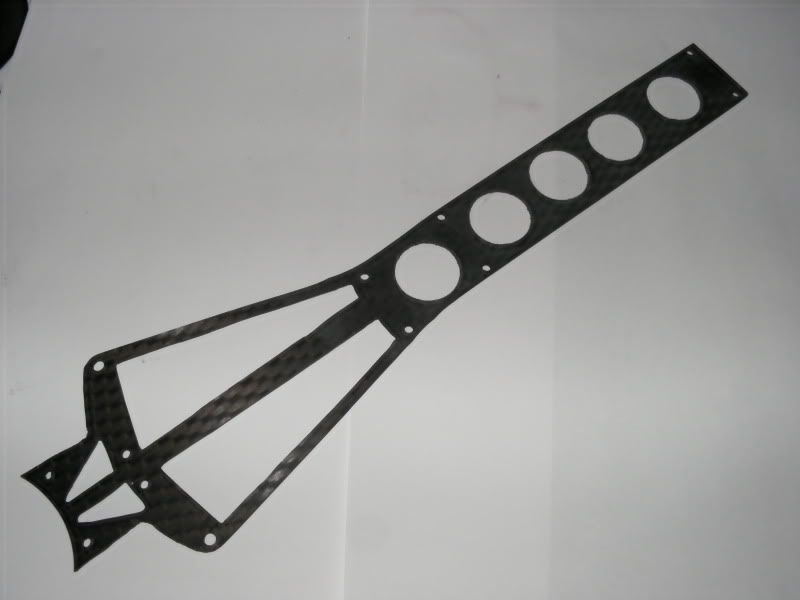 Motor mount lightened from this, 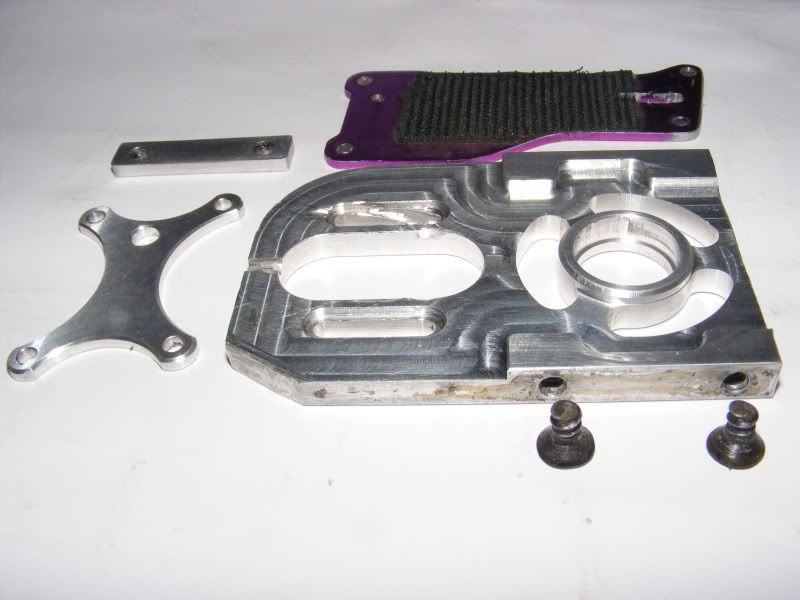 to this, 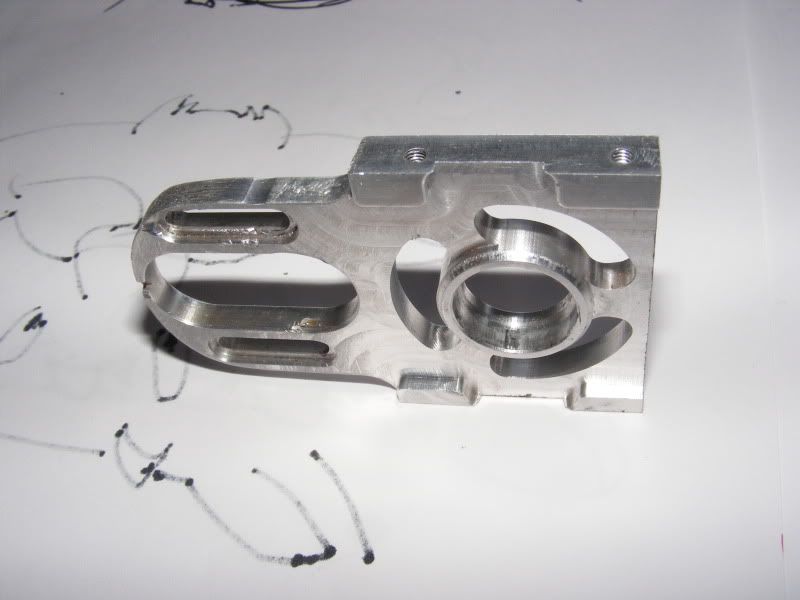 As well as the material reduction around the motor to make it more like Mikes current mounts I removed 3mm from the bottom so i no longer have to use the spacer mike made me under the front centre diff upright lowering the CoG as well as weighing less and removed about 3.5mm from the top of both the motor mount and the front centre diff upright so the new long chassis top plate sits flat from the rear diff case across the centre diff to the steering bellcrank posts. Tamiya F201 carbon, Mamba 7700, MM, 2s A123 2.3ah. Xray XT8, 1518, MMM, 4s5Ah. Lots of boats. fastelectrics.net |
|
|
|
|
|
|
|
(#13)
|
|
Guest
Posts: n/a
|
01.15.2010, 07:30 PM
you should get a subaru 300mm body, they are at amainhobbies.com for like 40$ and paint it blue.
|
|
|
|
|
|
|
|
(#14)
|
|
RC-Monster Aluminum
Offline
Posts: 522
Join Date: Jan 2007
Location: Sussex, England.
|
01.15.2010, 07:41 PM
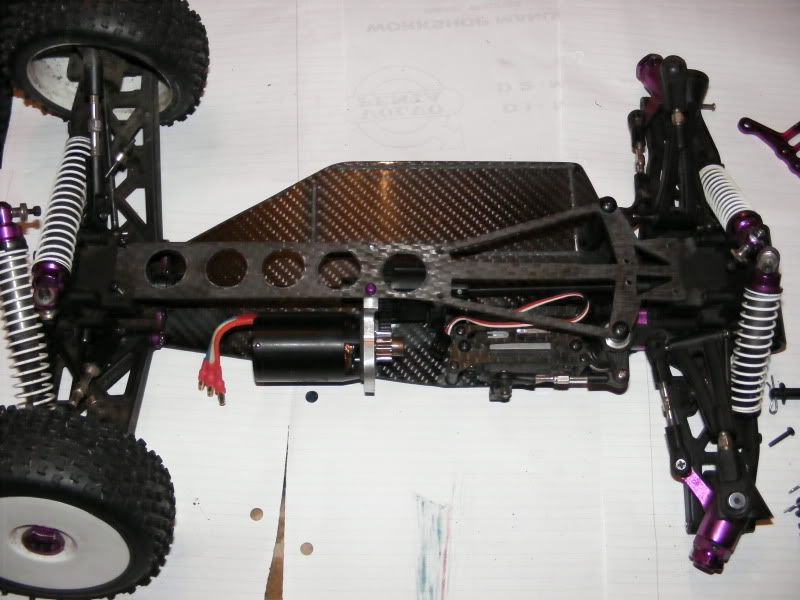
I got my 3.5mm carbon and went to work making the chassis.
outline cut out, drilled and countersunk, spur gear and diff case location holes slotted and slots to locate the battery tray cut. 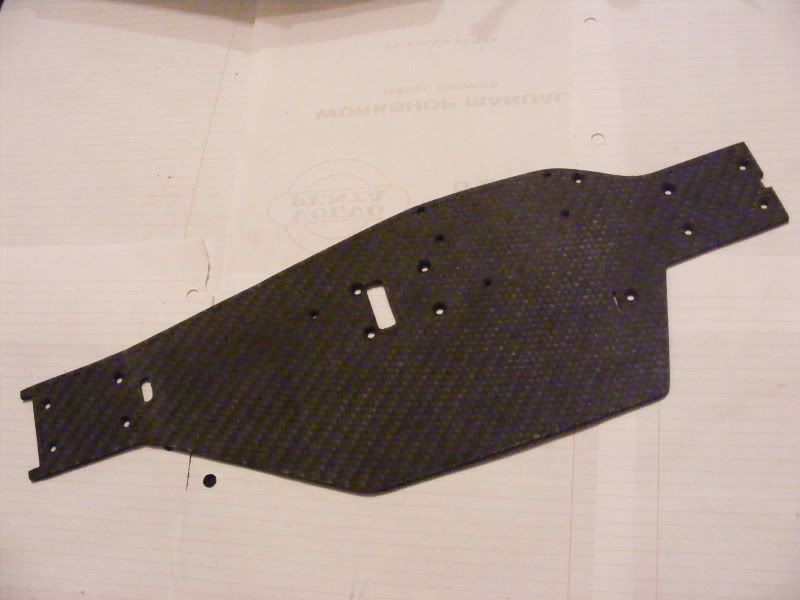 Bottom view. 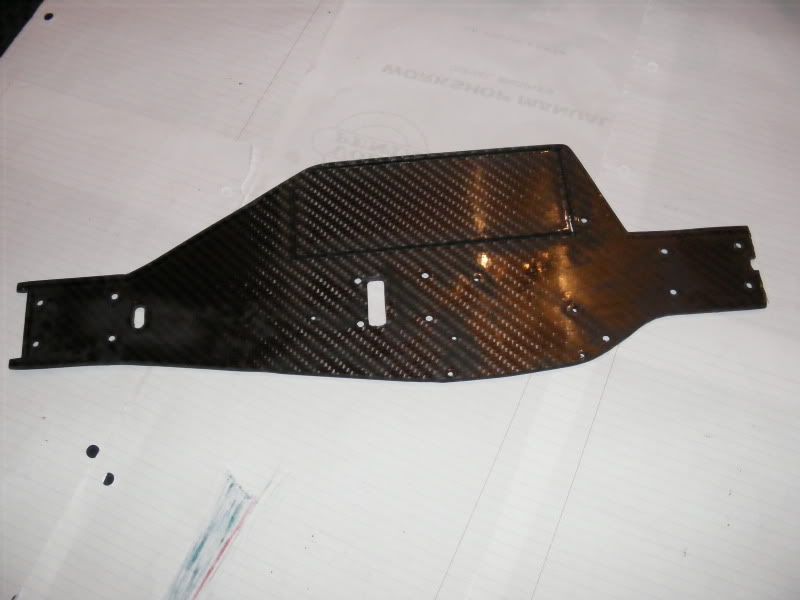 Shiney top view. 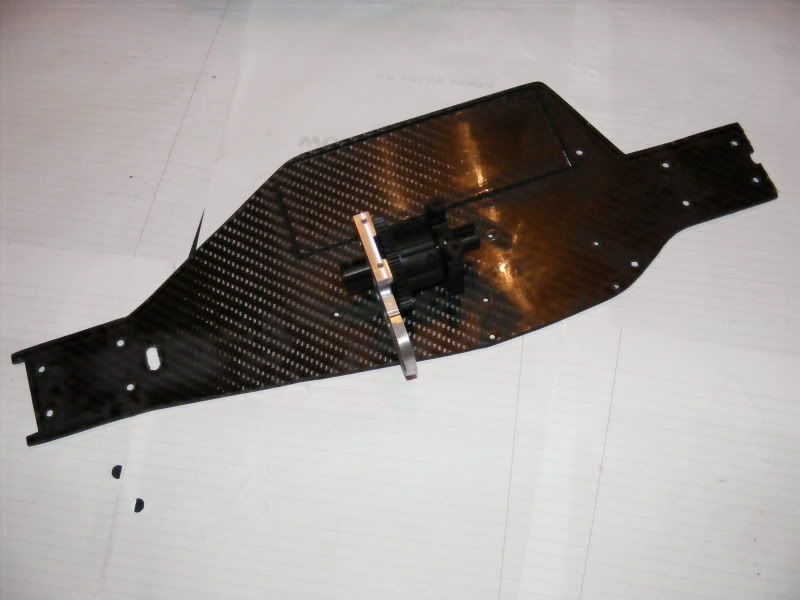 Centre diff in place. 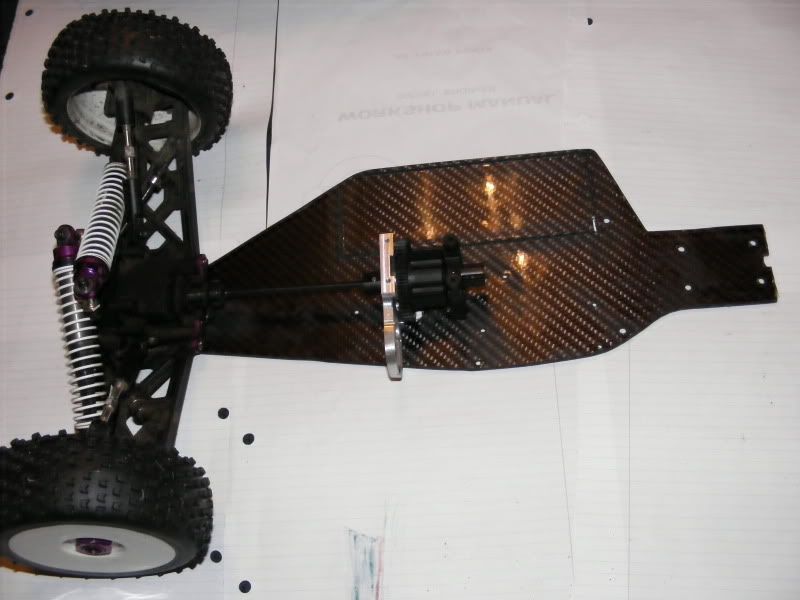 Rear suspension mounted. 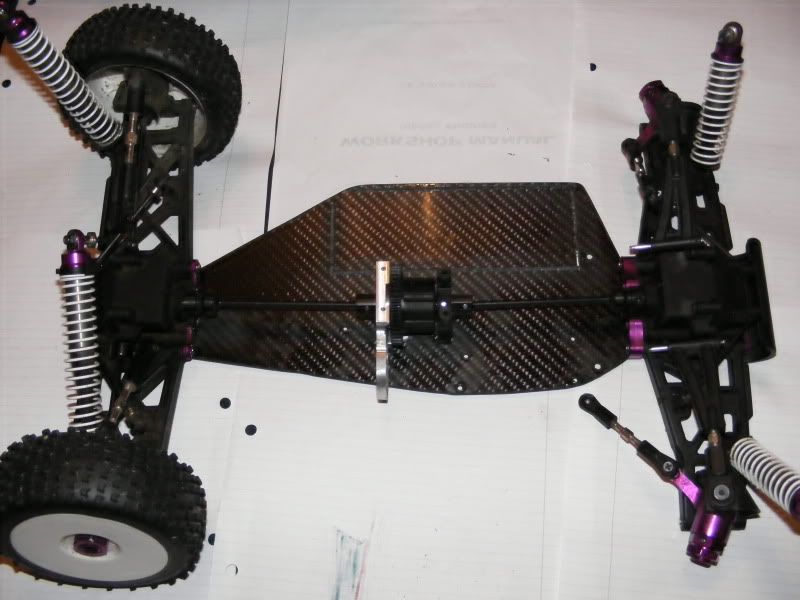 Front suspension in place. 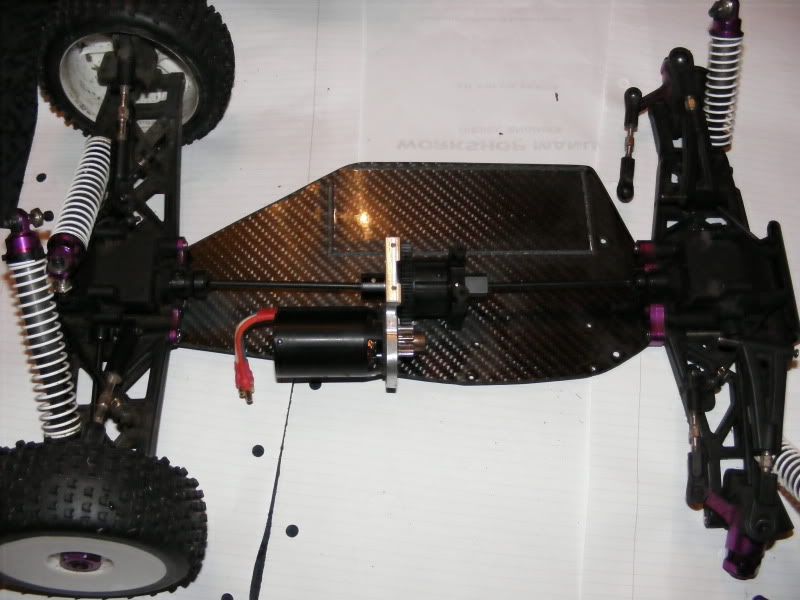 Motor mounted, it all fits in pace on the chassis. Tamiya F201 carbon, Mamba 7700, MM, 2s A123 2.3ah. Xray XT8, 1518, MMM, 4s5Ah. Lots of boats. fastelectrics.net |
|
|
|
|
|
|
|
(#15)
|
|
RC-Monster Aluminum
Offline
Posts: 522
Join Date: Jan 2007
Location: Sussex, England.
|
01.15.2010, 08:02 PM
Top plate in place.
 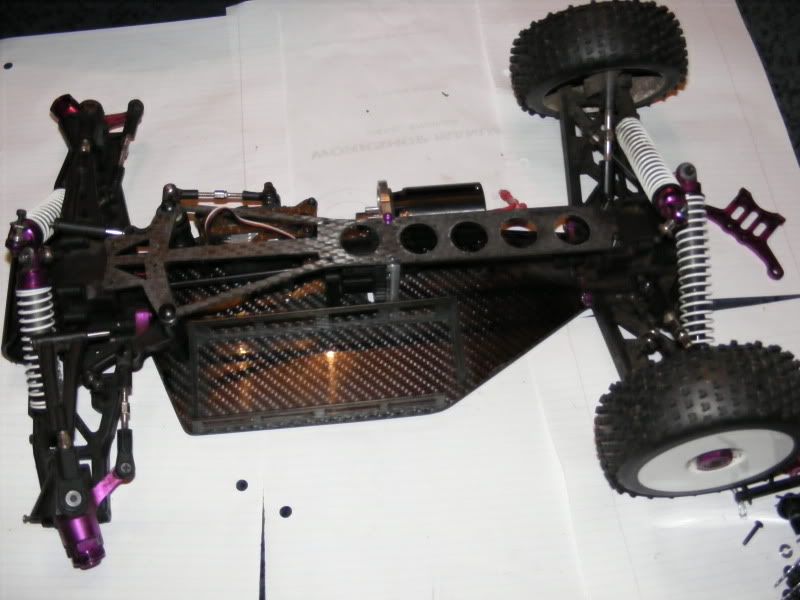 Battery tray slipped into the slots cut in the chassis. 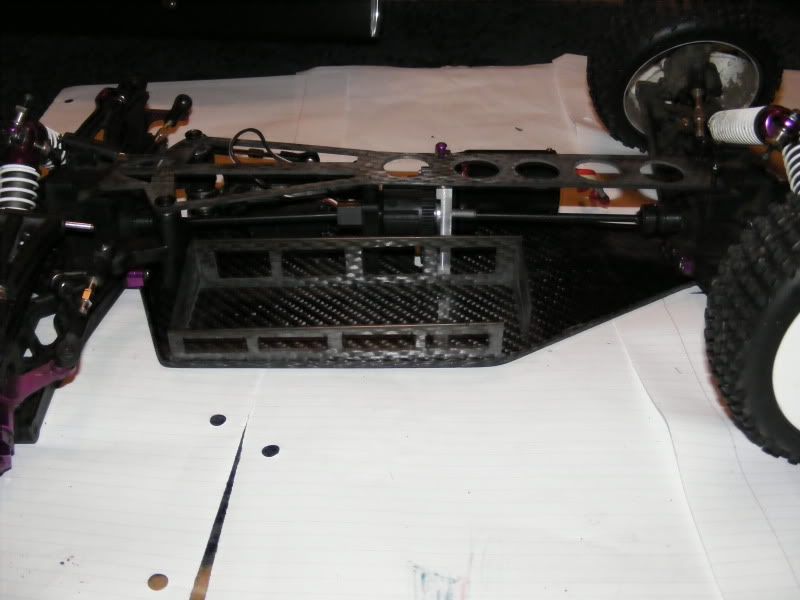 Low profile front shock tower made, drilled and fitted. 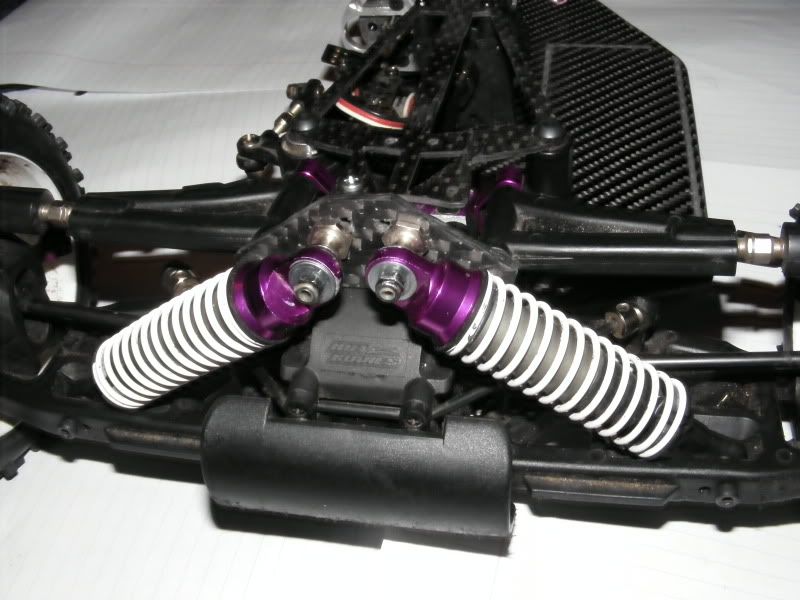 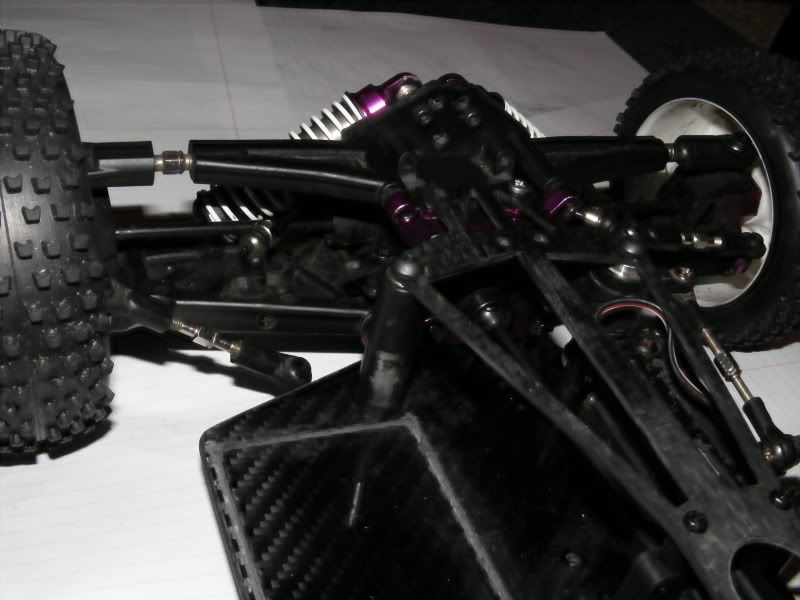
Tamiya F201 carbon, Mamba 7700, MM, 2s A123 2.3ah. Xray XT8, 1518, MMM, 4s5Ah. Lots of boats. fastelectrics.net |
|
|
|
 |
«
Previous Thread
|
Next Thread
»
| Currently Active Users Viewing This Thread: 1 (0 members and 1 guests) | |
 Linear Mode

|
|

Powered by vBulletin® Version 3.8.11
Copyright ©2000 - 2026, vBulletin Solutions Inc.
vBulletin Skin developed by: vBStyles.com
Copyright ©2000 - 2026, vBulletin Solutions Inc.
vBulletin Skin developed by: vBStyles.com